Discord.py 入门指南:如何创建你的第一个Discord机器人
Discord.py 入门指南:如何创建你的第一个Discord机器人
Discord 作为一款流行的通讯软件,其强大的机器人功能为用户带来了更丰富的交互体验。本文将带领读者一步步使用 Python 和 discord.py 库创建一个简单但功能完整的 Discord 机器人。无论你是编程新手还是有经验的开发者,本指南都能帮助你快速入门 Discord 机器人开发。
1. 环境准备
在开始开发之前,我们需要准备以下环境:
- Python 3.10 或更高版本
- discord.py 库
- 一个 Discord 账号和开发者应用
首先,确保你的电脑上安装了 Python 3.10+。你可以从 Python 官网 下载最新版本。
接下来,使用 pip 安装 discord.py:
pip install discord.py
2. 创建 Discord 应用和机器人
- 访问 Discord �开发者门户
- 点击 "New Application" 创建一个新应用
- 为你的应用取一个名字,然后点击 "Create"
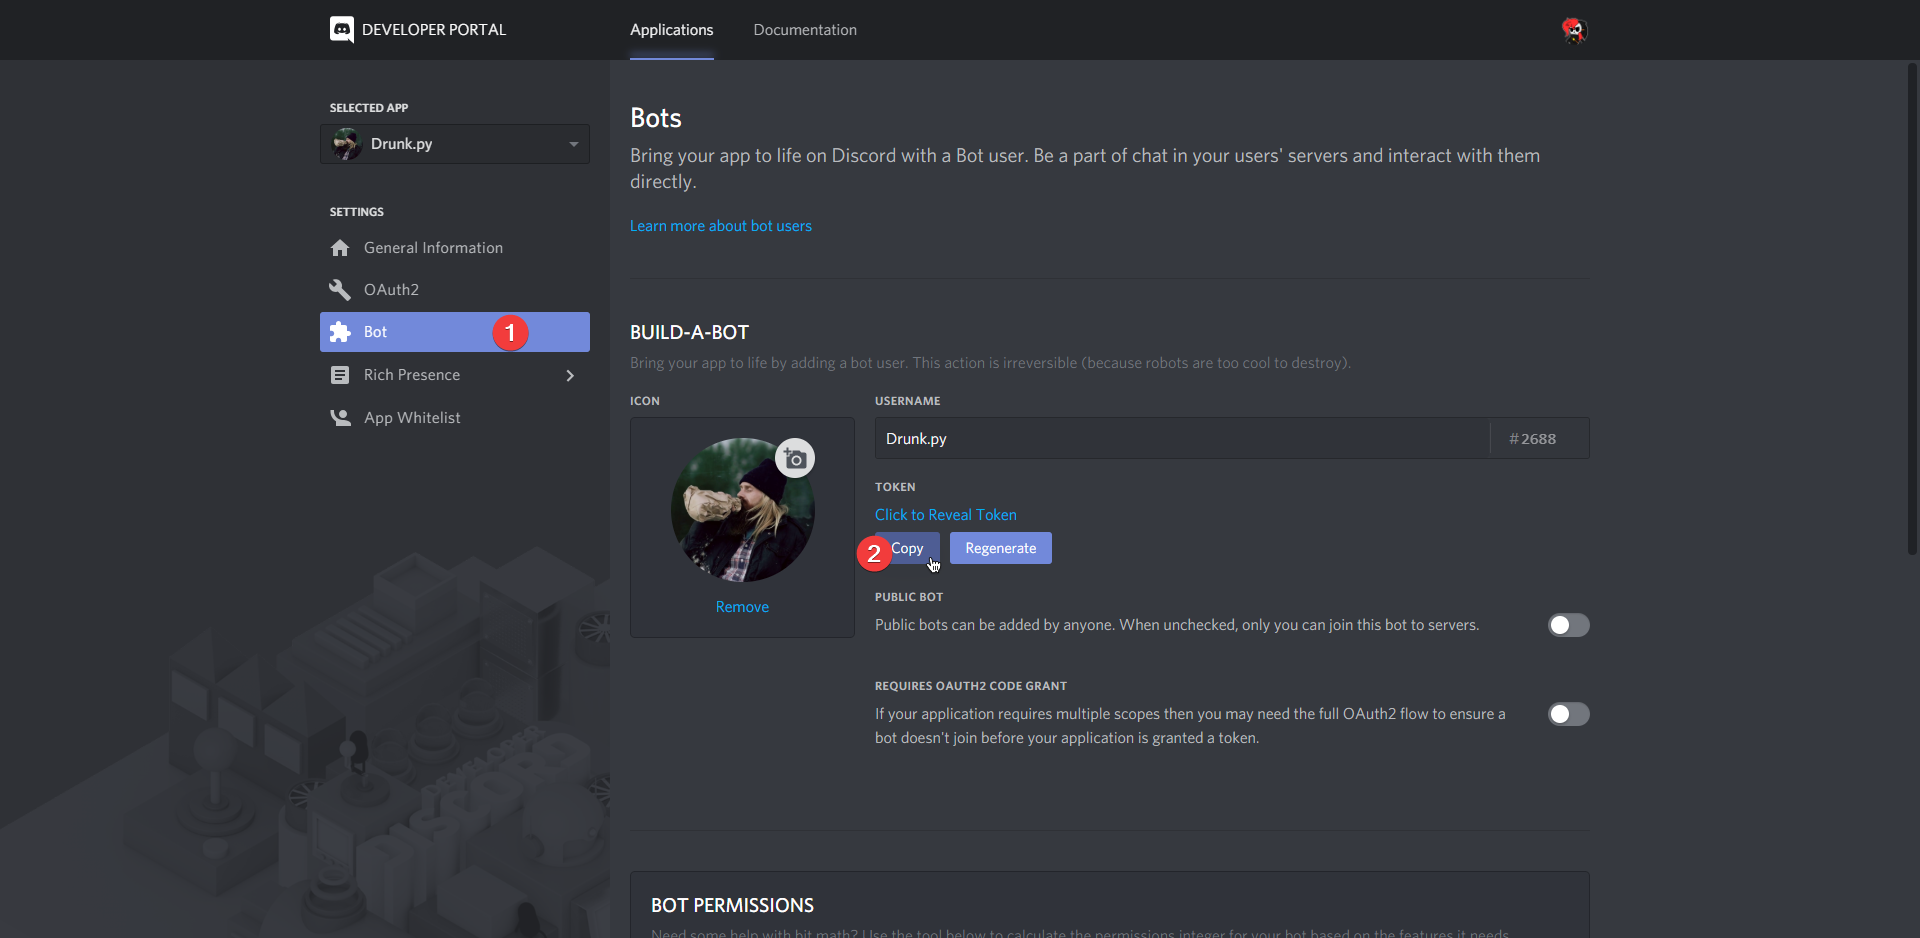
- 在左侧菜单中选择 "Bot",然后点击 "Add Bot"
- 自定义你的机器人名称和头像

请记住保存你的机器人令牌(Token),我们稍后会用到它。注意不要公开分享这个令牌!
3. 基本代码结构
让我们从一个最简单的机器人代码开始:
import discord
from discord.ext import commands

intents = discord.Intents.default()
intents.message_content = True

bot = commands.Bot(command_prefix='!', intents=intents)

@bot.event
async def on_ready():
    print(f'Bot已登录为 {bot.user}')

@bot.command()
async def hello(ctx):
    await ctx.send('你好!')

bot.run('你的机器人令牌')
这段代码完成了以下几件事:
- 导入必要的模块
- 设置机器人的命令前缀和意图
- 定义机器人准备就绪时的事件处理
- 创建一个简单的
!hello命令 - 使用令牌启动机器人
4. 添加更多功能
让我们为机器人添加一些有用的功能:
@bot.command()
async def info(ctx):
    embed = discord.Embed(title="机器人信息", description="这是一个用 discord.py 创建的机器人", color=0x00ff00)
    embed.add_field(name="创建者", value="你的名字", inline=False)
    embed.add_field(name="服务器数量", value=f"{len(bot.guilds)}", inline=True)
    embed.add_field(name="用户数量", value=f"{len(set(bot.get_all_members()))}", inline=True)
    await ctx.send(embed=embed)

@bot.command()
async def ping(ctx):
    latency = bot.latency * 1000
    await ctx.send(f'Pong! 延迟: {latency:.2f}ms')

@bot.event
async def on_member_join(member):
    channel = member.guild.system_channel
    if channel is not None:
        await channel.send(f'欢迎 {member.mention} 加入服务器!')
这些新增的功能包括:
- 一个展示机器人信息的嵌入消息命令
- 一个测试机器人延迟的命令
- 一个欢迎新成员的事件处理器
5. 错误处理
为了使机器人更加健壮,我们可以添加一些基本的错误处理:
@bot.event
async def on_command_error(ctx, error):
    if isinstance(error, commands.CommandNotFound):
        await ctx.send("未知命令。请使用 `!help` 查看可用命令。")
    elif isinstance(error, commands.MissingRequiredArgument):
        await ctx.send("缺少必要的参数。请检查命令用法。")
    else:
        await ctx.send(f"发生错误: {str(error)}")
6. 使用 Cogs 组织代码
随着机器人功能的增加,将代码分割成多个文件会更加易于管理。Discord.py 提供了 Cogs 系统来实现这一点:
# cogs/basic.py
import discord
from discord.ext import commands

class Basic(commands.Cog):
    def __init__(self, bot):
        self.bot = bot

    @commands.command()
    async def hello(self, ctx):
        await ctx.send('你好!')

    @commands.command()
    async def info(self, ctx):
        # ... (之前的 info 命令代码)

async def setup(bot):
    await bot.add_cog(Basic(bot))

# main.py
import asyncio
from discord.ext import commands

intents = discord.Intents.default()
intents.message_content = True

bot = commands.Bot(command_prefix='!', intents=intents)

async def load_extensions():
    await bot.load_extension("cogs.basic")

asyncio.run(load_extensions())
bot.run('你的机器人令牌')
7. 部署和运行
完成代码编写后,你可以通过以下方式运行你的机器人:
-
直接在本地运行:
python main.py -
使用 PM2 管理 (需要安装 Node.js 和 PM2):
pm2 start main.py --name discord-bot -
使用 Docker (需要安装 Docker):
FROM python:3.10-slim

WORKDIR /app

COPY requirements.txt .
RUN pip install --no-cache-dir -r requirements.txt

COPY . .

CMD ["python", "main.py"]
构建并运行 Docker 容器:
docker build -t discord-bot .
docker run -d discord-bot
8. 安全性考虑
在开发和部署过程中,请注意以下安全事项:
- 永远不要公开你的机器人令牌。使用环境变量或配置文件来存储敏感信息。
- 谨慎处理用户输入,防止潜在的恶意代码注入。
- 限制机器人的权限,只给予必要的最小权限。
- 定期更新 discord.py 和其他依赖库,以修复潜在的安全漏洞。
结语
通过本指南,你已经学会了如何创建一个基本的 Discord 机器人,并了解了一些进阶的开发技巧。随着你对 discord.py 的深入学习,你将能够开发出更加复杂和有趣的功能。
记住,创意和实践是提升编程技能的关键。尝试为你的机器人添加更多独特的功能,比如游戏集成、音乐播放或者自定义的管理工具。Discord 机器人开发是一个充满乐趣和挑战的领域,希望这个指南能激发你的创造力,帮助你开始这段有趣的编程之旅!

祝你编程愉快,创造出amazing的Discord机器人!
编辑推荐精选


酷表ChatExcel
大模型驱动的Excel数据处理工具
基于大模型交互的表格处理系统,允许用户通过对话方式完成数据整理和可视化分析。系统采用机器学习算法解析用户指令,自动执行排序、公式计算和数据透视等操作,支持多种文件格式导入导出。数据处理响应速度保持在0.8秒以内,支持超过100万行数据的即时分析。


DeepEP
DeepSeek开源的专家并行通信优化框架
DeepEP是一个专为大规模分布式计算设计的通信库,重点解决专家并行模式中的通信瓶颈问题。其核心架构采用分层拓扑感知技术,能够自动识别节点间物理连接关系,优化数据传输路径。通过实现动态路由选择与负载均衡机制,系统在千卡级计算集群中维持稳定的低延迟特性,同时兼容主流深度学习框架的通信接口。


DeepSeek
全球领先开源大模型,高效智能助手
DeepSeek是一家幻方量化创办的专注于通用人工智能的中国科技公司,主攻大模型研发与应用。DeepSeek-R1是开源的推理模型,擅长处理复杂任务且可免费商用。


问小白
DeepSeek R1 满血模型上线
问小白是一个基于 DeepSeek R1 模型的智能对话平台,专为用户提供高效、贴心的对话体验。实时在线,支持深度思考和联网搜索。免费不限次数,帮用户写作、创作、分析和规划,各种任务随时完成!


KnowS
AI医学搜索引擎 整合4000万+实时更新的全球医学文献
医学领域专用搜索引擎整合4000万+实时更新的全球医学文献,通�过自主研发AI模型实现精准知识检索。系统每日更新指南、中英文文献及会议资料,搜索准确率较传统工具提升80%,同时将大模型幻觉率控制在8%以下。支持临床建议生成、文献深度解析、学术报告制作等全流程科研辅助,典型用户反馈显示每周可节省医疗工作者70%时间。


Windsurf Wave 3
Windsurf Editor推出第三次重大更新Wave 3
新增模型上下文协议支持与智能编辑功能。本次更新包含五项核心改进:支持接入MCP协议扩展工具生态,Tab键智能跳转提升编码效率,Turbo模式实现自动化终端操作,图片拖拽功能优化多模态交互,以及面向付费用户的个性化图标定制。系统同步集成DeepSeek、Gemini等新模型,并通过信用点数机制实现差异化的资源调配。


腾讯元宝
腾讯自研的混元大模型AI助手
腾讯元宝是腾讯基于自研的混元大模型推出的一款多功能AI应用,旨在通过人工智能技术提升用户在写作、绘画、翻译、编程、搜索、阅读总结等多个领域的工作与生活效率。


Grok3
埃隆·马斯克旗下的人工智能公司 xAI 推出的第三代大规模语言模型
Grok3 是由埃隆·马斯克旗下的人工智能公司 xAI 推出的第三代大规模语言模型,常被马斯克称为“地球上最聪明的 AI”。它不仅是在前代产品 Grok 1 和 Grok 2 基础上的一次飞跃,还在多个关键技术上实现了创新突破。


OmniParser
帮助AI理解电脑屏幕 纯视觉GUI元素的自动化解析方案
开源工具通过计算机视觉技术实现图形界面元素的智能识别与结构化处理,支持自动化测试脚本生成和辅助功能开发。项目采用模块化设计,提供API接口与多种输出格式,适用于跨平台应用场景。核心算法优化了元素定位精度,在动态界面和复杂布局场景下保持稳定解析能力。


流畅阅读
AI网页翻译插件 双语阅读工具,还原母语级体验
流畅阅读是一款浏览器翻译插件,通过上下文智能分析提升翻译准确性,支持中英双语对照显示。集成多翻译引擎接口,允许用户自定义翻译规则和快捷键配置,操作数据全部存储在本地设备保障隐私安全。兼容Chrome、Edge、Firefox等主流浏览器,基于GPL-3.0开源协议开发,提供持续的功能迭代和社区支持。
推荐工具精选
AI云服务特惠
懂AI专属折扣关注微信公众号
最新AI工具、AI资讯
独家AI资源、AI项目落地

微信扫一扫关注公众号


