
pixoo-homeassistant
Pixoo 64显示器与Home Assistant智能家居集成方案
该项目提供自定义组件,实现Divoom Pixoo 64显示器与Home Assistant的无缝集成。用户可利用Home Assistant数据,在Pixoo 64上展示个性化设计,包括多文本和图像显示、页面切换时间设置、亮度调节等功能。此外,还支持通过自动化触发特定页面显示,为智能家居系统增添动态视觉元素。集成简单易用,大大扩展了Pixoo 64在智能家居场景中的应用潜力。
这是一个自定义组件,用于在 Home Assistant 中方便地使用 Pixoo64。通过此集成,您可以显示不同的设计并使用来自 Home Assistant 的信息对其进行个性化设置。例如,您可以使用此集成在一个页面上显示多个文本 {{ 模板 }} 和图像。您还可以使用此集成来设定您希望看到页面的时间长度,比如您可以设置页面每15秒更换一次。此外,您还有一个灯光实体用于开关显示屏或调节亮度。最后但同样重要的是,您可以创建自动化,使用特定触发器来显示您可用的页面作为推送。
安装
- 通过 HACS 安装此集成(需要添加存储库),或将此存储库的
custom_components/divoom_pixoo目录内容复制到您的custom_components/divoom_pixoo目录中。
-
��重启 Home Assistant。
-
转到设置 / 集成并添加集成 "Divoom Pixoo 64"。
- 请从列表中选择一个已发现的 Pixoo 64 设备,或选择"手动 IP"以手动输入设备的 IP。
配置
基础设置
设置 > 设备 > Divoom Pixoo > 配置
设备的 IP 地址: 已发现或手动输入的 IP 扫描间隔(秒): 显示一个页面的时间 YAML 格式的页面列表: 见下文(可选)
页面类型与配置
每种页面类型都有其独特的配置选项。所有配置都应使用YAML编写
如果你是这个集成的新用户,我们建议从组件页面类型开始。
在YAML配置中,所有页面都嵌套在 - page_type: XXX 下
设置默认配置时,可以设置多个页面。这些页面将通过"duration"标签轮换显示,或默认使用"扫描间隔"中设置的时间。
YAML布局示例
- page_type: channel
  id: 0
- page_type: clock
  id: 182
此外,所有页面类型都可以根据HA实体动态设置启用/禁用。
| 配置选项 | 必填 | 默认值 | 值 |
|---|---|---|---|
| enabled | 否 | true | 布尔值或 {{ 模板 }} #期望状态为 'true', 'yes', 'on' 或 '1' |
- page_type: 页面类型
  enabled: "{{ states.input_boolean.你的实体.state }}"
你还可以设置页面的持续时间(以秒为单位)。这将覆盖设备设置中的扫描间隔。
| 配置选项 | 必填 | 默认值 | 值 |
|---|---|---|---|
| duration | 否 | (扫描间隔时间) | 整数/浮点数(单位:秒) |
- page_type: 页面类型
  duration: 10
[!注意] enabled标签和duration标签仅在配置中使用时生效。因此,它们在服务中不起作用。
页面:组件
组件页面将您的Pixoo变成您的画布!您可以将多个文本/图像配置绑定到单个页面。
<br> > [!注意] > 每个组件类型的X,Y坐标位置需要手动配置 #### XY定位 <img src="https://yellow-cdn.veclightyear.com/87312a0a/3f996201-50f3-4997-adb3-75cdcf3673f9.png?raw=true" title="XY轴示例" height="300" /> ## 组件配置 -类型: [ 文本 | 图像 | 矩形 ]- page_type: components components: - type: text #[文本配置] - type: text #[文本配置] - type: image #[图像配置] - type: rectangle #[矩形配置] - type: templatable #[可模板化配置]
组件: 文本
| 配置选项 | 必填 | 默认值 | 可选值 |
|---|---|---|---|
| 位置 | 是 | 文本在64x64像素XY轴上的位置 | |
| 内容 | 是 | 你的消息! {{ 模板 }} 和 换行 支持 | |
| 字体 | 否 | pico_8 | 字体 |
| 颜色 | 否 | 白色 | [R, G, B] 或 预设颜色 |
示例
- 类型: 文本
  位置: [0,0]
  内容: 欢迎回家!
组件: 图像
| 配置选项 | 必填 | 默认值 | 可选值 |
|---|---|---|---|
| 位置 | 是 | 图像在64x64像素XY轴上的位置 | |
| 图像路径 | 是(三选一) | 图像路径,如 /config/img/haus.png | |
| 图像URL | 是(三选一) | 图像URL,如模板 {{ entity image }} 或 https://raw.githubusercontent.com/gickowtf/pixoo-homeassistant/main/images/fuel.png | |
| 图像数据 | 是(三选一) | base64格式的图像数据。在这里转换图像。 | |
| 高度 | 否 | 如果未选择,图像将保持原始尺寸。如果选择一个,它将成为最长边。按比例缩放 | |
| 宽度 | 否 | 如果未选择,图像将保持原始尺寸。如果选择一个,它将成为最长边。按比例缩放 | |
| 重采样模式 | 否 | box | box, nearest, bilinear, hamming, bicubic, lanczos |
示例
- 类型: 图像
  位置: [5,5]
  图像路径: /config/image/haus.png
  重采样模式: box
  高度: 64
组件: 矩形
| 配置选项 | 必填 | 默认值 | 可选值 |
|---|---|---|---|
| 位置 | 是 | 矩形在64x64像素XY轴上的位置 | |
| 尺寸 | 是 | 矩形的最终尺寸。格式为 [宽度, 高度] | |
| 颜色 | 否 | [R, G, B] 或 预设颜色 | |
| 填充 | 否 | 布尔值 |
示例
- 类型: 矩形
  位置: [20, 20]
  尺寸: [10, 10]
  颜色: 黄色
  填充: "{{ states.input_boolean.YOURS.state }}"  #可选
组件: 可模板化
| 配置选项 | 必填 | 默认值 | 可选值 |
|---|---|---|---|
| 模板 | 是 | jinja2 模板 |
示例
- 类型: 可模板化
  模板: >-
    {% set entities = [["input_boolean.sw1", "input_boolean.sw2"],
    ["input_boolean.sw2"]] %} {% set origin = [1, 62] %}

    {% set output = namespace(list=[], position_x = origin[0], position_y =
    origin[1]) %} {% for entity_group in entities -%} {# {%- if loop.first
    %}The {% elif loop.last %} and the {% else %}, the {% endif -%} #}

    {% for entity in entity_group -%} {# {%- if loop.first %}The {% elif
    loop.last %} and the {% else %}, the {% endif -%} #} {% set entity_state
    = states(entity) %}

    {## 选择颜色 ##} {% if entity_state=="off" or
    entity_state=="not_home" or entity_state == "standby" %} {% set
    color="red" %} {% elif entity_state=="on" or entity_state=="home" %} {%
    set color="green" %} {% elif entity_state=="playing" or
    entity_state=="idle" or entity_state=="paused" %} {% set color="blue" %}
    {% else %} {% set color="white" %} {% endif %}

    {% set component = {"type": "rectangle", "size": [1,1], "color": color,
    "position": [output.position_x, output.position_y]}%}

    {## 下一个像素高2像素 ##} {% set output.position_y =
    output.position_y - 2 %} {## 添加到输出列表 ##} {% set
    output.list = output.list + [component] %}

    {%- endfor %} {## 下一个像素右移2像素 ##} {% set
    output.position_x = output.position_x + 2 %} {## 重置y ##} {% set
    output.position_y = origin[1] %} {%- endfor %} {{output.list}}
变量 (可选) (仅适用于组件页面)
如果你希望更容易地共享自定义组件页面,可以在变量标签中定义变量。这些变量可以在任何模板中使用。
[!注意] 服务调用中不支持变量标签。对于那些情况,你必须使用 Home Assistant 的变量功能(通过自动化/脚本)
使用示例:
- 页面类型: 组件
  变量:
    power: "{{ states('input_number.power') }}"
    storage: "{{ states('input_number.storage') }}"
  组件:
    - 类型: 图像
      图像路径: /config/custom_components/divoom_pixoo/img/sunpower.png
      位置: [2,1]
    - 类型: 文本
      内容: "{{ power }}"
      颜色: "{{ [255,175,0] if power|int >= 1 else [131,131,131] }}"
      字体: gicko
      位置: [17,8]
    - 类型: 图像
      图像路径: "{{ '/config/custom_components/divoom_pixoo/img/akku80-100.png' if storage|int >= 80 else '/config/custom_components/divoom_pixoo/img/akku60-80.png' if storage|int >= 60 else '/config/custom_components/divoom_pixoo/img/akku40-60.png' if storage|int >= 40 else '/config/custom_components/divoom_pixoo/img/akku20-40.png' if storage|int >= 20 else '/config/custom_components/divoom_pixoo/img/akku00-20.png'}}"
      位置: [2, 17]
    - 类型: 文本
      内容: "{{ storage }}"
      颜色: "{{ [255,0,68] if storage|int <= 0 else [4,204,2] }}"
      字体: gicko
      位置: [17, 18]
页面:动图
动画GIF
- 将动图下载到你的电脑上。
- 将你的动图调整为16x16、32x32或64x64的尺寸。我知道一些网站说是64x64,但它实际上必须是64x64。你可以在多个网站上调整动图尺寸。这里有一个例子。(你只需要在页面下方手动选择宽度和高度的尺寸)。
- 重新下载动图。
- 重新上传动图。你可以使用许多图片服务,比如这个。(确保你使用的是动图文件的链接,而不是"动图查看页面"。你可以在网站上右击动图,然后点击"复制图片链接"来获取。你剪贴板中的链接可能现在以.gif结尾,就像你的文件一样。(尽管这可能不是100%的情况。))
| 配置选项 | 是否必需 | 默认值 | 可选值 |
|---|---|---|---|
| gif_url | 是 | URL |
示例:
- page_type: gif
  gif_url: https://i.ibb.co/tKnvLs2/ezgif-5-30ff95e9ca.gif
页面:频道
在Divoom应用中,你可以设置三个不同的自定义频道,并在此处选择。
[!注意] Divoom自定义频道的图片循环速率必须在应用内设置。
- 频道1 =
id: 0 - 频道2 =
id: 1 - 频道3 =
id: 2| 配置选项 | 必填 | 默认值 | 值类型 | |--------------|:--------:|------------|------------| | id | 是 | | 整数 | 示例:
- page_type: channel
  id: 0
页面:时钟
在Divoom应用中,有一大列表的时钟可供你设置到你的设备上。 - page_type: clock
| 配置选项 | 必填 | 默认值 | 可选值 |
|---|---|---|---|
| id | 是 | 时钟ID 时钟ID列表 | |
| 示例: |
- page_type: clock
id: 182
查找时钟面板ID的替代方法
- 导航至设置 > 集成 > Divoom Pixoo 64
- 激活调试日志
- 在你的智能手机上打开Divoom应用并选择你喜欢的时钟面板。
- 一旦这个面板显示在你的Pixoo64上,你就会在日志中找到"Device Data",然后是"CurClockId"。
- CurClockId就是你要找的数字。
页面:可视化器
这将可视化器页面添加到集成中。 <br>
| 配置选项 | 必填 | 默认值 | 可选值 |
|---|---|---|---|
| id | 是 | 时钟(可视化器)ID |
光伏 - PV 是一个预设计的页面。图标会根据电池容量变化,字体颜色从红色变为绿色 这里可能需要使用辅助实体 <img src="https://yellow-cdn.veclightyear.com/87312a0a/472ab6ee-2c99-4d7a-a41e-95ea897750c4.png?raw=true" title="配置.yaml 太阳能示例" align="left" height="150" width="150" />
- page_type: PV
enabled: "{{ states.input_boolean.YOURS.state }}"  #仅在状态为 'true'、'yes'、'on' 或 '1' 时显示
power: "{{ states.sensor.YOUR_SENSOR.state }}"
storage: "{{ states.sensor.YOUR_SENSOR.state }}"
discharge: "{{ states.sensor.YOUR_SENSOR.state }}"
powerhousetotal: "{{ states.sensor.YOUR_SENSOR.state }}"
vomNetz: "{{ states.sensor.YOUR_SENSOR.state }}"
time: "{{ now().strftime('%H:%M') }}"
页面:进度条
预设的带有进度条的页面,例如用于洗碗机的状态或汽车的充电状态 - page_type: progress_bar <img src="https://yellow-cdn.veclightyear.com/87312a0a/3f222e0a-4b07-4cfd-854a-e48f93baa691.png?raw=true" title="configuration.yaml 进度条示例" align="left" height="150" />
| 配置选项 | 是否必需 | 默认值 | 可选值 |
|---|---|---|---|
| header | 是 | 字符串或使用 {{ template }} 例如:洗碗机 | |
| progress | 是 | 整数或使用 {{ template }} | |
| footer | 是 | 字符串或使用 {{ template }} 例如:日期 | |
| bg_color | 否 | blue | 使用 "[R, G, B]" 或 颜色预设 |
| header_offset | 否 | 2 | 整数 |
| header_font_color | 否 | white | 使用 "[R, G, B]" 或 颜色预设 |
| progress_bar_color | 否 | red | 使用 "[R, G, B]" 或 颜色预设 |
| progress_text_color | 否 | white | 使用 "[R, G, B]" 或 颜色预设 |
| time_color | 否 | grey | 使用 "[R, G, B]" 或 颜色预设 |
| footer_offset | 否 | 2 | 整数 |
| footer_font_color | 否 | white | 使用 "[R, G, B]" 或 颜色预设 |
| 示例: |
- page_type: progress_bar
enabled: >-
{% if is_state('sensor.DISHWASCHER_STATE', 'Run') %} true {% else %} false {% endif %}
header: 洗碗机
progress: "{{ states.sensor.DISHWASHER_PROGRESS.state }}"
footer: 任意页脚
header_font_color: "[255, 255, 255]"
页面:燃料
加油站价格的特殊页面。此处可能需要使用辅助实体 - page_type: fuel <img src="https://yellow-cdn.veclightyear.com/87312a0a/294f3b7d-0aa5-4daa-932c-937c67b69af3.jpg?raw=true" title="配置文件 configuration.yaml 太阳能示例" /> <br>
| 配置选项 | 必填 | 默认值 | 值 |
|---|---|---|---|
| title | 是 | 字符串 - 可使用 {{ 模板 }} 例如:加油站名称 | |
| name1 | 是 | 字符串 - 可使用 {{ 模板 }} 例如:燃料类��型 | |
| price1 | 是 | 使用 {{ 模板 }} 例如:燃料价格 | |
| name2 | 是 | 字符串 - 可使用 {{ 模板 }} | |
| price2 | 是 | 使用 {{ 模板 }} | |
| name3 | 是 | 字符串 - 可使用 {{ 模板 }} | |
| price3 | 是 | 使用 {{ 模板 }} 例如:燃料价格 | |
| status | 是 | 字符串 - 可使用 {{ 模板 }} 任何额外字段,在我的例子中是营业状态 | |
| font_color | 否 | 白色 | "[R, G, B]" 或 颜色 |
| bg_color | 否 | 黄色 (255, 230, 0) | "[R, G, B]" 或 颜色 |
| price_color | 否 | 白色 | "[R, G, B]" 或 颜色 |
| title_color | 否 | 黑色 | "[R, G, B]" 或 颜色 |
| stripe_color | 否 | font_color | "[R, G, B]" 或 颜色 |
| title_offset | 否 | 2 | 整数 用于居中文本 |
图片示例:
- page_type: Fuel
enabled: "{{ states.input_boolean.YOURS.state }}"
title: 经典
name1: 柴油
price1: "{{ states.sensor.diesel.state }}"
name2: 高级汽油
price2: "{{ states.sensor.super.state }}"
name3: E10
price3: "{{ states.sensor.e10.state }}"
status: >-
{% if is_state('binary_sensor.status', 'on') %} 营业中 {%
else %} 已关闭 {% endif %}
title_offset: "10"
font_color: "[255, 255, 255]"
换行
content: 中的换行支持示例:
content: |-
文本 1
{{ states.*.state }}
除了64像素的限制外,没有最大换行次数的限制 ;)
服务
服务:发送页面到Divoom Pixoo(show_message)推送通知
您可以将其用于推送通知。通过任何方式触发!使用"Divoom Pixoo 64:发送页面到Divoom Pixoo"服务调�用它。
您可以在_页面数据_字段中输入一个页面的数据,使用常规YAML格式。它可以是任何内容!
[!注意] 这旨在临时覆盖您的默认配置。此处不会遵守任何启用/禁用行。
一些页面数据示例:
page_type: clock
id: 182
或
page_type: components
components:
- type: text
  position: [10, 0]
  content: 2 github/gickowtf
  font: gicko
  color: [255, 0, 0]
- type: image
  image_path: /config/img/haus.png
  position: [30, 30]
服务:播放蜂鸣器
在Divoom Pixoo上播放蜂鸣器。请注意,这可能会损坏设备。使用风险自负。
每个周期的蜂鸣时间(毫秒)默认:500毫秒<br>
每个周期蜂鸣器的工作时间。蜂鸣器不会持续蜂鸣;它会在周期内开启和关闭(中间的持续时间不可控)。
每个周期的空闲时间(毫秒)默认:500毫秒<br>
每个周期蜂鸣器的空闲时间。
总时间(毫秒)默认:3000毫秒<br>
蜂鸣器将工作的总时间。
服务:重启Divoom Pixoo
重启Divoom Pixoo设备。(会有一点延迟,请耐心等待。)
<br>模板
如上所述,模板允许您将实体状态和属性直接带到您的Pixoo上(例如温度、亮度、存在、实体开/关)。它们可以在集成的大多数设置中使用。如需深入了解,请参阅https://www.home-assistant.io/docs/configuration/templating/,或者甚至https://jinja.palletsprojects.com/en/latest/templates/(模板背后的语言)
您可以在Home Assistant的开发者 > 状态下找到实体ID(尽管您可能不需要这个)。
模板使用示例
报告原始传感器读数
二进制传感器是最容易上手的,因为它们只有开和关两种状态。
- page_type: components
components:
- type: text
position: [0,0]
color: white
content: "动作-FL1: {{ states('binary_sensor.MotionDetector') }}"
在上面的例子中,Pixoo 将显示 动作-FL1: [开/关]
根据传感器读数有条件地替换文本
如果你想把 on -> 检测到 和 off -> 清除 怎么办? 一种方法是使用 If/then/else 组合(下面是简短形式)和状态比较器(is_state)
content: >-
动作-FL1: {{ '检测到' if
is_state('binary_sensor.MotionDetector', ['on']) else
'清除' }}
你可能会说"这很不错,但我还想动态改变颜色,因为美观。" 好消息是我们可以做到!
使用模板动态改变文本颜色
我们可以将用于文本的相同概念应用于颜色。我们只需要将文本替换为颜色代码。 如果检测到动作,颜色 = 红色 (255,0,0); 否则颜色 = 绿色 (0,255,0)
color: >-
{{ [255,0,0] if is_state('binary_sensor.motionDetector',
['on']) else [0,255,0] }}
通过自动化实现动画
[!注意] 在这个例子中,我们使用计数助手作为倒计时。这也使用自动化而不是配置。
alias: pixoo64 - 自动动画
description: ""
trigger: []
condition: []
action:
- service: counter.reset
metadata: {}
data: {}
target:
entity_id: counter.pixoo_5s_count_down
- repeat:
count: 20
sequence:
- service: divoom_pixoo.show_message
target:
entity_id: sensor.divoom_pixoo_64_current_page
data:
page_data:
page_type: components
components:
- type: text
position:
- 0
- 30
content: "认证检查: {{ states('counter.pixoo_5s_count_down') }}"
font: pico_8
color: white
- type: image
image_url: https://pub.inflowbogie.dev/lock_closed.png
position:
- 0
- 40
resample_mode: box
height: 20
- type: image
image_url: https://pub.inflowbogie.dev/key.png
position:
- "{{ 2 * states('counter.pixoo_5s_count_down') }}"
- 50
resample_mode: box
height: 7
- service: counter.decrement
metadata: {}
data: {}
target:
entity_id: counter.pixoo_5s_count_down
- delay:
hours: 0
minutes: 0
seconds: 1
milliseconds: 0
- if:
- condition: state
entity_id: counter.pixoo_5s_count_down
state: "0"
then:
- service: counter.reset
metadata: {}
data: {}
target:
entity_id: counter.pixoo_5s_count_down
mode: single

参考资料
字体
| 字体名称 | 图片 |
|---|---|
| gicko | 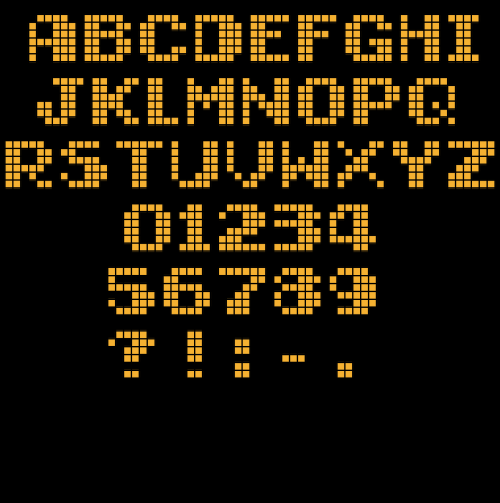 |
| five_pix | 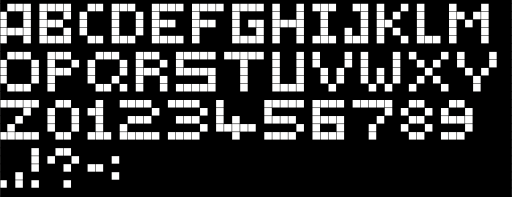 |
| pico_8 | 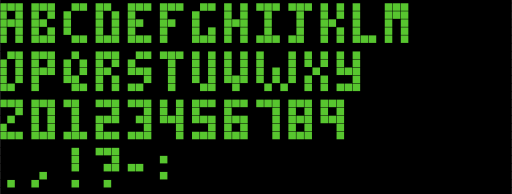 |
| eleven_pix | 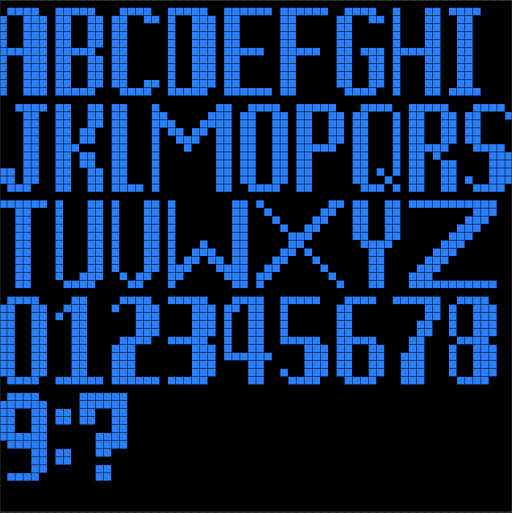 |
| clock |  |
编辑推荐精选


酷表ChatExcel
大模型驱动的Excel数据处理工具
基于大模型交互的表格处理系统,允许用户通过对话方式完成数据整理和可视化分析。系统采用机器学习算法解析用户指令,自动执行排序、公式计算和数据透视等操作,支持多种文件格式导入导出。数据处理响应速度保持在0.8秒以内,支持超过100万行数据的即时分析。


DeepEP
DeepSeek开源的专家并行通信优化框架
DeepEP是一个专为大规模分布式计算设计的通信库,重点解决专家并行模式中的通信瓶颈问题。其核心架构采用分层拓扑感知技术,能够自动识别节点间物理连接关系,优化数据传输路径。通过实现动态路由选择与负载均衡机制,系统在千卡级计算集群中维持稳定的低延迟特性,同时兼容主流深度学习框架的通信接口。


DeepSeek
全球领先开源大模型,高效智能助手
DeepSeek是一家幻方量化创办的专注于通用人工智能的中国科技公司,主攻大模型研发与应用。DeepSeek-R1是开源的推理模型,擅长处理复杂任务且可免费商用。


问小白
DeepSeek R1 满血模型上线
问小白是一个基于 DeepSeek R1 模型的智能对话平台,专为用户提供高效、贴心的对话体验。实时在线,支持深度思考和联网搜索。免费不限次数,帮用户写作、创作、分析和规划,各种任务随时完成!


KnowS
AI医学搜索引擎 整合4000万+实时更新的全球医学文献
医学领域专用搜索引擎整合4000万+实时更新的全球医学文献,通过自主研发AI模型实现精准知识检索。系统每日更新指南、中英文文献及会议资料,搜索准确率较传统工具提升80%,同时将大模型幻觉率控制在8%以下。支持临床建议生成、文献深度解析、学术报告制作等全流程科研辅助,典型用户反馈显示每周可节省医疗工作者70%时间。


Windsurf Wave 3
Windsurf Editor推出第三次重大更新Wave 3
新增模型上下文协议支持与智能编辑功能。本次更新包含五项核心�改进:支持接入MCP协议扩展工具生态,Tab键智能跳转提升编码效率,Turbo模式实现自动化终端操作,图片拖拽功能优化多模态交互,以及面向付费用户的个性化图标定制。系统同步集成DeepSeek、Gemini等新模型,并通过信用点数机制实现差异化的资源调配。


腾讯元宝
腾讯自研的混元大模型AI助手
腾讯元宝是腾讯基于自研的混元大模型推出的一款多功能AI应用,旨在通过人工智能技术提升用户在写作、绘画、翻译、编程、搜索、阅读总结等多个领域的工作与生活效率。


Grok3
埃隆·马斯克旗下的人工智能公司 xAI 推出的第三代大规模语言模型
Grok3 是由埃隆·马斯克旗下的人工智能公司 xAI 推出的第三代大规模语言模型,常被马斯克称为“地球上最聪明的 AI”。它不仅是在前代产品 Grok 1 和 Grok 2 基础上的一次飞跃,还在多个关键技术上实现了创新突破。


OmniParser
帮助AI理解电脑屏幕 纯视觉GUI元素的自动化解析方案
开源工具通过计算机视觉技术实现图形界面元素的智能识别与结构化处理,支持自动化测试脚本生成和辅助功能开发。项目采用模块化设计,提供API接口与多种输出格式,适用于跨平台应用场景。核心算法优化了元素定位精度,在动态界面和复杂布局场景下保持稳定解析能力。


流畅阅读
AI网页翻译插件 双语阅读工具,还原母语级体验
流畅阅读是一款浏览器翻译插件,通过上下文智能分析提升翻译准确性,支持中英双语对照显示。集成多翻译引擎接口,允许用户自定义翻译规则和快捷键配置,操作数据全部存储在本地设备保障隐私安全。兼容Chrome、Edge、Firefox等主流浏览器,基于GPL-3.0开源协议开发,提供持续的功能迭代和社区支持。
推荐工具精选
AI云服务特惠
懂AI专属折扣关注微信公众号
最新AI工具、AI资讯
独家AI资源、AI项目落地

微信扫一扫关注公众号


