


TinyTuya

![]()
![]()
![]()

Python module to interface with Tuya WiFi smart devices
Description
This python module controls and reads state of Tuya compatible WiFi Smart Devices (Plugs, Switches, Lights, Window Covers, etc.) using the local area network (LAN) or the cloud (TuyaCloud API). This is a compatible replacement for the pytuya PyPI module and currently supports Tuya Protocols 3.1, 3.2, 3.3, 3.4 and 3.5.
Tuya devices are designed to communicate with the TuyaCloud but most also expose a local area network API. This allows us to directly control the devices without using the cloud. This python module provides a way to poll status and issue commands to these devices.
TinyTuya can also connect to the Tuya Cloud to poll status and issue commands to Tuya devices.

# Example Usage of TinyTuya
import tinytuya

d = tinytuya.Device('DEVICE_ID_HERE', 'IP_ADDRESS_HERE', 'LOCAL_KEY_HERE', version=3.3)
data = d.status()
print('Device status: %r' % data)
NOTE: Devices need to be activated by Smart Life App.
TinyTuya Installation
# Install TinyTuya Library
python -m pip install tinytuya

# Optional: Install Command Line Tool
pipx install tinytuya
Pip will attempt to install cryptography, requests and colorama if not already installed.
Tuya Device Preparation
Controlling and monitoring Tuya devices on your network requires the following:
- Address - Network address (IPv4) of the device e.g. 10.0.1.100
- Device ID - Unique identifier for the Tuya device
- Version - Tuya protocol version used (3.1, 3.2, 3.3, 3.4 or 3.5)
- Local_Key - Security key needed to access the Tuya device. See Setup Wizard to get these keys.
Network Scanner
TinyTuya has a built in network scanner that can be used to find Tuya Devices on your local network. It will show Address, Device ID and Version for each device. Your LAN and firewall will need to allow UDP (6666, 6667 and 7000) and TCP (6668) traffic.
python -m tinytuya scan
Setup Wizard - Getting Local Keys
TinyTuya has a built-in setup Wizard that uses the Tuya IoT Cloud Platform to generate a JSON list (devices.json) of all your registered devices, including secret Local_Key and Name of your devices. Follow the steps below:
-
PAIR - Download the Smart Life App or Tuya Smart App, available for iPhone or Android. Set up your SmartLife account and pair all of your Tuya devices (this is important as you cannot access a device that has not been paired). Do not use a 'guest' account, otherwise it will get deleted without confirmation at step 3.
-
SCAN (Optional) - Run the TinyTuya scan to get a list of Tuya devices on your network. It will show device Address, Device ID and Version number (3.x):
python -m tinytuya scanNOTE: You will need to use one of the displayed Device IDs for step 4.
-
TUYA ACCOUNT - Set up a Tuya Account (see PDF Instructions):
- NOTE: Tuya often changes their portal and services. Please open an issue with screenshots if we need to update these instructions.
- Create a Tuya Developer account on iot.tuya.com. When it asks for the "Account Type", select "Skip this step..." (see screenshot).
- Click on "Cloud" icon -> "Create Cloud Project"
- Pick the correct Data Center "Region" for your location (check HERE to find your Region). This will be used by TinyTuya Wizard (screenshot).
- Skip the configuration wizard but remember the Authorization Key: API ID and Secret for below (screenshot).
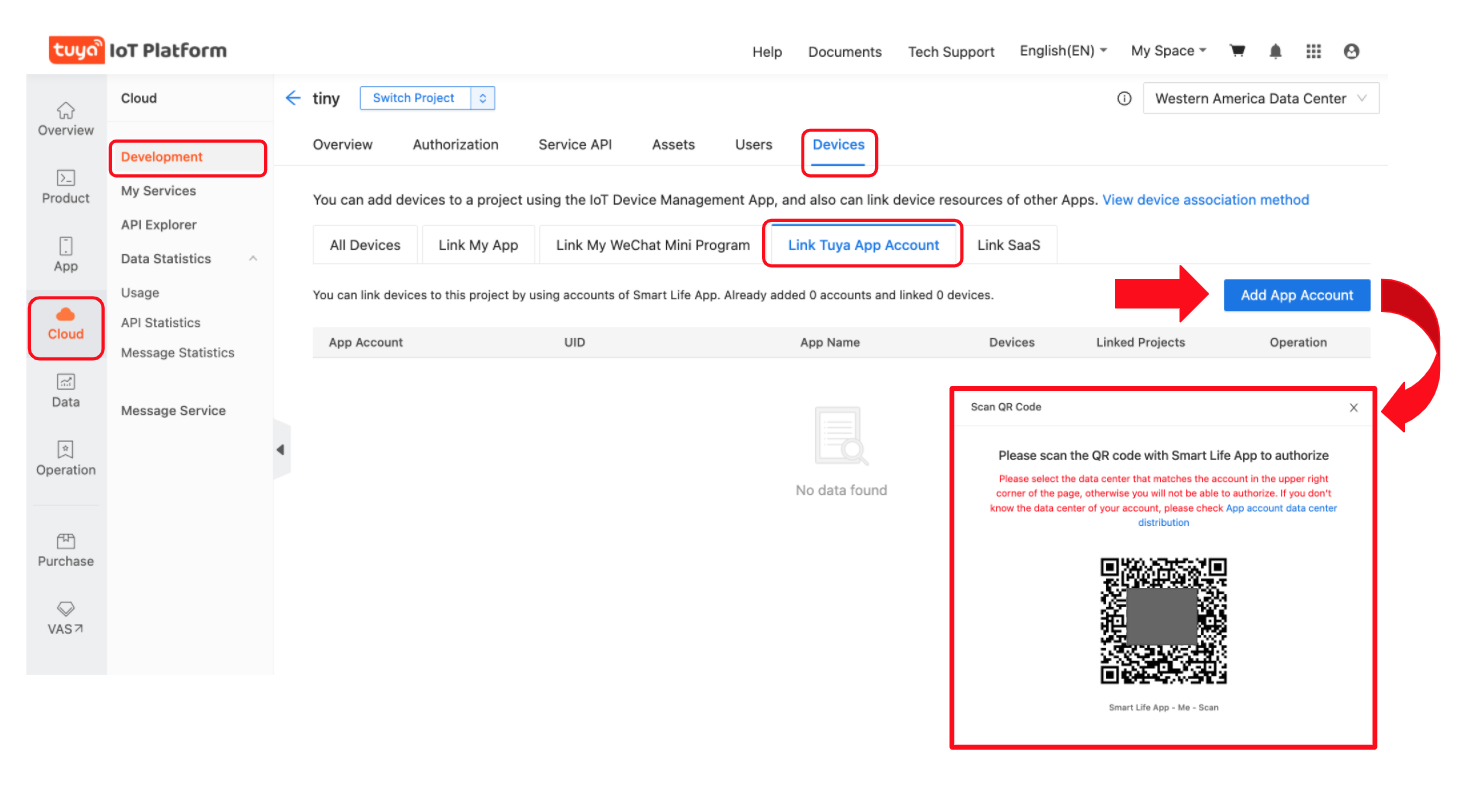
- Click on "Cloud" icon -> Select your project -> Devices -> Link Tuya App Account (see screenshot)
- Click Add App Account (screenshot) and it will pop-up a "Link Tuya App Account" dialog, chose "Automatic" and "Read Only Status" (it will still alow commands). Click OK and it will display a QR code. Scan the QR code with the Smart Life app on your Phone (see step 1 above) by going to the "Me" tab in the Smart Life app and clicking on the QR code button
[..]in the upper right hand corner of the app. When you scan the QR code, it will link all of the devices registered in your Smart Life app into your Tuya IoT project. If the QR code will not scan then make sure to disable any browser theming plug-ins (such as Dark Reader) and try again. - NO DEVICES? If no devices show up after scanning the QR code, you will need to select a different data center and edit your project (or create a new one) until you see your paired devices from the Smart Life App show up. (screenshot). The data center may not be the most logical. As an example, some in the UK have reported needing to select "Central Europe" instead of "Western Europe".
- SERVICE API: Under "Service API" ensure these APIs are listed:
IoT CoreandAuthorization. To be sure, click subscribe again on every service. Very important: disable popup blockers otherwise subscribing won't work without providing any indication of a failure. Make sure you authorize your Project to use those APIs:- Click "Service API" tab
- Click "Go to Authorize" button
- Select the API Groups from the dropdown and click
Subscribe(screenshot)
-
WIZARD - Run Setup Wizard:
- From your Linux/Mac/Win PC run the TinyTuya Setup Wizard to fetch the Local_Keys for all of your registered devices:
python -m tinytuya wizard # use -nocolor for non-ANSI-color terminals - The Wizard will prompt you for the API ID key, API Secret, API Region (cn, us, us-e, eu, eu-w, or in) from your Tuya IoT project as set in Step 3 above.
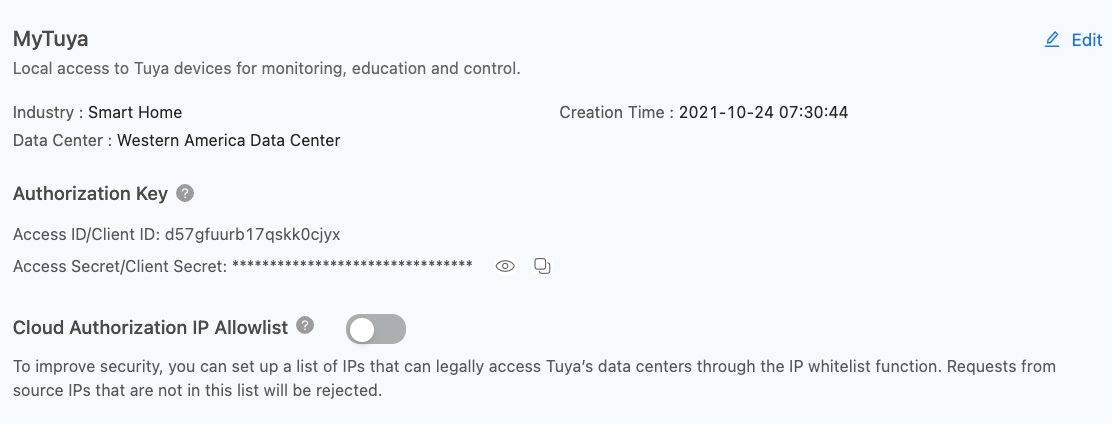
- To find those again, go to iot.tuya.com, choose your project and click
Overview- API Key: Access ID/Client ID
- API Secret: Access Secret/Client Secret
- To find those again, go to iot.tuya.com, choose your project and click
- It will also ask for a sample Device ID. You can have the wizard scan for one (enter
scan), use one from step 2 above or in the Device List on your Tuya IoT project. - The Wizard will poll the Tuya IoT Cloud Platform and print a JSON list of all your registered devices with the "name", "id" and "key" of your registered device(s). The "key"s in this list are the Devices' Local_Key you will use to access your device.
- In addition to displaying the list of devices, Wizard will create a local file
devices.jsonthat TinyTuya will use to provide additional details for scan results fromtinytuya.deviceScan()or when runningpython -m tinytuya scan. The wizard also creates a local filetuya-raw.jsonthat contains the entire payload from Tuya Cloud. - The Wizard will ask if you want to poll all the devices. If you do, it will display the status of all devices on record and create a
snapshot.jsonfile with these results. Make sure your LAN and firewall permit UDP (6666, 6667 and 7000) and TCP (6668) traffic.
- From your Linux/Mac/Win PC run the TinyTuya Setup Wizard to fetch the Local_Keys for all of your registered devices:
Notes:
- If you ever reset or re-pair your smart devices, the Local_Key will be reset and you will need to repeat the steps above.
- The TinyTuya Wizard was inspired by the TuyAPI CLI which is an alternative way to fetch the Local_Keys:
npm i @tuyapi/cli -gand runtuya-cli wizard
Programming with TinyTuya
After importing tinytuya, you create a device handle for the device you want to read or control. Here is an example for a Tuya smart switch or plug:
import tinytuya

# Connect to Device
d = tinytuya.OutletDevice(
    dev_id='DEVICE_ID_HERE',
    address='IP_ADDRESS_HERE',      # Or set to 'Auto' to auto-discover IP address
    local_key='LOCAL_KEY_HERE',
    version=3.3)

# Get Status
data = d.status()
print('set_status() result %r' % data)

# Turn On
d.turn_on()

# Turn Off
d.turn_off()
TinyTuya Module Classes and Functions
Classes

  AESCipher - Cryptography Helpers
  XenonDevice(args...) - Base Class
    Device(args...) - Tuya Class for Devices
      OutletDevice(args...)
      CoverDevice(args...)
      BulbDevice(args...)
        Where args:
          dev_id (str): Device ID e.g. 01234567891234567890
          address (str): Device Network IP Address e.g. 10.0.1.99 or "Auto" to auto-find
          local_key (str): The encryption key
          dev_type (str): Device type for payload options (see below)
          version = 3.1 (float): Tuya Protocol (e.g. 3.1, 3.2, 3.3, 3.4, 3.5)
          persist = False (bool): Keep TCP link open
          cid = None (str): Optional sub device id
          node_id = None (str): Alias for cid
          parent = None (object): Gateway device object this is a child of
          port = TCPPORT (int): The port to connect to device
          connection_timeout = 5 (int): Timeout in seconds
          connection_retry_limit = 5 (int)
          connection_retry_delay = 5 (int)

          Total timeout = (connection_timeout * connection_retry_limit) +
                          (connection_retry_delay * (connection_retry_limit - 1))
                          Defaults: (5 * 5) + (5 * (5 - 1)) = 45 seconds

  Cloud(apiRegion, apiKey, apiSecret, apiDeviceID, new_sign_algorithm)

TinyTuya Base Functions
    devices = deviceScan()                        # Returns dictionary of devices found on local network
    scan()                                        # Interactive scan of local network
    wizard()                                      # Interactive setup wizard
    set_debug(toggle, color)                      # Activate verbose debugging output
    pack_message(msg, hmac_key)                   # Packs a TuyaMessage(), encrypting or adding a CRC if required
    unpack_message(data, hmac_key, header,
                    no_retcode)                   # Unpacks a TuyaMessage()
    parse_header(data)                            # Unpacks just the header part of a message into a TuyaHeader()
    find_device(dev_id, address)                  # Scans network for Tuya devices with either ID = dev_id or IP = address
    device_info(dev_id)                           # Searches DEVICEFILE (usually devices.json) for device with ID
    assign_dp_mappings(tuyadevices, mappings)     # Adds mappings to all the devices in the tuyadevices list
    decrypt_udp(msg)                              # Decrypts a UDP network broadcast packet

 Device Functions (All Devices)
    json = status()                               # returns json payload
    subdev_query(nowait)                          # query sub-device status (only for gateway devices)
    set_version(version)                          # 3.1 [default], 3.2, 3.3 or 3.4
    set_socketPersistent(False/True)              # False [default] or True
    set_socketNODELAY(False/True)                 # False or True [default]
    set_socketRetryLimit(integer)                 # retry count limit [default 5]
    set_socketRetryDelay(integer)                 # retry delay [default 5]
    set_socketTimeout(timeout)                    # set connection timeout in seconds [default 5]
    set_dpsUsed(dps_to_request)                   # add data points (DPS) to request
    add_dps_to_request(index)                     # add data point (DPS) index set to None
    set_retry(retry=True)                         # retry if response payload is truncated
    set_status(on, switch=1, nowait)              # Set status of switch to 'on' or 'off' (bool)
    set_value(index, value, nowait)               # Set int value of any index.
    set_multiple_values(index_value_dict, nowait) # Set multiple values with a single request
    heartbeat(nowait)                             # Send heartbeat to device
    updatedps(index=[1], nowait)                  # Send updatedps command to device
    turn_on(switch=1, nowait)                     # Turn on device / switch #
    turn_off(switch=1, nowait)                    # Turn off
    set_timer(num_secs, nowait)                   # Set timer for num_secs
    set_sendWait(num_secs)                        # Time to wait after sending commands before pulling response
    detect_available_dps()                        # Return list of DPS available from device
    generate_payload(command, data,...            # Generate TuyaMessage payload for command with data
    send(payload)                                 # Send payload to device (do not wait for response)
    receive()                                     # Receive payload from device

OutletDevice Additional Functions
    set_dimmer(percentage):

BulbDevice Additional Functions
    set_colour(r, g, b, nowait):
    set_hsv(h, s, v, nowait):
    set_white(brightness, colourtemp, nowait):
    set_white_percentage(brightness=100, colourtemp=0, nowait):
    set_brightness(brightness, nowait):
    set_brightness_percentage(brightness=100, nowait):
    set_colourtemp(colourtemp, nowait):
    set_colourtemp_percentage(colourtemp=100, nowait):
    set_scene(scene, nowait):                     # 1=nature, 3=rave, 4=rainbow
    set_mode(mode='white', nowait):               # white, colour, scene, music
    result = brightness():
    result = colourtemp():
    (r, g, b) = colour_rgb():
    (h,s,v) = colour_hsv()
    result = state():

CoverDevice Additional Functions
    open_cover(switch=1):
    close_cover(switch=1):
    stop_cover(switch=1):

Cloud Functions
    setregion(apiRegion)
    cloudrequest(url, action=[POST if post else GET], post={}, query={})
    getdevices(verbose=False)
    getstatus(deviceid)
    getfunctions(deviceid)
    getproperties(deviceid)
    getdps(deviceid)
编辑推荐精选


酷表ChatExcel
大模型驱动的Excel数据处理工具
基于大模型交互的表格处理系统,允许用户通过对话方式完成数据整理和可视化分析。系统采用机器学习算法解析用户指令,自动执行排序、公式计算和数据透视等操作,支持多种文件格式导入导出。数据处理响应速度保持在0.8秒以内,支持超过100万行数据的即时分析。


DeepEP
DeepSeek开源的专家并行通信优化框架
DeepEP是一个专为大规模分布式计算设计的通信库,重点解决专家并行模式中的通信瓶颈问题。其核心架构采用分层拓扑感知技术,能够自动识别节点间物理连接关系,优化数据传输路径。通过实现动态路由选择与负载均衡机制,系统在千卡级计算集群中维持稳定的低延迟特性,同时兼容主流深度学习框架的通信接口。


DeepSeek
全球领先开源大模型,高效智能助手
DeepSeek是一家幻方量化创办的专注于通用人工智能的中国科技公司,主攻大模型研发与应用。DeepSeek-R1是开源的推理模型,擅长处理复杂任务且可免费商用。


问小白
DeepSeek R1 满血模型上线
问小白是一个基于 DeepSeek R1 模型的智能对话平台,专为用户提供高效、贴心的对话体验。实时在线,支持深度思考和联网搜索。免费不限次数,帮用户写作、创作、分析和规划,各种任务随时完成!


KnowS
AI医学搜索引擎 整合4000万+实时更新的全球医学文献
医学领域专用搜索引擎整合4000万+实时更新的全球医学文献,通过自主研发AI模型实现精准知识检索。系统每日更新指南、中英文文献及会议资料,搜索准确率较传统工具提升80%,同时将大模型幻觉率控制在8%以下。支持临床建议生成、文献深度解析、学术报告制作等全流程科研辅助,典型用户反馈显示每周可节省医疗工作者70%时间。

Windsurf Wave 3
Windsurf Editor推出第三次重大更新Wave 3
新增模型上下文协议支持与智能编辑功能。本次更新包含五项核心改进:支持接入MCP协议扩展工具生态,Tab键智能跳转提升编码效率,Turbo模式实现自动化终端操作,图片拖拽功能优化多模态交互,以及面向付费用户的个性化图标定制。系统同步集成DeepSeek、Gemini等新模型,并通过信用点数机制实现差异化的资源调配。

腾讯元宝
腾讯自研的混元大模型AI助手
腾讯元宝是腾讯基于自研的混元大模型推出的一款多功能AI应用,旨在通过人工智能技术提升用户在写作、绘画、翻译、编程、搜索、阅读总结等多个领域的工作与生活效率。


Grok3
埃隆·马斯克旗下的人工智能公司 xAI 推出的第三代大规模语言模型
Grok3 是由埃隆·马斯克旗下的人工智能公司 xAI 推出的第三代大规模语言模型,常被马斯克称为“地球上最聪明的 AI”。它不仅是在前代产品 Grok 1 和 Grok 2 基础上的一次飞跃,还在多个关键技术上实现了创新突破。


OmniParser
帮助AI理解电脑屏幕 纯视觉GUI元素的自动化解析方案
开源工具通过计算机视觉技术实现图形界面元素的智能识别与结构化处理,支持自动化测试脚本生成和辅助功能开发。项目采用模块化设计,提供API接口与多种输出格式,适用于跨平台应用场景。核心算法优化了元素定位精度,在动态界面和复杂布局场景下保持稳定解析能力。

流畅阅读
AI网页翻译插件 双语阅读工具,还原母语级体验
流畅阅读是一款浏览器翻译插件,通过上下文智能分析提升翻译准确性,支持中英双语对照显示。集成多翻译引擎接口,允许用户自定义翻译规则和快捷键配置,操作数据全部存储在本地设备保障隐私安全。兼容Chrome、Edge、Firefox等主流浏览器,基于GPL-3.0开源协议开发,提供持续的功能迭代和社区支持。
推荐工具精选


AI云服务特惠
懂AI专属折扣关注微信公众号
最新AI工具、AI资讯
独家AI资源、AI项目落地

微信扫一扫关注公众号