A new version has been released, with performance boost. To update please run python -m pip install bota botasaurus botasaurus-api botasaurus-requests botasaurus-driver bota botasaurus-proxy-authentication botasaurus-server --upgrade.
🐿️ Botasaurus In a Nutshell
How wonderful that of all the web scraping tools out there, you chose to learn about Botasaurus. Congratulations!
And now that you are here, you are in for an exciting, unusual and rewarding journey that will make your web scraping life a lot, lot easier.
Now, let me tell you in bullet points about Botasaurus. (Because as per the marketing gurus, YOU as a member of Developer Tribe have a VERY short attention span.)
So, what is Botasaurus?
Botasaurus is an all-in-one web scraping framework that enables you to build awesome scrapers in less time, less code, and with more fun.
A Web Scraping Magician has put all his web scraping experience and best practices into Botasaurus to save you hundreds of hours of Development Time!
Now, for the magical powers awaiting you after learning Botasaurus:
- Convert any Web Scraper to a UI-based Scraper in minutes, which will make your Customer sing praises of you.

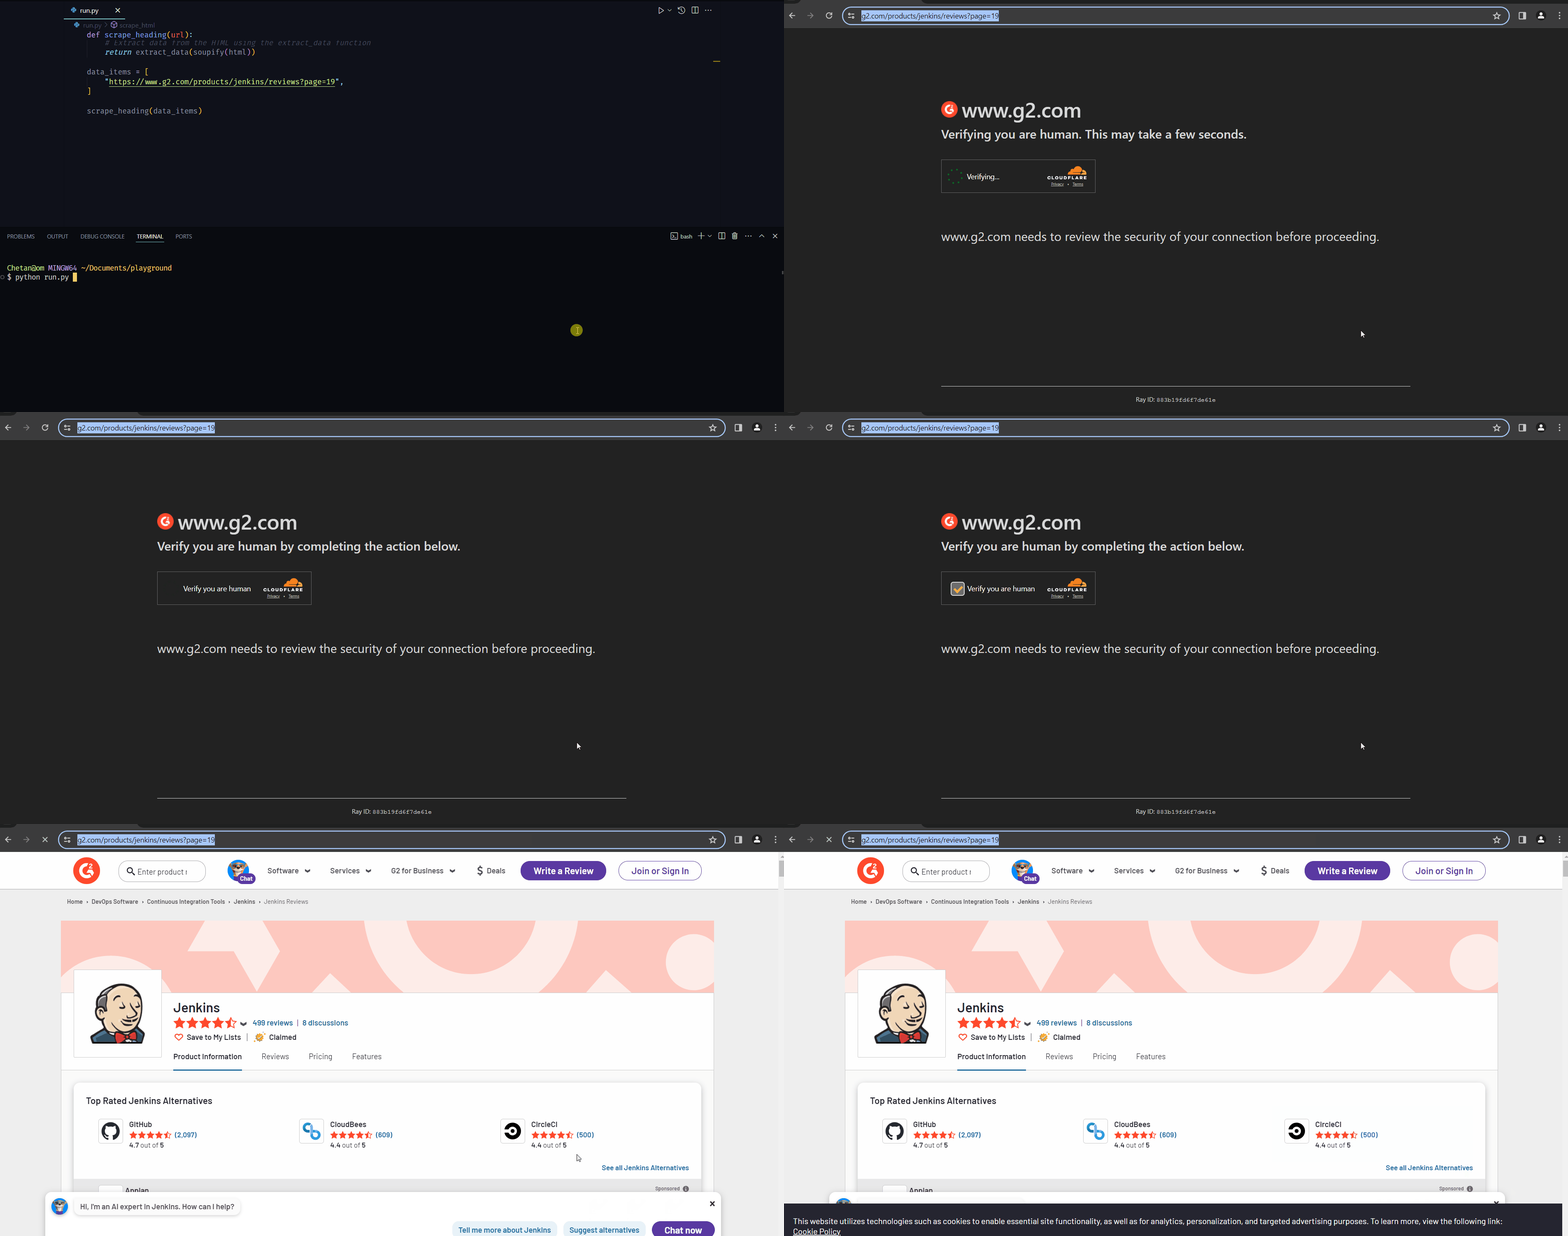
- In terms of humaneness, what Superman is to Man, Botasaurus is to Selenium and Playwright. Easily pass every (Yes E-V-E-R-Y) bot test, no need to spend time finding ways to access a website.
-
Save up to 97%, yes 97% on browser proxy costs by using browser-based fetch requests.
-
Easily save hours of Development Time with easy parallelization, profiles, extensions, and proxy configuration. Botasaurus makes asynchronous, parallel scraping a child's play.
-
Use Caching, Sitemap, Data cleaning, and other utilities to save hours of time spent in writing and debugging code.
-
Easily scale your scraper to multiple machines with Kubernetes, and get your data faster than ever.
And those are just the highlights. I Mean!
There is so much more to Botasaurus, that you will be amazed at how much time you will save with it.
🚀 Getting Started with Botasaurus
Let's dive right in with a straightforward example to understand Botasaurus.
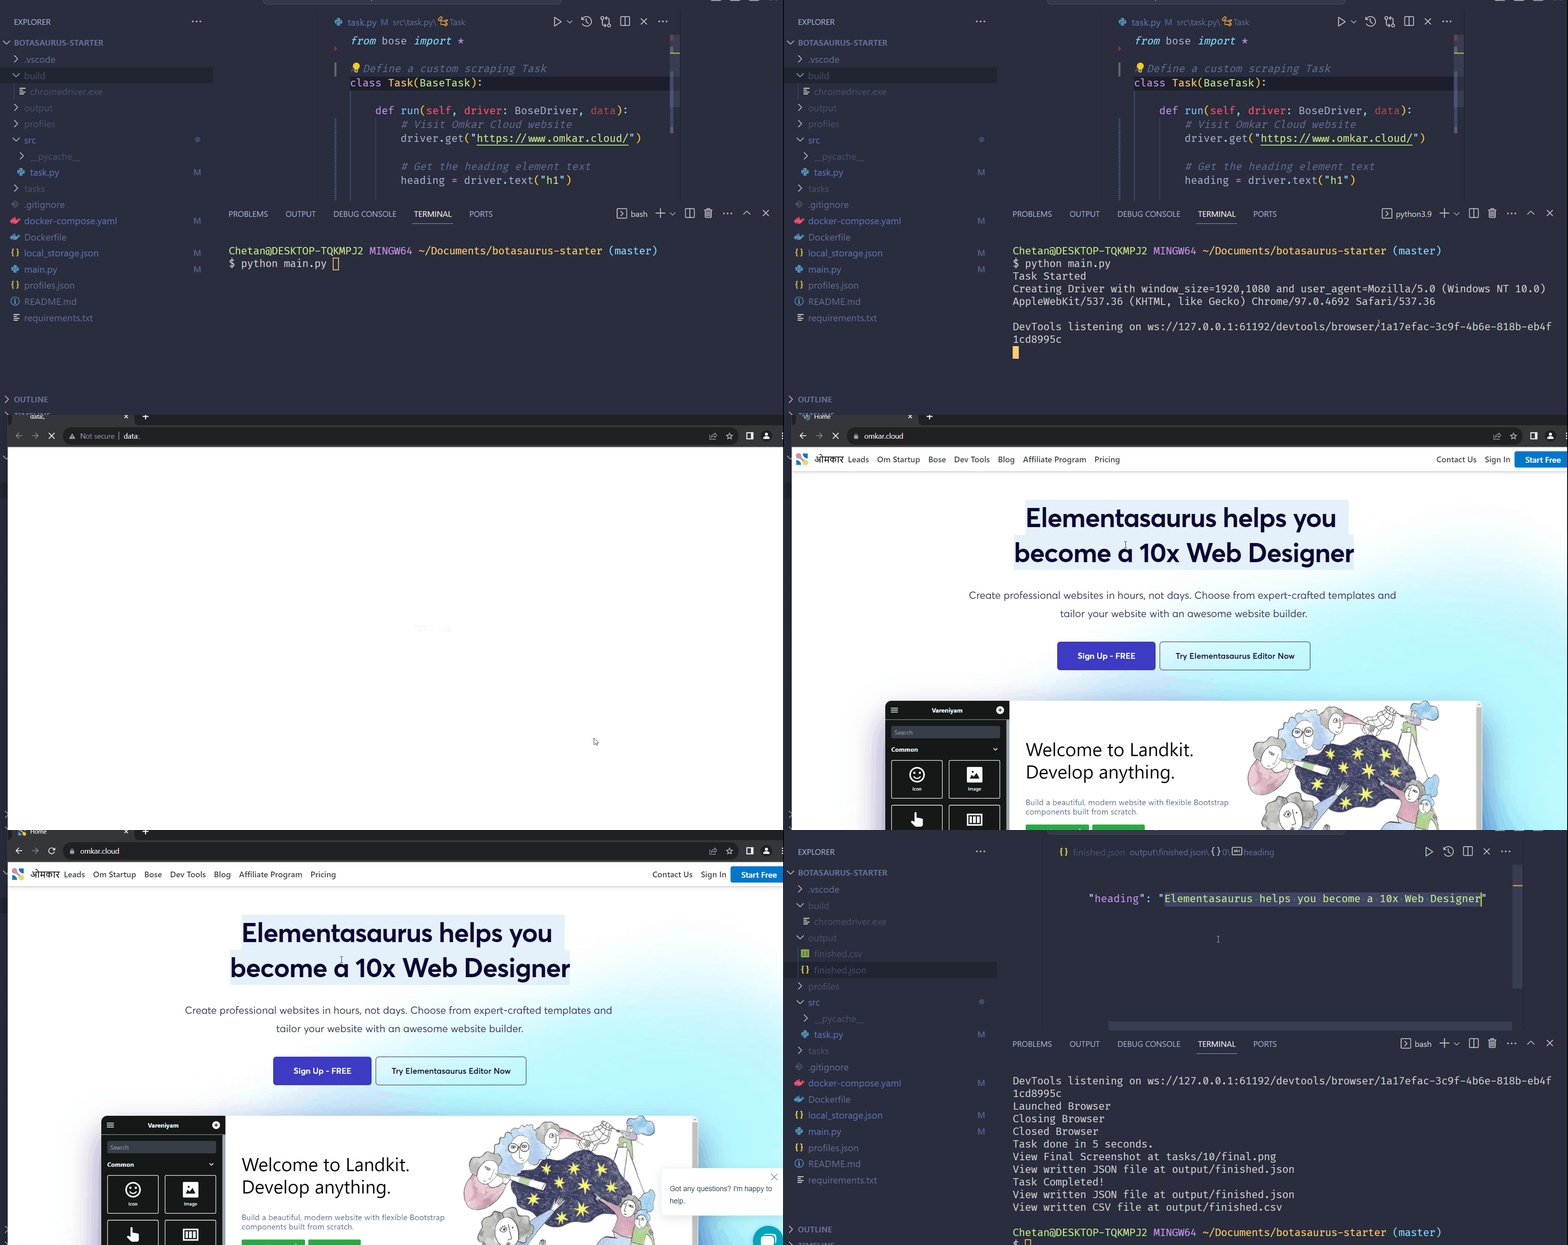
In this example, we will go through the steps to scrape the heading text from https://www.omkar.cloud/.
Step 1: Install Botasaurus
First things first, you need to install Botasaurus. Run the following command in your terminal:
python -m pip install botasaurus
Step 2: Set Up Your Botasaurus Project
Next, let's set up the project:
- Create a directory for your Botasaurus project and navigate into it:
mkdir my-botasaurus-project
cd my-botasaurus-project
code .  # This will open the project in VSCode if you have it installed
Step 3: Write the Scraping Code
Now, create a Python script named main.py in your project directory and paste the following code:
from botasaurus.browser import browser, Driver

@browser
def scrape_heading_task(driver: Driver, data):
    # Visit the Omkar Cloud website
    driver.get("https://www.omkar.cloud/")

    # Retrieve the heading element's text
    heading = driver.get_text("h1")

    # Save the data as a JSON file in output/scrape_heading_task.json
    return {
        "heading": heading
    }

# Initiate the web scraping task
scrape_heading_task()
Let's understand this code:
- We define a custom scraping task,
scrape_heading_task, decorated with@browser:
@browser
def scrape_heading_task(driver: Driver, data):
- Botasaurus automatically provides an Humane Driver to our function:
def scrape_heading_task(driver: Driver, data):
- Inside the function, we:
- Visit Omkar Cloud
- Extract the heading text
- Return the data to be automatically saved as
scrape_heading_task.jsonby Botasaurus:
    driver.get("https://www.omkar.cloud/")
    heading = driver.get_text("h1")
    return {"heading": heading}
- Finally, we initiate the scraping task:
# Initiate the web scraping task
scrape_heading_task()
Step 4: Run the Scraping Task
Time to run it:
python main.py
After executing the script, it will:
- Launch Google Chrome
- Visit omkar.cloud
- Extract the heading text
- Save it automatically as
output/scrape_heading_task.json.

Now, let's explore another way to scrape the heading using the request module. Replace the previous code in main.py with the following:
from botasaurus.request import request, Request
from botasaurus.soupify import soupify

@request
def scrape_heading_task(request: Request, data):
    # Visit the Omkar Cloud website
    response = request.get("https://www.omkar.cloud/")

    # Create a BeautifulSoup object
    soup = soupify(response)

    # Retrieve the heading element's text
    heading = soup.find('h1').get_text()

    # Save the data as a JSON file in output/scrape_heading_task.json
    return {
        "heading": heading
    }
# Initiate the web scraping task
scrape_heading_task()
In this code:
- We scrape the HTML using
request, which is specifically designed for making browser-like humane requests. - Next, we parse the HTML into a
BeautifulSoupobject usingsoupify()and extract the heading.
Step 5: Run the Scraping Task (which makes Humane HTTP Requests)
Finally, run it again:
python main.py
This time, you will observe the exact same result as before, but instead of opening a whole Browser, we are making browser-like humane HTTP requests.
💡 Understanding Botasaurus
What is Botasaurus Driver, And Why should I use it over Selenium and Playwright?
Botasaurus Driver is a web automation driver like Selenium, and the single most important reason to use it is because it is truly humane, and you will not, and I repeat NOT, have any issues with accessing any website.
Plus, it is super fast to launch and use, and the API is designed by and for web scrapers, and you will love it.
How do I access Cloudflare-protected pages using Botasaurus?
Cloudflare is the most popular protection system on the web. So, let's see how Botasaurus can help you solve various Cloudflare challenges.
Connection Challenge
This is the single most popular challenge and requires making a browser-like connection with appropriate headers. It's commonly used for:
- Product Pages
- Blog Pages
- Search Result Pages
Example Page: https://www.g2.com/products/github/reviews
What Works?
- Visiting the website via Google Referrer (which makes is seems as if the user has arrived from google search).
from botasaurus.browser import browser, Driver

@browser
def scrape_heading_task(driver: Driver, data):
    # Visit the website via Google Referrer
    driver.google_get("https://www.g2.com/products/github/reviews")
    driver.prompt()
    heading = driver.get_text('.product-head__title [itemprop="name"]')
    return heading

scrape_heading_task()
- Use the request module. The Request Object is smart and, by default, visits any link with a Google Referrer. Although it works, you will need to use retries.
from botasaurus.request import request, Request

@request(max_retry=10)
def scrape_heading_task(request: Request, data):
    response = request.get('https://www.g2.com/products/github/reviews')
    print(response.status_code)
    response.raise_for_status()
    return response.text

scrape_heading_task()
JS with Captcha Challenge
This challenge requires performing JS computations that differentiate a Chrome controlled by Selenium/Puppeteer/Playwright from a real Chrome. It also involves solving a Captcha. It's used to for pages which are rarely but sometimes visited by people, like:
- 5th Review page
- Auth pages
Example Page: https://www.g2.com/products/github/reviews.html?page=5&product_id=github
What Does Not Work?
Using @request does not work because although it can make browser-like HTTP requests, it cannot run JavaScript to solve the challenge.
What Works?
Pass the bypass_cloudflare=True argument to the google_get method.
from botasaurus.browser import browser, Driver

@browser
def scrape_heading_task(driver: Driver, data):
    driver.google_get("https://www.g2.com/products/github/reviews.html?page=5&product_id=github", bypass_cloudflare=True)
    driver.prompt()
    heading = driver.get_text('.product-head__title [itemprop="name"]')
    return heading

scrape_heading_task()
What are the benefits of a UI Scraper?
Here are some benefits of creating a scraper with a user interface:
- Simplify your scraper usage for customers, eliminating the need to teach them how to modify and run your code.
- Protect your code by hosting the scraper on the web and offering a monthly subscription, rather than providing full access to your code. This approach:
- Safeguards your Python code from being copied and reused, increasing your customer's lifetime value.
- Generate monthly recurring revenue via subscription from your customers, surpassing a one-time payment.
- Enable sorting, filtering, and downloading of data in various formats (JSON, Excel, CSV, etc.).
- Provide access via a REST API for seamless integration.
- Create a polished frontend, backend, and API integration with minimal code.
How to run a UI-based scraper?
Let's run the Botasaurus Starter Template (the recommended template for greenfield Botasaurus projects), which scrapes the heading of the provided link by following these steps:
-
Clone the Starter Template:
git clone https://github.com/omkarcloud/botasaurus-starter my-botasaurus-project cd my-botasaurus-project -
Install dependencies (will take a few minutes):
python -m pip install -r requirements.txt python run.py install -
Run the scraper:
python run.py
Your browser will automatically open up at http://localhost:3000/. Then, enter the link you want to scrape (e.g., https://www.omkar.cloud/) and click on the Run Button.
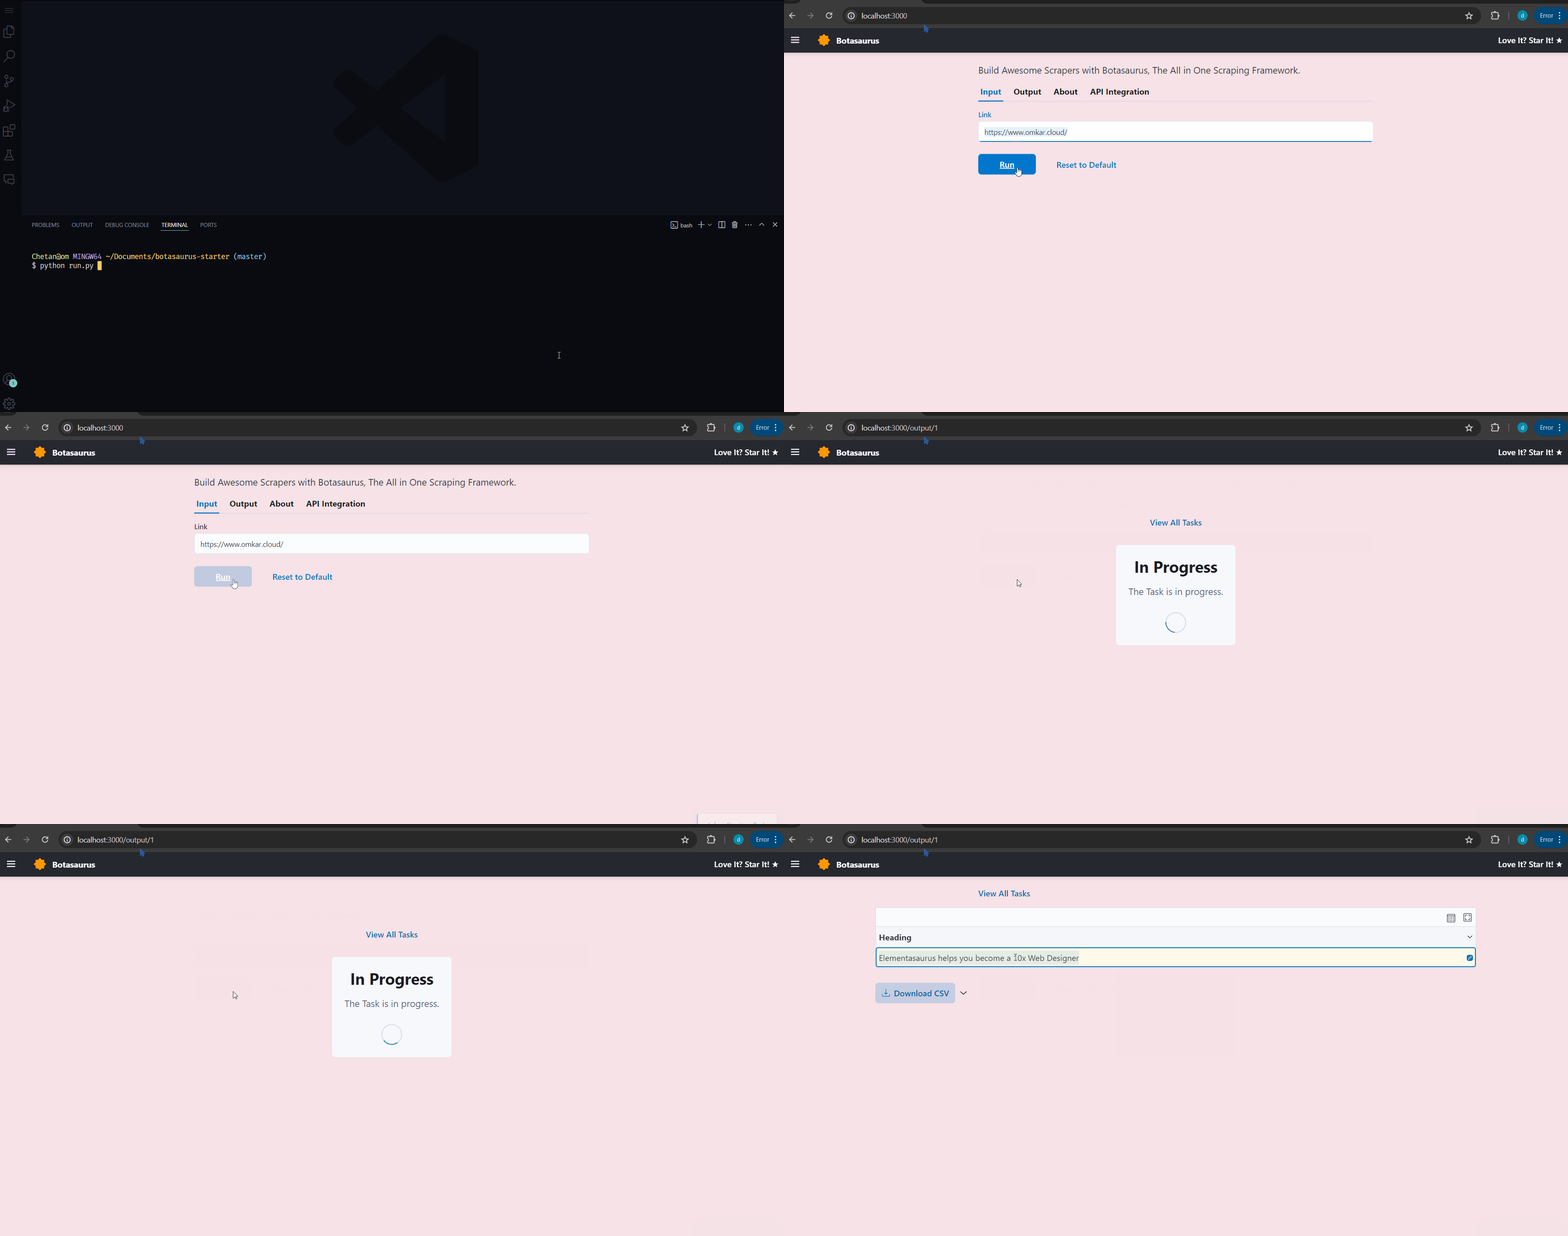
After some seconds, the data will be scraped.
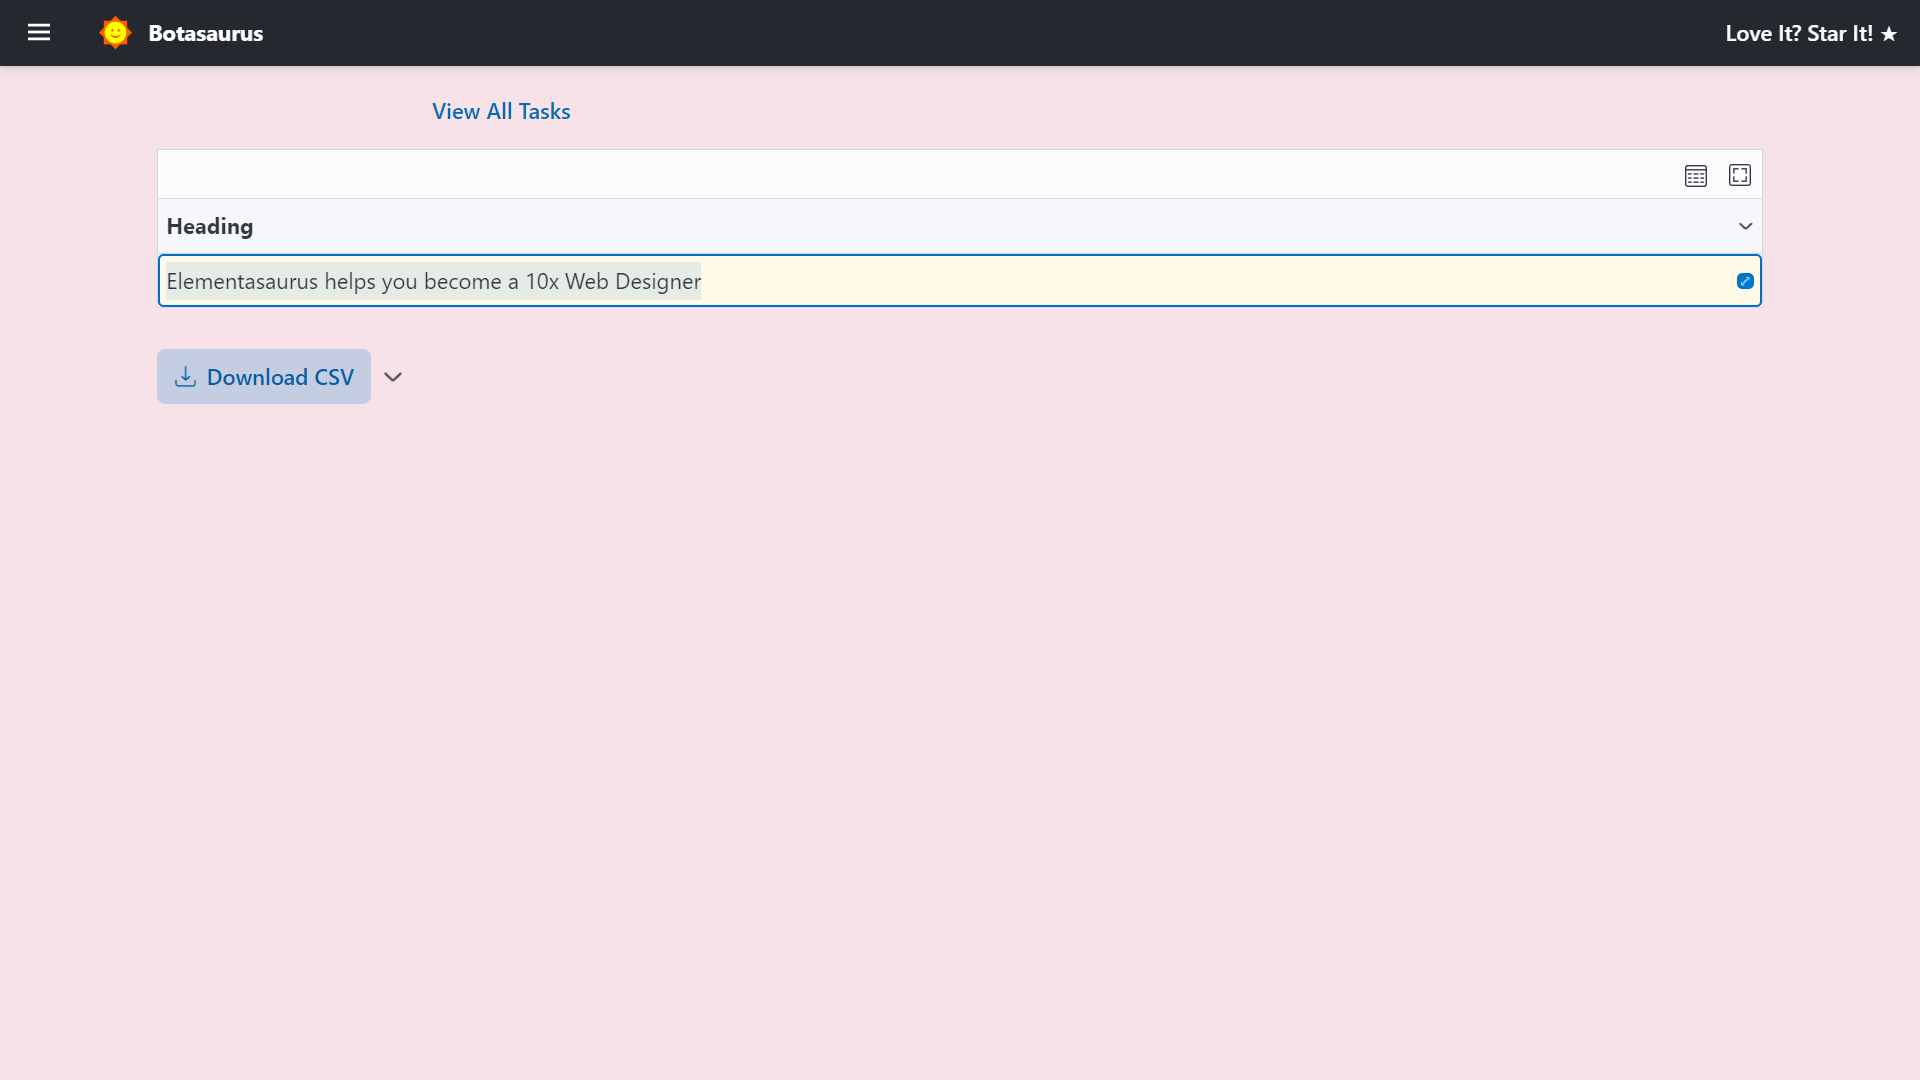
Visit http://localhost:3000/output to see all the tasks you have started.
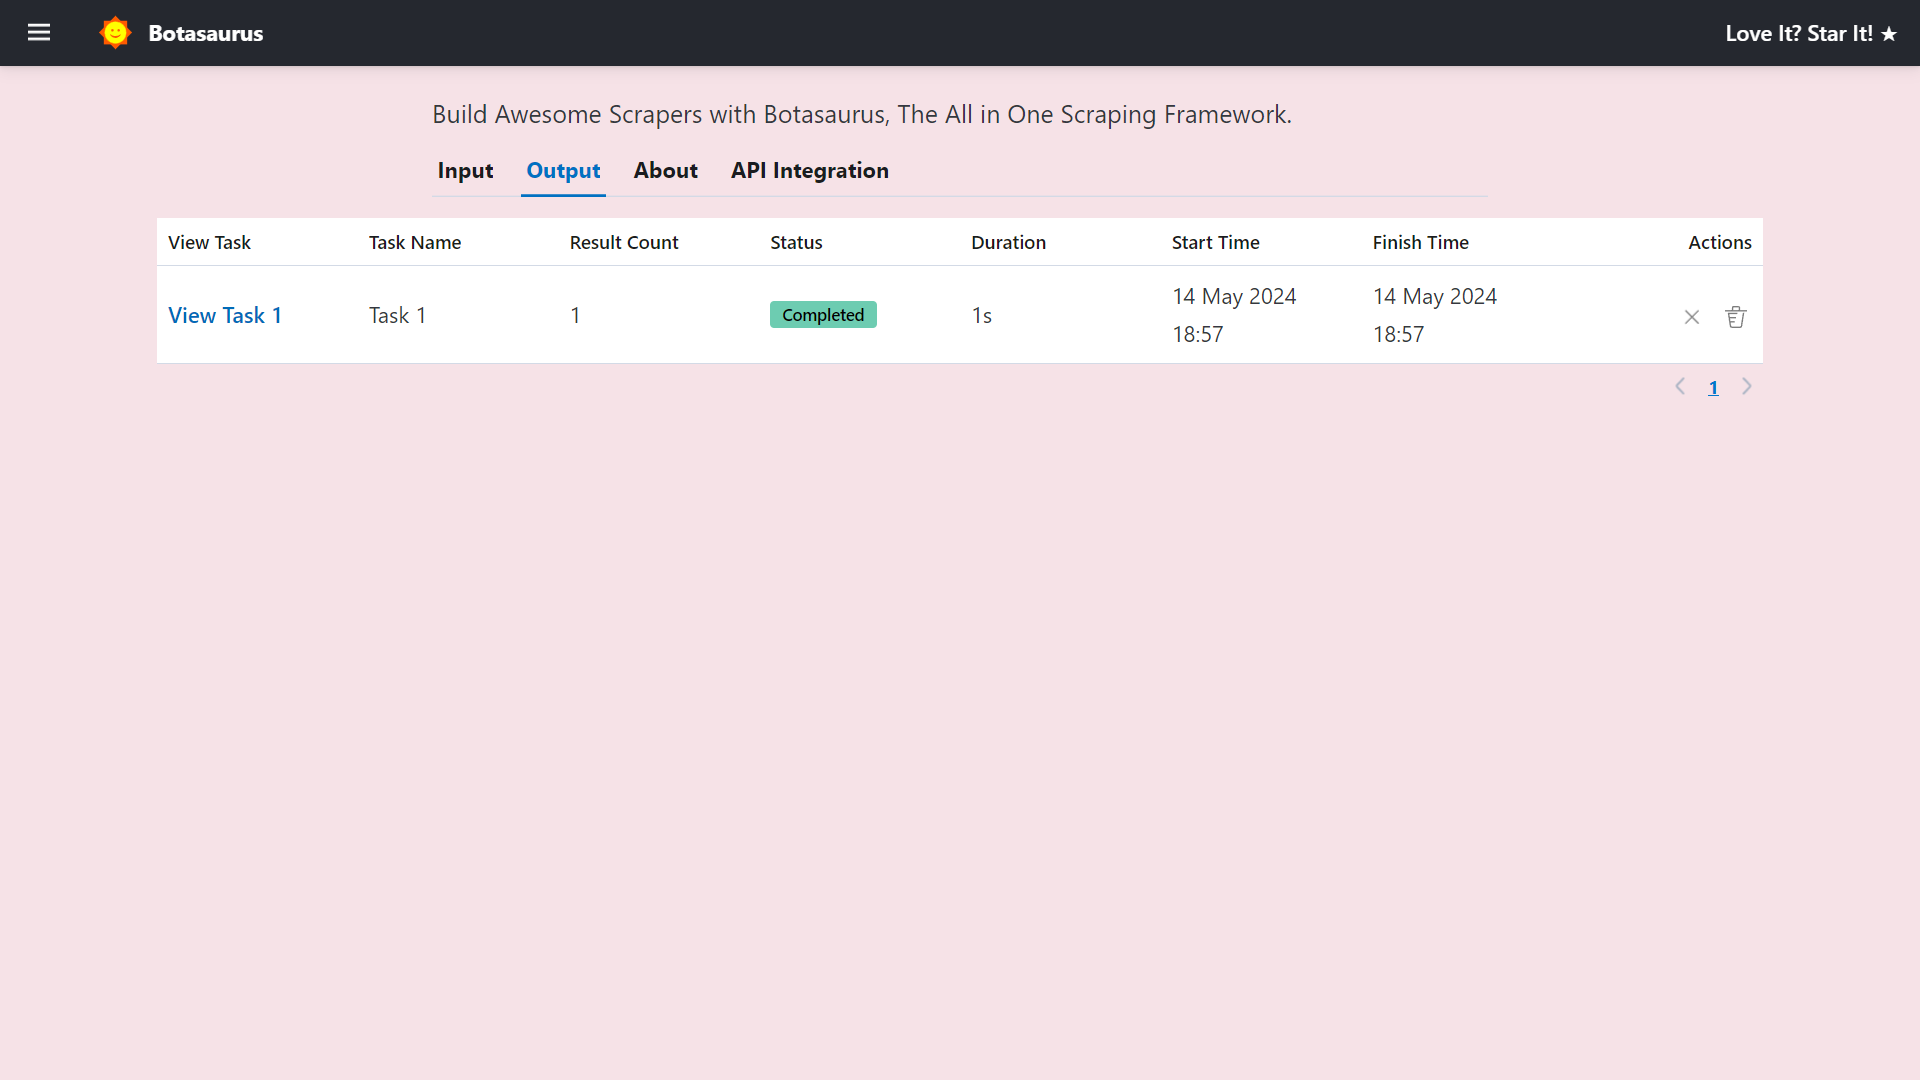
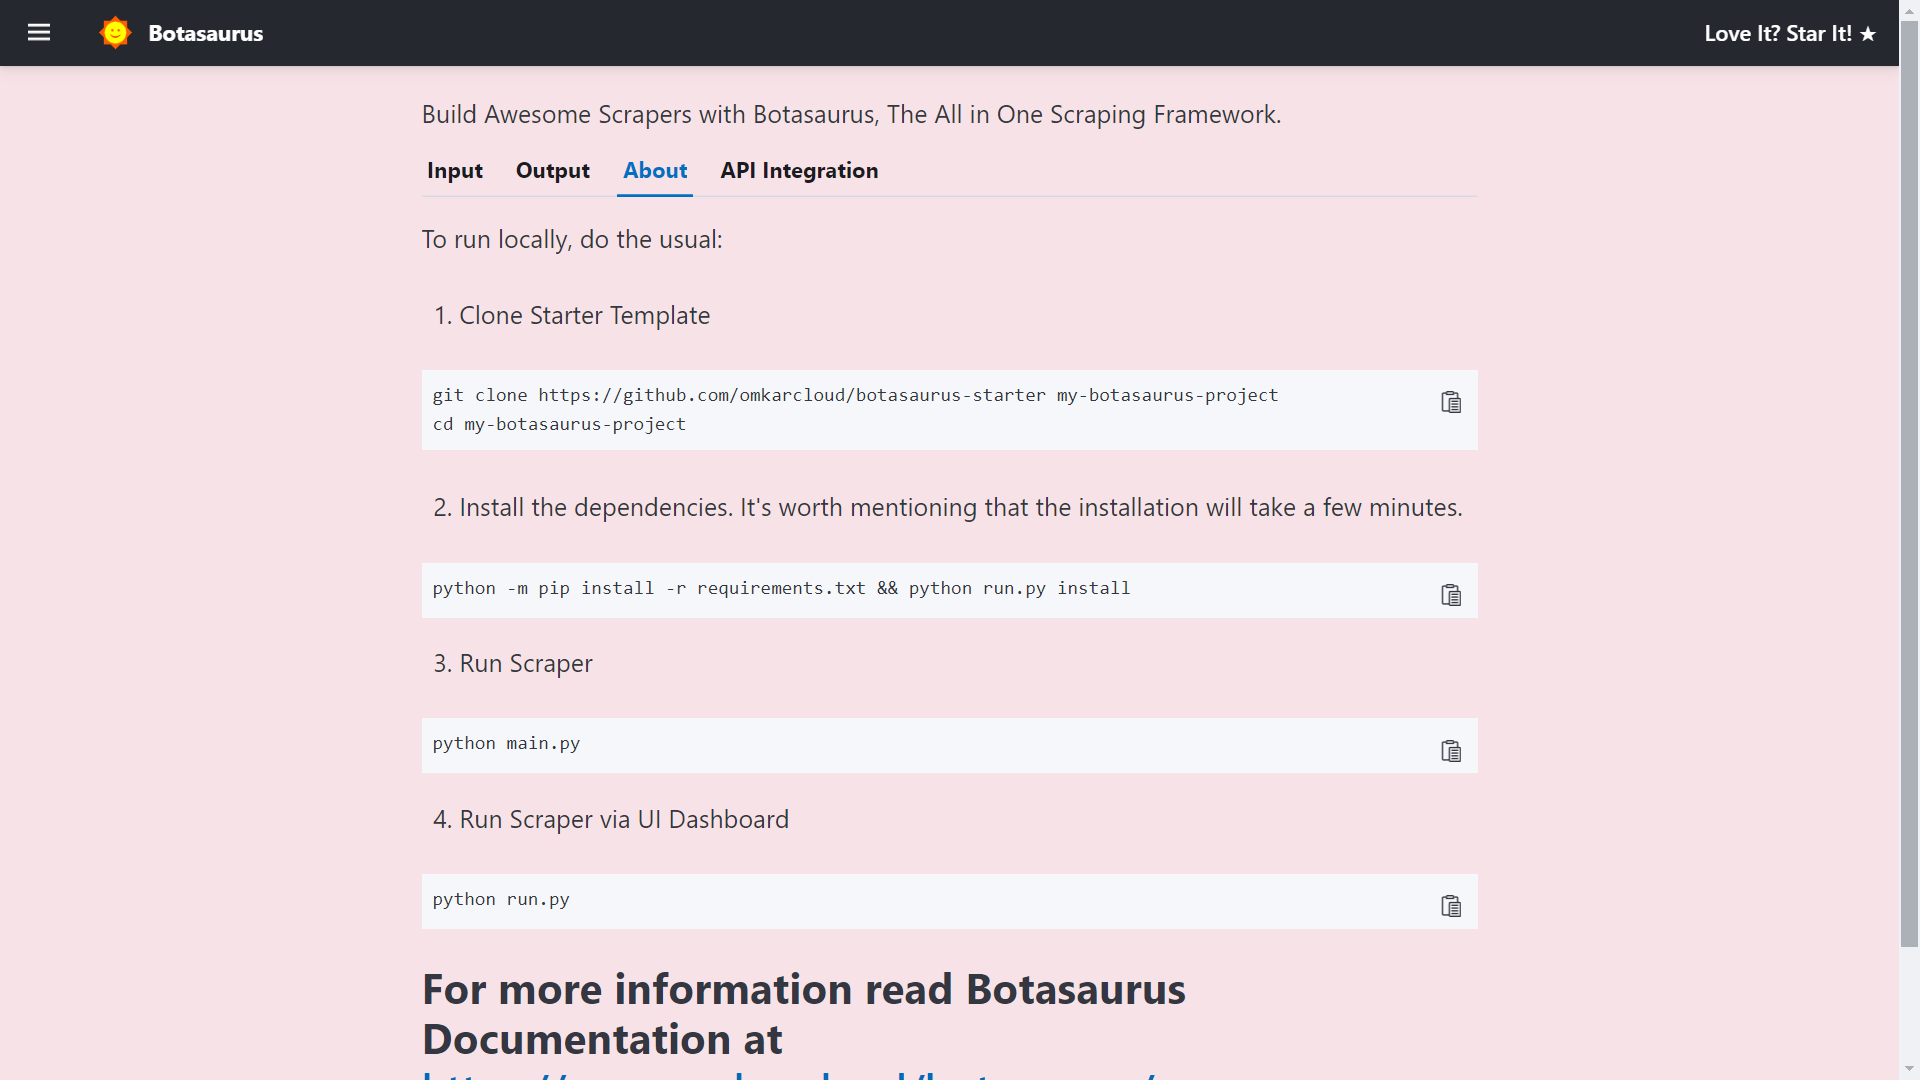
Go to http://localhost:3000/about to see the rendered README.md file of the project.
Finally, visit http://localhost:3000/api-integration to see how to access the Scraper via API.
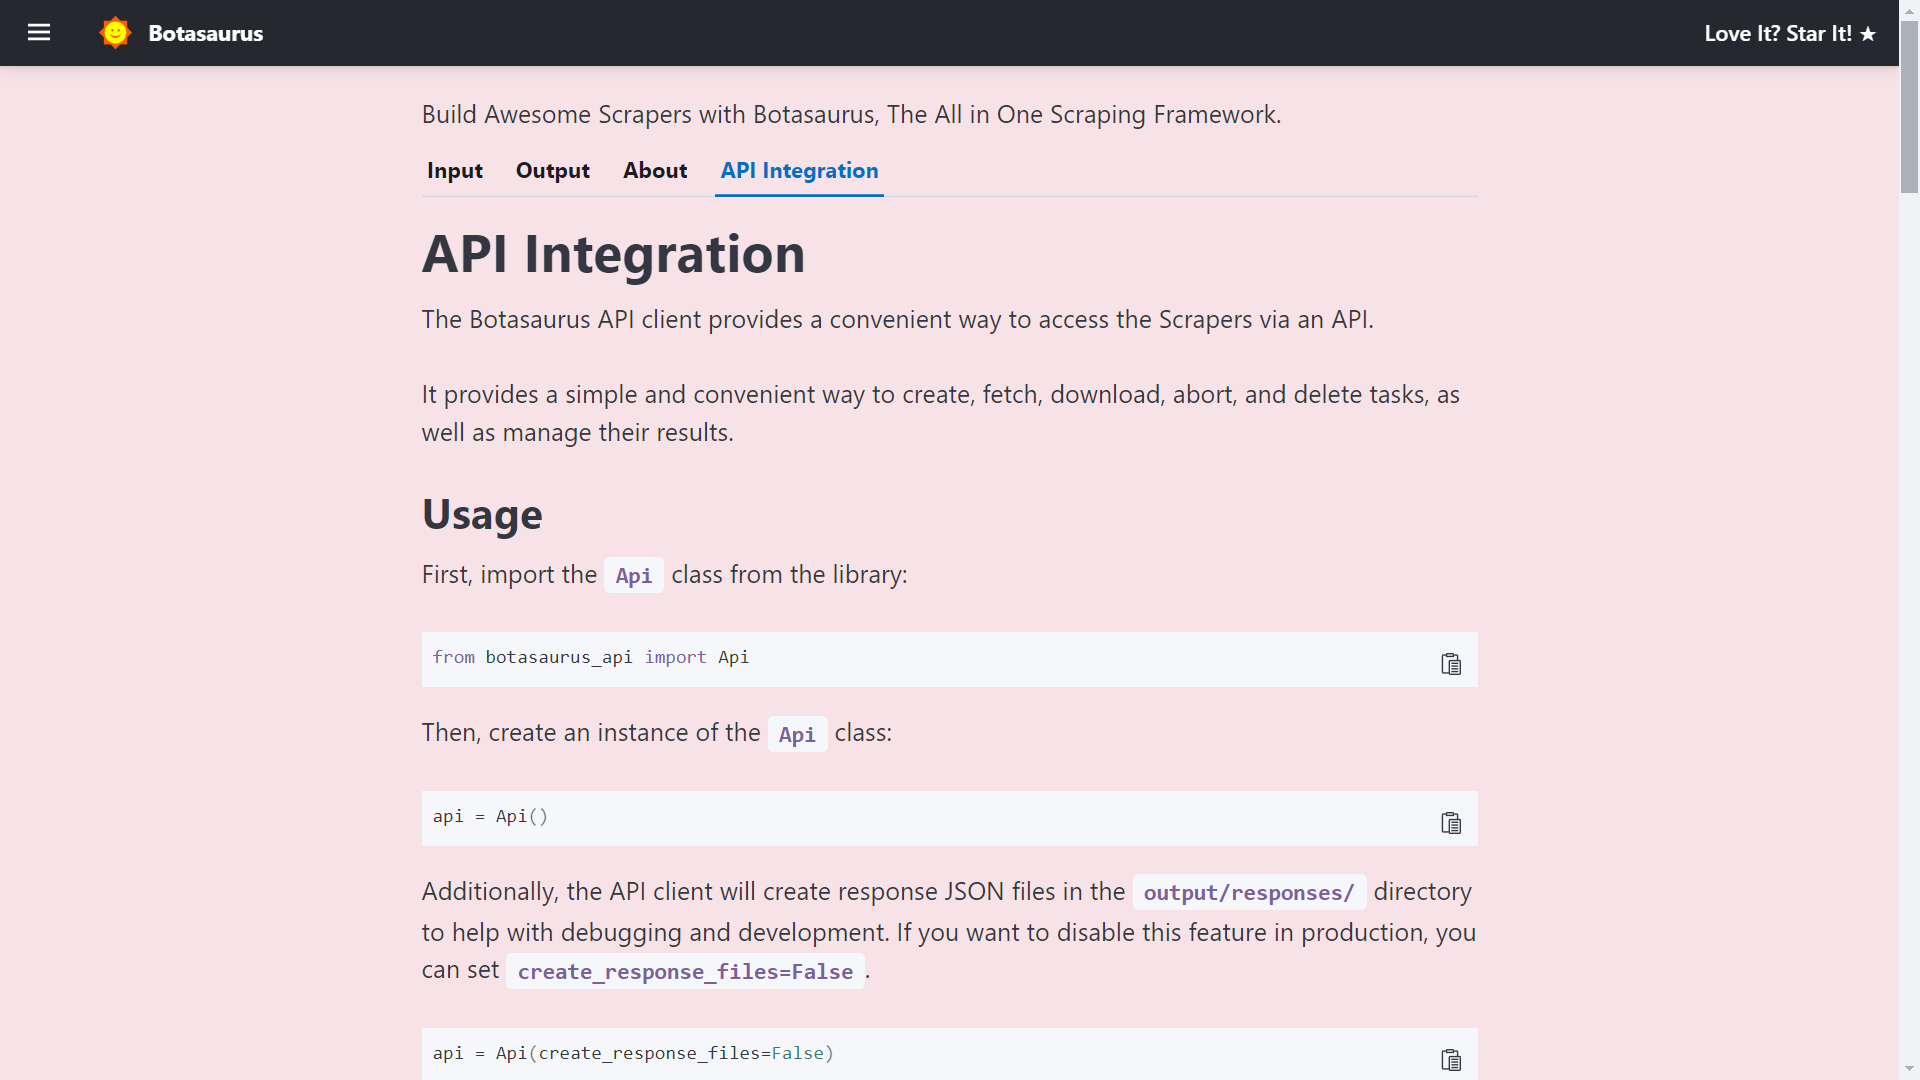
The API Documentation is generated dynamically based on your Scraper's Inputs, Sorts, Filters, etc., and is unique to your Scraper.
So, whenever you need to run the Scraper via API, visit this tab and copy the code specific to your Scraper.
How to create a UI Scraper using Botasaurus?
Creating a UI Scraper with Botasaurus is a simple 3-step process:
- Create your Scraper function
- Add the Scraper to the Server using 1 line of code
- Define the input controls for the Scraper
To understand these steps, let's go through the code of the Botasaurus Starter Template that you just ran.
Step 1: Create the Scraper Function
In src/scrape_heading_task.py, we define a scraping function which basically does the following:
- Receives a
dataobject and extracts the "link". - Retrieves the HTML content of the webpage using the "link".
- Converts the HTML into a BeautifulSoup object.
- Locates the heading element, extracts its text content and returns it.
from botasaurus.request import request, Request
from botasaurus.soupify import soupify

@request
def scrape_heading_task(request: Request, data):
    # Visit the Link
    response = request.get(data["link"])

    # Create a BeautifulSoup object
    soup = soupify(response)

    # Retrieve the heading element's text
    heading = soup.find('h1').get_text()

    # Save the data as a JSON file in output/scrape_heading_task.json
    return {
        "heading": heading
    }
Step 2: Add the Scraper to the Server
In backend/scrapers.py, we:
- Import our scraping function
- Use
Server.add_scraper()to register the scraper
from botasaurus_server.server import Server
from src.scrape_heading_task import scrape_heading_task

# Add the scraper to the server
Server.add_scraper(scrape_heading_task)
Step 3: Define the Input Controls
In backend/inputs/scrape_heading_task.js we:
- Define a
getInputfunction that takes the controls parameter - Add a link input control to it
- Use comments to enable intellisense in VSCode (Very Very Important)
/**
 * @typedef {import('../../frontend/node_modules/botasaurus-controls/dist/index').Controls} Controls
 */

/**
 * @param {Controls} controls
 */
function getInput(controls) {
    controls
        // Render a Link Input, which is required, defaults to "https://www.omkar.cloud/".
        .link('link', { isRequired: true, defaultValue: "https://www.omkar.cloud/" })
}
Above was a simple example; below is a real-world example with multi-text, number, switch, select, section, and other controls.
/**
 * @typedef {import('../../frontend/node_modules/botasaurus-controls/dist/index').Controls} Controls
 */


/**
 * @param {Controls} controls
 */
function getInput(controls) {
    controls
        .listOfTexts('queries', {
            defaultValue: ["Web Developers in Bangalore"],
            placeholder: "Web Developers in Bangalore",
            label: 'Search Queries',
            isRequired: true
        })
        .section("Email and Social Links Extraction", (section) => {
            section.text('api_key', {
                placeholder: "2e5d346ap4db8mce4fj7fc112s9h26s61e1192b6a526af51n9",
                label: 'Email and Social Links Extraction API Key',
                helpText: 'Enter your API key to extract email addresses and social media links.',
            })
        })
        .section("Reviews Extraction", (section) => {
            section
                .switch('enable_reviews_extraction', {
                    label: "Enable Reviews Extraction"
                })
                .numberGreaterThanOrEqualToZero('max_reviews', {
                    label: 'Max Reviews per Place (Leave empty to extract all reviews)',
                    placeholder: 20,
                    isShown: (data) => data['enable_reviews_extraction'], defaultValue: 20,
                })
                .choose('reviews_sort', {
                    label: "Sort Reviews By",
                    isRequired: true, isShown: (data) => data['enable_reviews_extraction'], defaultValue: 'newest', options: [{ value: 'newest', label: 'Newest' }, { value: 'most_relevant', label: 'Most Relevant' }, { value: 'highest_rating', label: 'Highest Rating' }, { value: 'lowest_rating', label: 'Lowest Rating' }]
                })
        })
        .section("Language and Max Results", (section) => {
            section
                .addLangSelect()
                .numberGreaterThanOrEqualToOne('max_results', {
                    placeholder: 100,
                    label: 'Max Results per Search Query (Leave empty to extract all places)'
                })
        })
        .section("Geo Location", (section) => {
            section
                .text('coordinates', {
                    placeholder:
编辑推荐精选


酷表ChatExcel
大模型驱动的Excel数据处理工具
基于大模型交互的表格处理系统,允许用户通过对话方式完成数据整理和可视化分析。系统采用机器学习算法解析用户指令,自动执行排序、公式计算和数据透视等操作,支持多种文件格式导入导出。数据处理响应速度保持在0.8秒以内,支持超过100万行数据的即时分析。


DeepEP
DeepSeek开源的专家并行通信优化框架
DeepEP是一个专为大规模分布式计算设计的通信库,重点解决专家并行模式中的通信瓶颈问题。其核心架构采用分层拓扑感知技术,能够自动识别节点间物理连接关系,优化数据传输路径。通过实现动态路由选择与负载均衡机制,系统在千卡级计算集群中维持稳定的低延迟特性,同时兼容主流深度学习框架的通信接口。


DeepSeek
全球领先开源大模型,高效智能助手
DeepSeek是一家幻方量化创办的专注于通用人工智能的中国科技公司,主攻大模型研发与应用。DeepSeek-R1是开源的推理模型,擅长处理复杂任务且可免费商用。


问小白
DeepSeek R1 满血模型上线
问小白是一个基于 DeepSeek R1 模型的智能对话平台,专为用户提供高效、贴心的对话体验。实时在线,支持深度思考和联网搜索。免费不限次数,帮用户写作、创作、分析和规划,各种任务随时完成!


KnowS
AI医学搜索引擎 整合4000万+实时更新的全球医学文献
医学领域专用搜索引擎整合4000万+实时更新的全球医学文献,通过自主研发AI模型实现精准知识检索。系统每日更新指南、中英文文献及会议资料,搜索准确率较传统工具提升80%,同时将大模型幻觉率控制在8%以下。支持临床建议生成、文献深度解析、学术报告制作等全流程科研辅助,典型用户反馈显示每周可节省医疗工作者70%时间。


Windsurf Wave 3
Windsurf Editor推出第三次重大更新Wave 3
新增模型上下文协议支持与智能编辑功能。本次更新包含五项核心改进:支持接入MCP协议扩展工具生态,Tab键智能跳转提升编码效率,Turbo模式实现自动化终端操作,图片拖拽功能优化多模态交互,以及面向付费用户的个性化图标定制。系统同步集成DeepSeek、Gemini等新模型,并通过信用点数机制实现差异化的资源调配。


腾讯元宝
腾讯自研的混元大模型AI助手
腾讯元宝是腾讯基于自研的混元大模型推出的一款多功能AI应用,旨在通过人工智能技术提升用户在写作、绘画、翻译、编程、搜索、阅读总结等多个领域的工作与生活效率。


Grok3
埃隆·马斯克旗下的人工智能公司 xAI 推出的第三代大规模语言模型
Grok3 是由埃隆·马斯克旗下的人工智能公司 xAI 推出的第三代大规模语言模型,常被马斯克称为“地球上最聪明的 AI”。它不仅是在前代产品 Grok 1 和 Grok 2 基础上的一次飞跃,还在多个关键技术上实现了创新突破。


OmniParser
帮助AI理解电脑屏幕 纯视觉GUI元素的自动化解析方案
开源工具通过计算机视觉技术实现图形界面元素的智能识别与结构化处理,支持自动化测试脚本生成和辅助功能开发。项目采用模块化设计,提供API接口与多种输出格式,适用于跨平台应用场景。核心算法优化了元素定位精度,在动态界面和复杂布局场景下保持稳定解析能力。


流畅阅读
AI网页翻译插件 双语阅读工具,还原母语级体验
流畅阅读是一款浏览器翻译插件,通过上下文智能分析提升翻译准确性,支持中英双语对照显示。集成多翻译引擎接口,允许用户自定义翻译规则和快捷键配置,操作数据全部存储在本地设备保障隐私安全。兼容Chrome、Edge、Firefox等主流浏览器,基于GPL-3.0开源协议开发,提供持续的功能迭代和社区支持。
推荐工具精选
AI云服务特惠
懂AI专属折扣关注微信公众号
最新AI工具、AI资讯
独家AI资源、AI项目落地

微信扫一扫关注公众号


