GitHub520
😘 让你"爱"上 GitHub,解决访问时图片加载失败、加载慢的问题。
服务器已续费到 2024年12月,共花费:1500多元💰 点击扫码赞助,感谢🙏
一、简介
对 GitHub 说"爱"太难了:访问慢、图片加载不出来。
本项目无需安装任何程序,仅需 5 分钟。
通过修改本地 hosts 文件,尝试解决:
- GitHub 访问速度慢的问题
- GitHub 项目中的图片显示不出的问题
让你"爱"上 GitHub。
注: 本项目仍处于测试阶段,仅在本机测试通过,如有问题欢迎提 issues
二、使用方法
以下地址无需访问 GitHub 即可获取最新的 hosts 内容:
- 文件:
https://raw.hellogithub.com/hosts - JSON:
https://raw.hellogithub.com/hosts.json
2.1 手动方式
2.1.1 复制以下内容
# GitHub520 Host Start
140.82.112.25                 alive.github.com
140.82.114.5                  api.github.com
185.199.110.153               assets-cdn.github.com
185.199.111.133               avatars.githubusercontent.com
185.199.108.133               avatars0.githubusercontent.com
185.199.111.133               avatars1.githubusercontent.com
185.199.111.133               avatars2.githubusercontent.com
185.199.111.133               avatars3.githubusercontent.com
185.199.111.133               avatars4.githubusercontent.com
185.199.111.133               avatars5.githubusercontent.com
185.199.111.133               camo.githubusercontent.com
140.82.114.22                 central.github.com
185.199.111.133               cloud.githubusercontent.com
140.82.112.10                 codeload.github.com
140.82.114.21                 collector.github.com
185.199.111.133               desktop.githubusercontent.com
185.199.109.133               favicons.githubusercontent.com
140.82.112.3                  gist.github.com
52.217.140.9                  github-cloud.s3.amazonaws.com
3.5.27.60                     github-com.s3.amazonaws.com
52.217.236.185                github-production-release-asset-2e65be.s3.amazonaws.com
54.231.162.49                 github-production-repository-file-5c1aeb.s3.amazonaws.com
52.217.166.145                github-production-user-asset-6210df.s3.amazonaws.com
192.0.66.2                    github.blog
140.82.112.3                  github.com
140.82.114.17                 github.community
185.199.110.154               github.githubassets.com
151.101.193.194               github.global.ssl.fastly.net
185.199.109.153               github.io
185.199.111.133               github.map.fastly.net
185.199.110.153               githubstatus.com
140.82.112.26                 live.github.com
185.199.111.133               media.githubusercontent.com
185.199.111.133               objects.githubusercontent.com
13.107.42.16                  pipelines.actions.githubusercontent.com
185.199.108.133               raw.githubusercontent.com
185.199.111.133               user-images.githubusercontent.com
140.82.113.21                 education.github.com
185.199.108.133               private-user-images.githubusercontent.com


# 更新时间:2024-08-17T20:07:06+08:00
# 更新地址:https://raw.hellogithub.com/hosts
# 关注项目:https://github.com/521xueweihan/GitHub520
# GitHub520 Host End
该内容会自动定时更新,数据更新时间:2024-08-17T20:07:06+08:00
2.1.2 修改 hosts 文件
hosts 文件在各系统中的位置如下:
- Windows 系统:
C:\Windows\System32\drivers\etc\hosts - Linux 系统:
/etc/hosts - Mac(苹果电脑)系统:
/etc/hosts - Android(安卓)系统:
/system/etc/hosts - iPhone(iOS)系统:
/etc/hosts
修改方法,将第一步的内容复制到文本末尾:
- Windows 使用记事本。
- Linux、Mac 使用 Root 权限:
sudo vi /etc/hosts。 - iPhone、iPad 需要越狱、Android 需要 root。
2.1.3 使更改生效
大多数情况下会立即生效,如未生效可尝试以下办法刷新 DNS:
-
Windows:在 CMD 窗口输入:
ipconfig /flushdns -
Linux 命令:
sudo nscd restart,如报错则需安装:sudo apt install nscd或sudo /etc/init.d/nscd restart -
Mac 命令:
sudo killall -HUP mDNSResponder
提示: 如上述方法无效,可尝试重启设备。
2.2 自动方式(SwitchHosts)
提示:推荐使用 SwitchHosts 工具管理 hosts
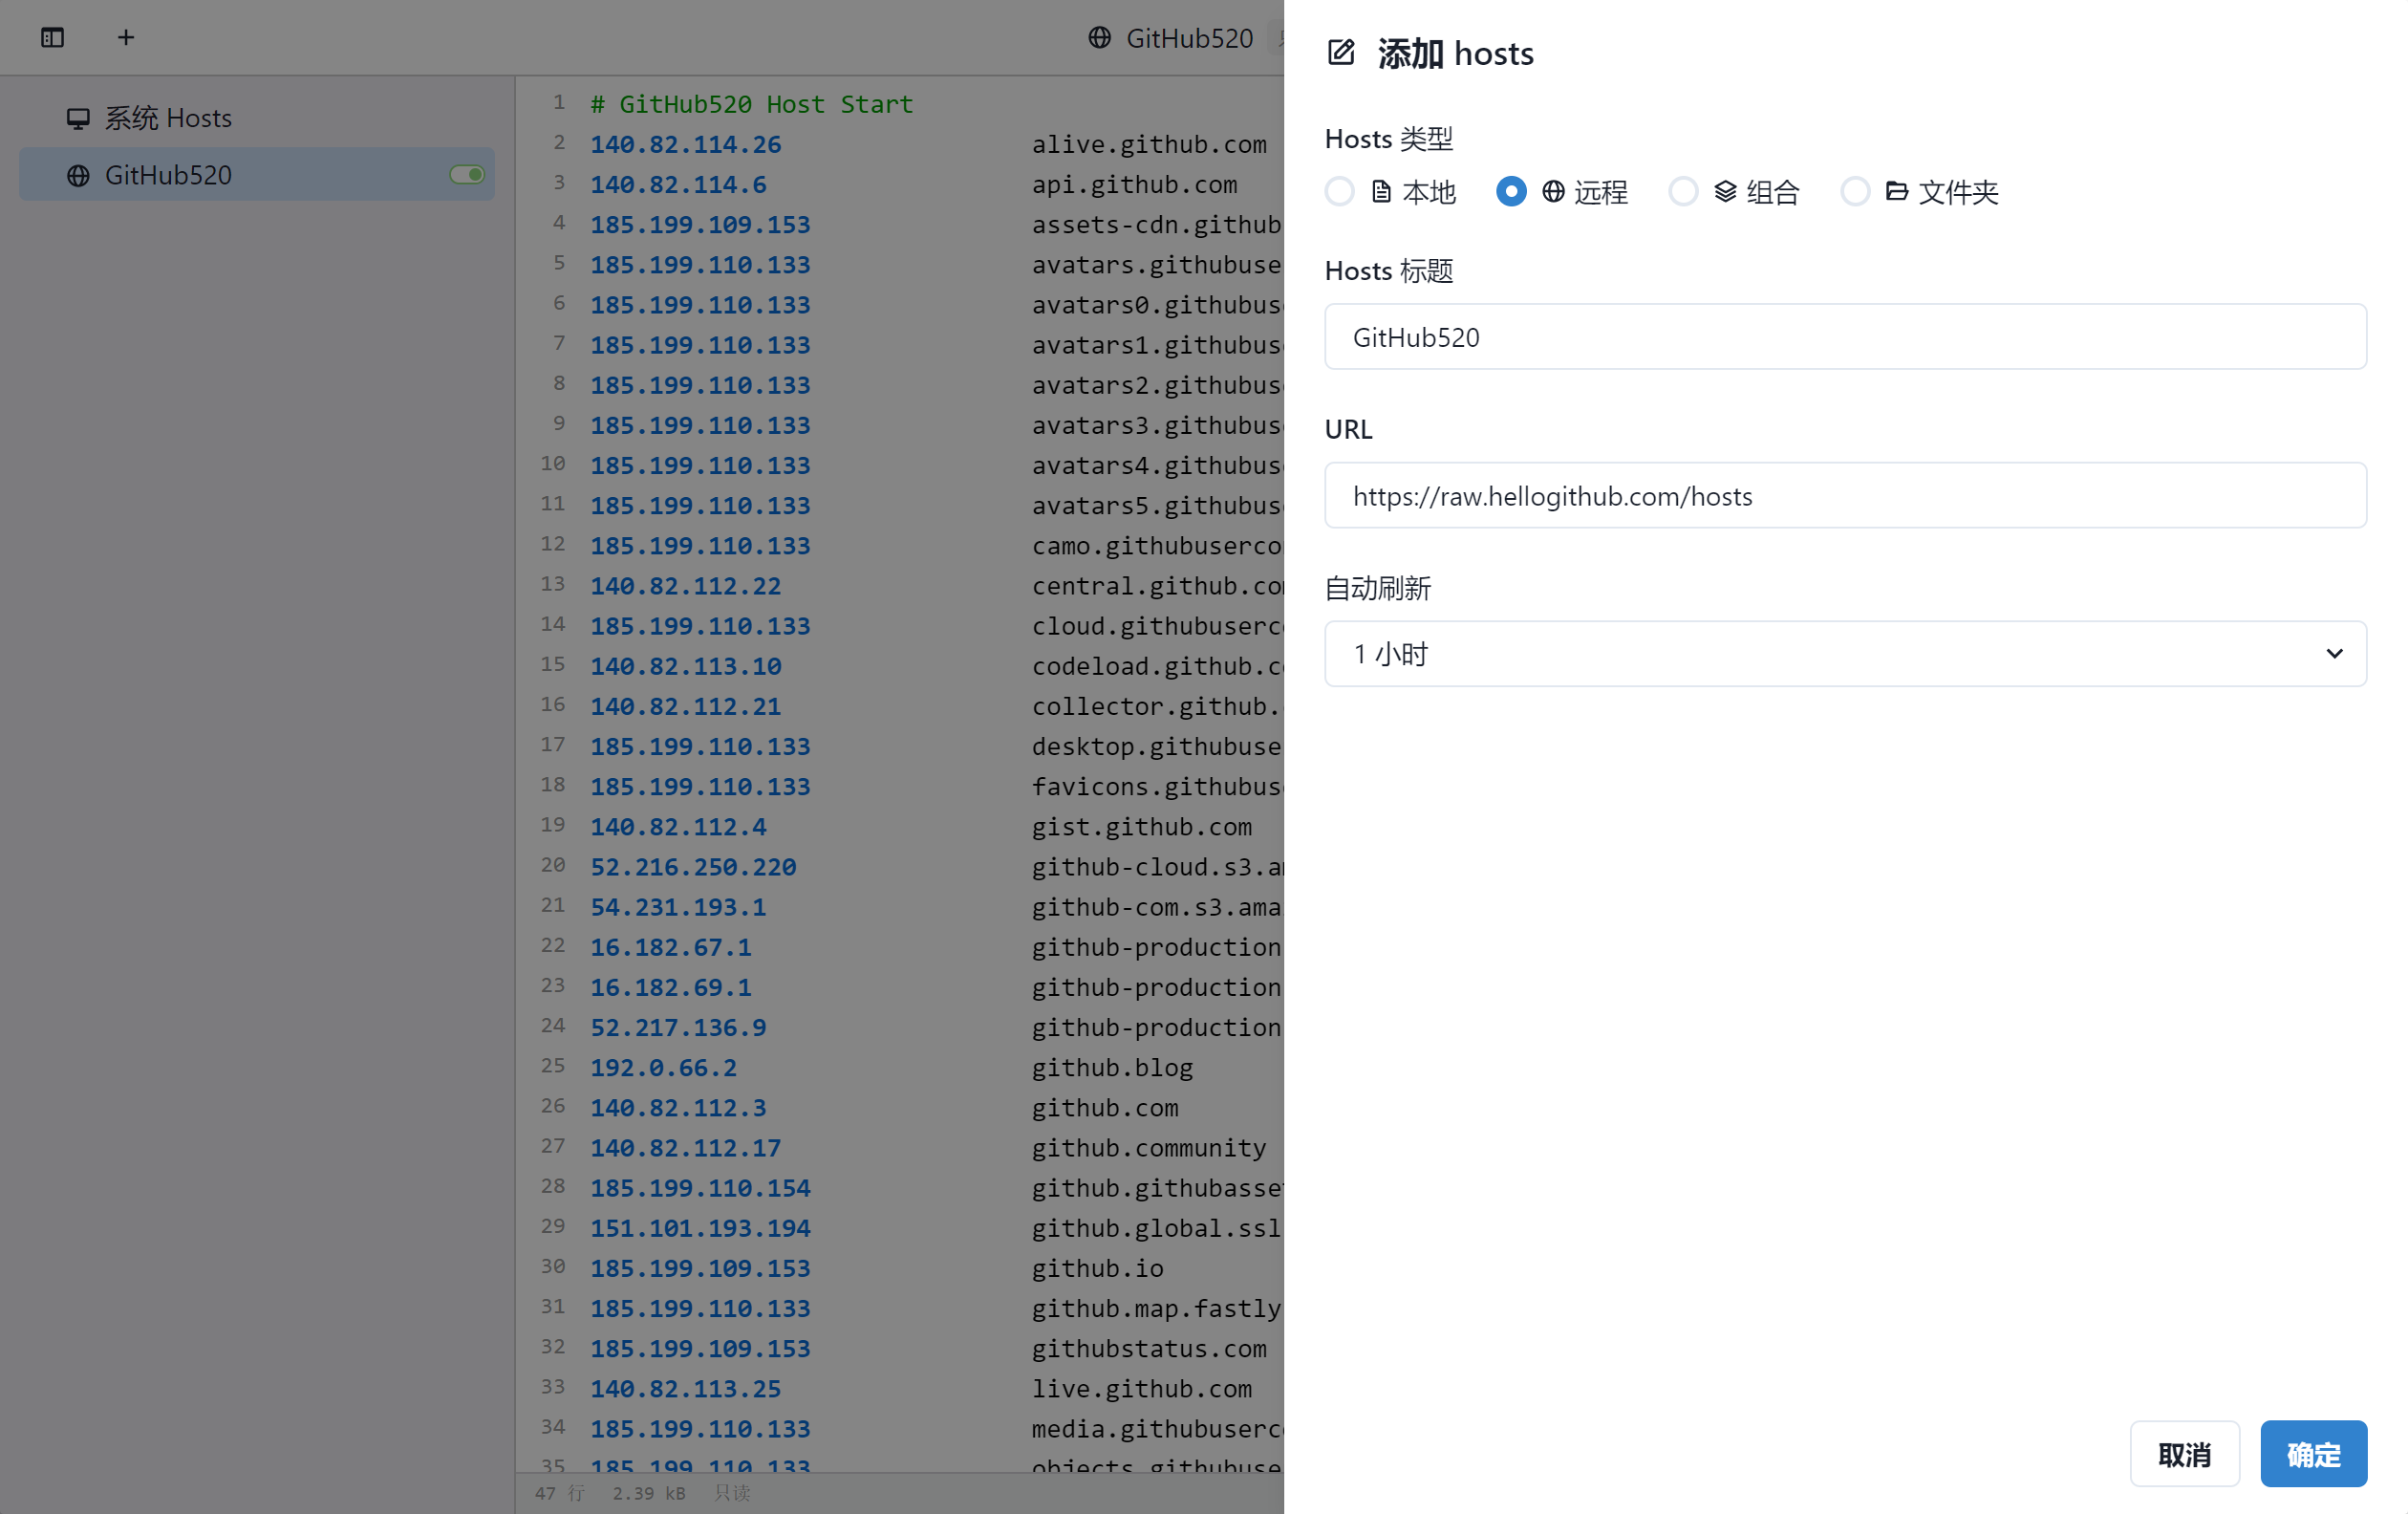
以 SwitchHosts 为例,看一下如何使用,配置参考如下:
-
Hosts 类型:
Remote -
Hosts 标题: 随意
-
URL:
https://raw.hellogithub.com/hosts -
自动刷新: 建议选择
1 小时
如图所示:

这样每次hosts有更新时都能及时进行更新,省去手动更新的麻烦。
2.3 一行命令
Windows
使用命令需要安装git bash 复制以下命令保存到本地,命名为fetch_github_hosts
_hosts=$(mktemp /tmp/hostsXXX)
hosts=/c/Windows/System32/drivers/etc/hosts
remote=https://raw.hellogithub.com/hosts
reg='/# GitHub520 Host Start/,/# Github520 Host End/d'

sed "$reg" $hosts > "$_hosts"
curl "$remote" >> "$_hosts"
cat "$_hosts" > "$hosts"

rm "$_hosts"
在CMD中执行以下命令,执行前需要将git-bash.exe和fetch_github_hosts替换为你本地的路径,注意前者为Windows路径格式,后者为shell路径格式
"C:\Program Files\Git\git-bash.exe" -c "/c/Users/XXX/fetch_github_hosts"
可以将上述命令添加到Windows的任务计划程序中以定时执行
GNU(Ubuntu/CentOS/Fedora)
sudo sh -c 'sed -i "/# GitHub520 Host Start/Q" /etc/hosts && curl https://raw.hellogithub.com/hosts >> /etc/hosts'
BSD/macOS
sudo sed -i "" "/# GitHub520 Host Start/,/# Github520 Host End/d" /etc/hosts && curl https://raw.hellogithub.com/hosts | sudo tee -a /etc/hosts
将上面的命令添加到cron,可定时执行。使用前确保GitHub520内容在该文件最后部分。
在Docker中运行,若遇到Device or resource busy错误,可使用以下命令执行
cp /etc/hosts ~/hosts.new && sed -i "/# GitHub520 Host Start/Q" ~/hosts.new && curl https://raw.hellogithub.com/hosts >> ~/hosts.new && cp -f ~/hosts.new /etc/hosts
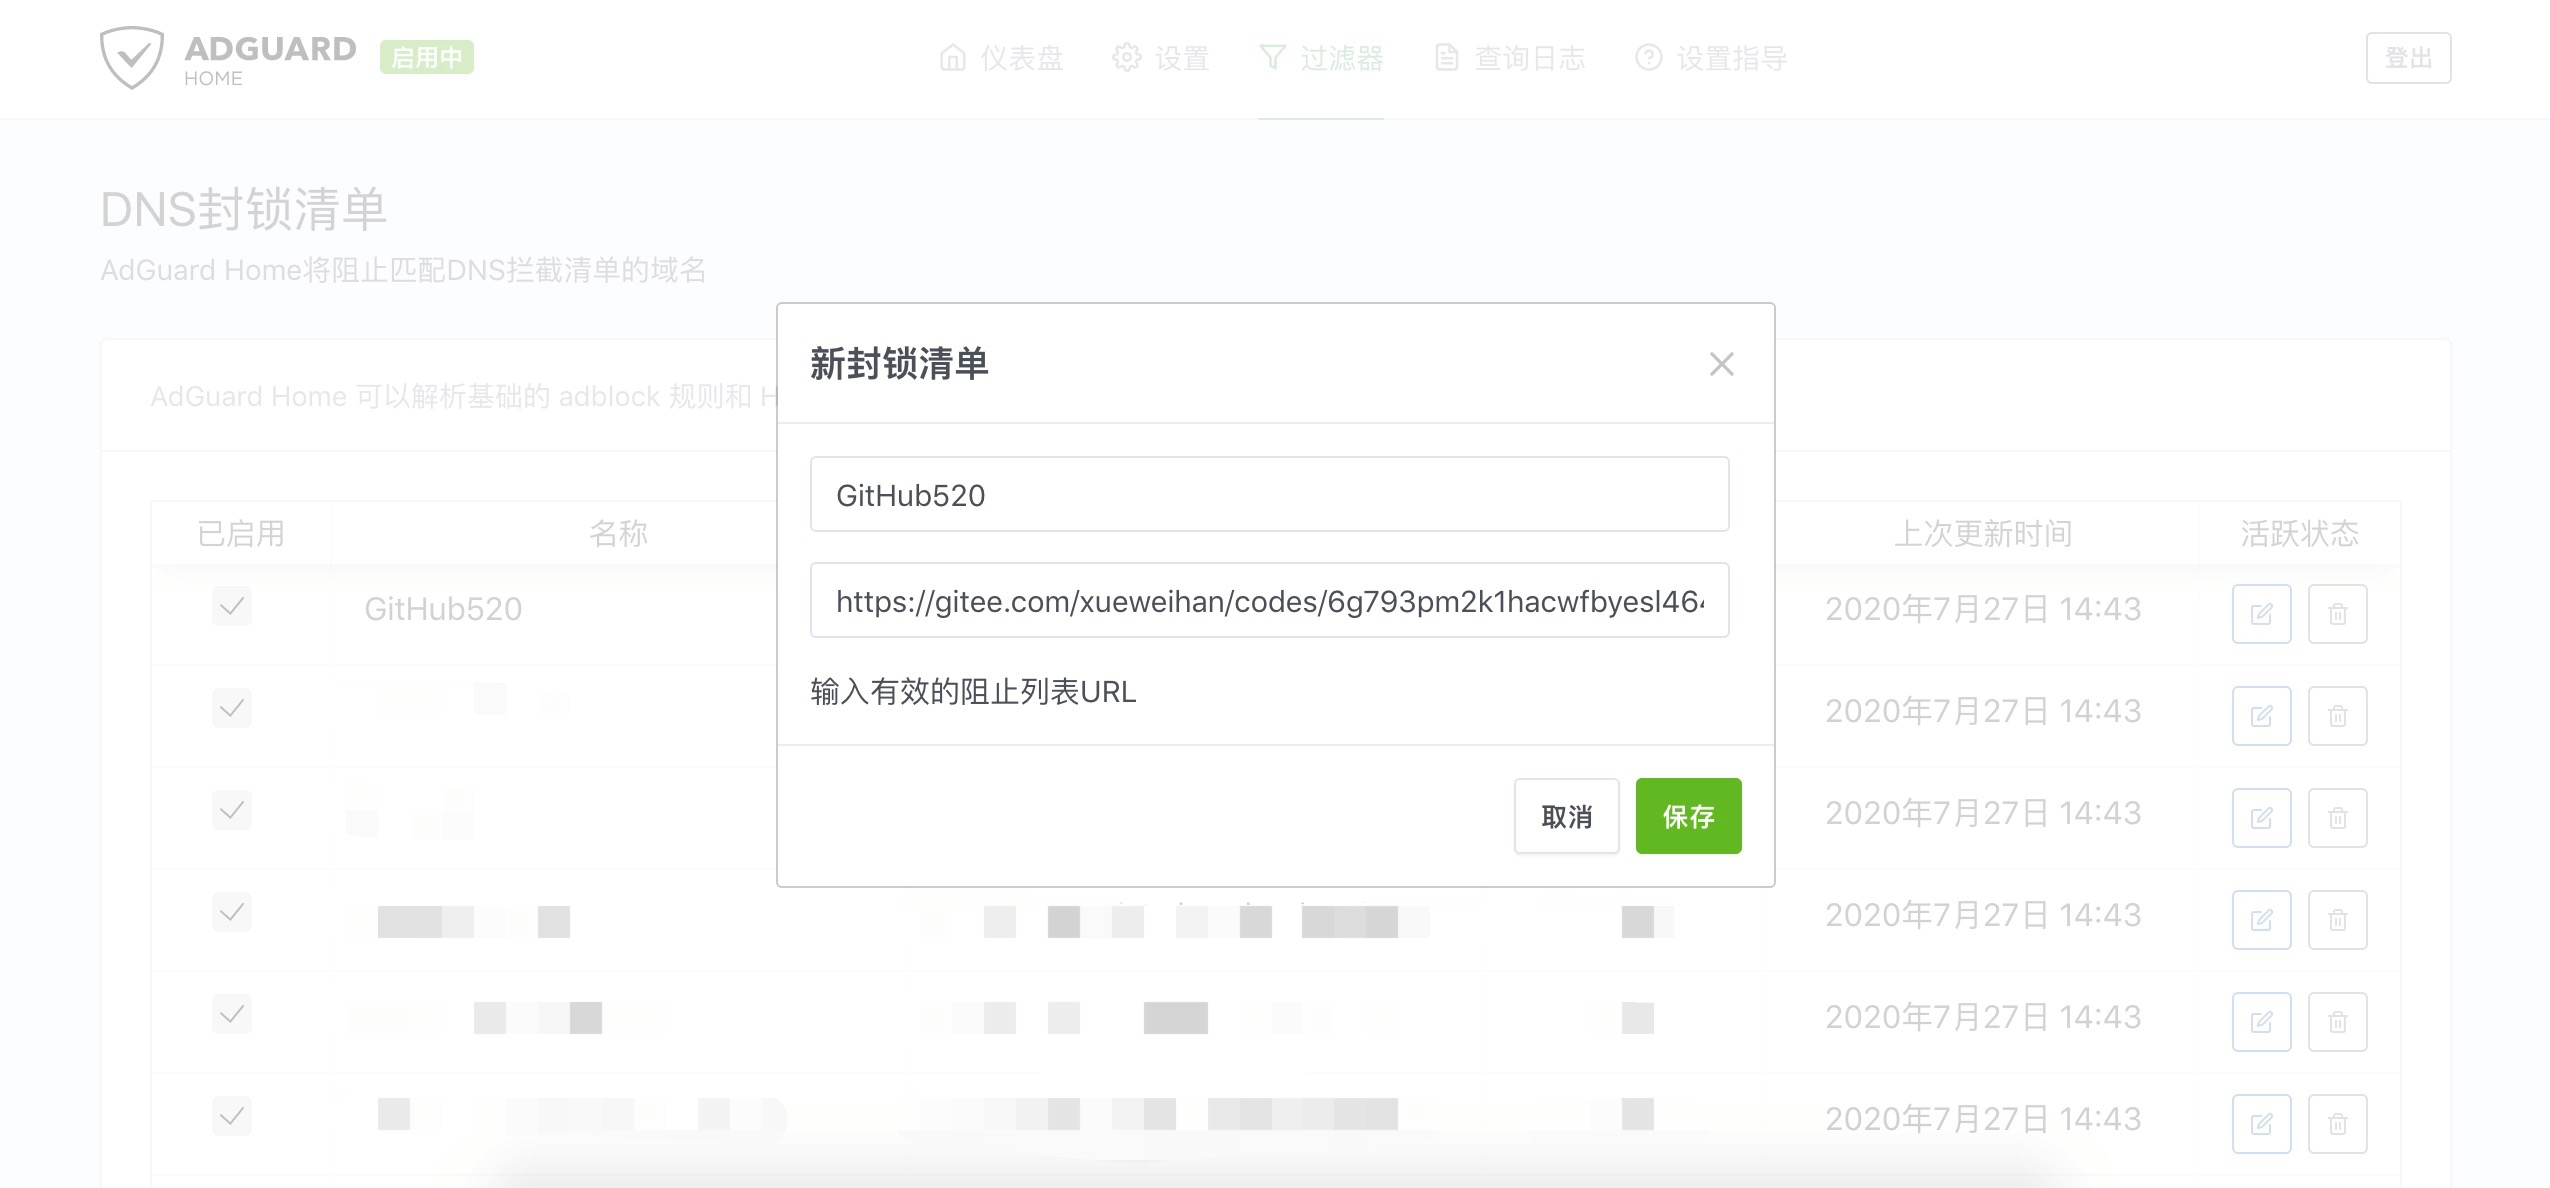
2.4 AdGuard用户(自动方式)
在过滤器>DNS封锁清单>添加阻止列表>添加一个自定义列表,配置如下:
-
名称:随意
-
URL:
https://raw.hellogithub.com/hosts(与上面SwitchHosts使用的相同)
如图:

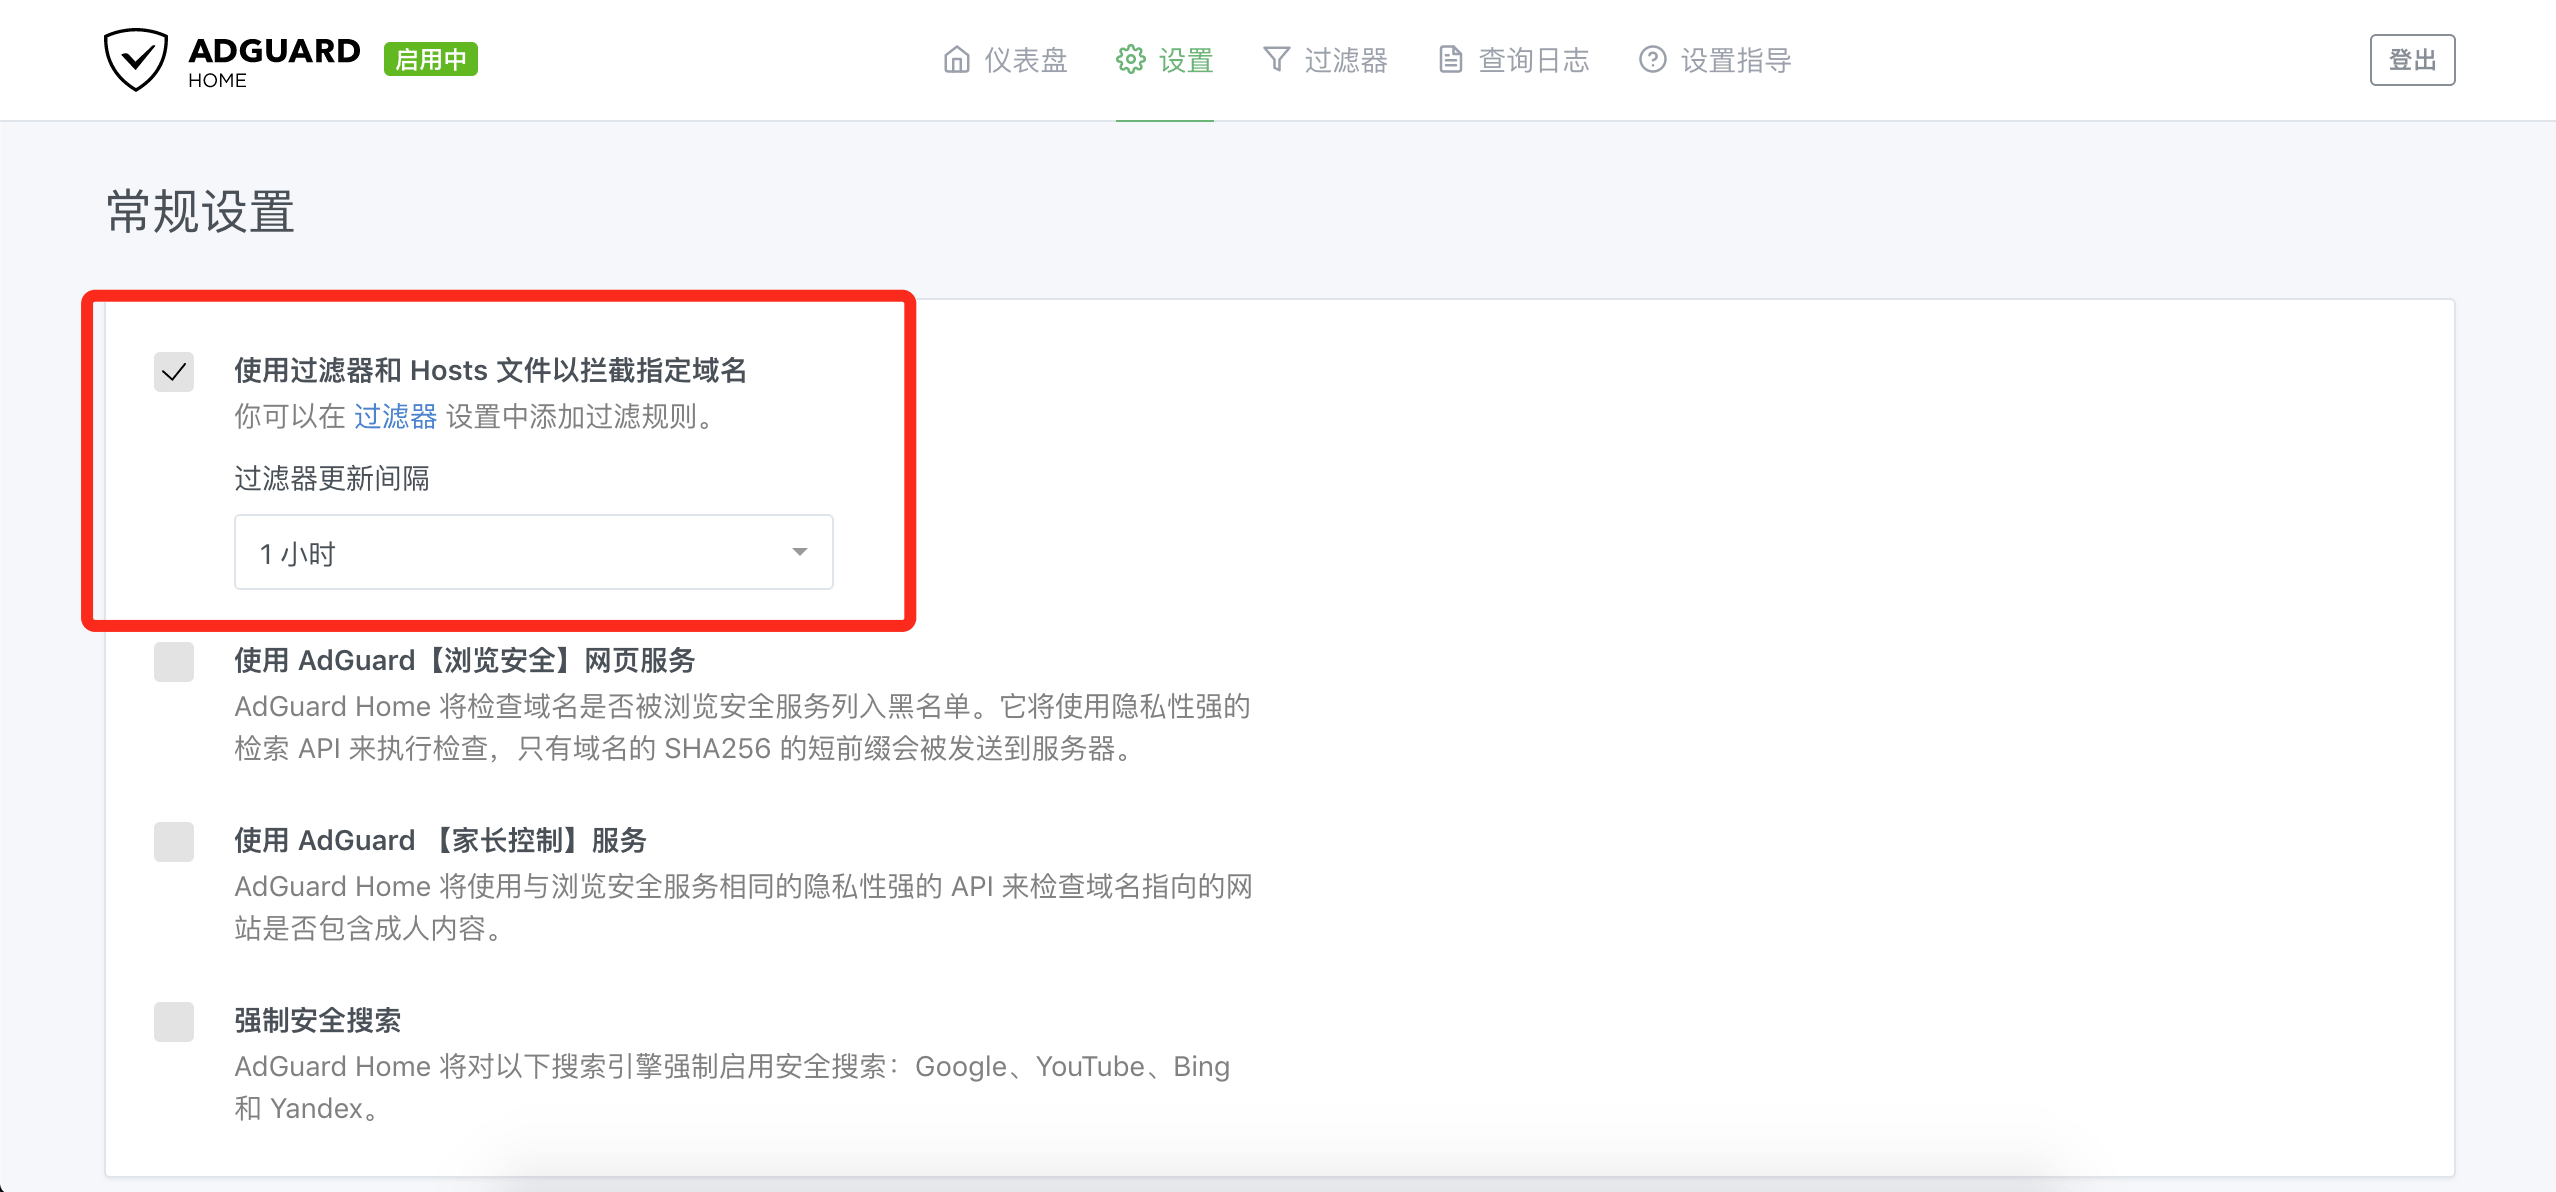
更新间隔在设置 > 常规设置 > 过滤器更新间隔(设置一小时一次即可),记得勾选使用过滤器和Hosts文件以拦截指定域名

提示:不要添加在DNS允许清单内,只能添加在DNS封锁清单才有效。此外,AdGuard for Mac、AdGuard for Windows、AdGuard for Android、AdGuard for iOS等AdGuard系列软件的添加方法均类似。
三、效果对比
之前的样子:

修改完hosts的样子:

TODO
- 定时自动更新hosts内容
- hosts内容无变动不会更新
- 寻找最优IP解析结果
声明

本作品采用署名-非商业性使用-禁止演绎 4.0 国际进行许可。

 访问官网
访问官网 Github


