
🌎 README 有其他语言版本: 🇪🇸 . 🇨🇳 . 🇧🇷 . 🇰🇷 . 🇫🇷 . 🇩🇪
如今几乎所有应用程序都有异步进程,如API请求、长时间运行的进程等。在这些进程运行时,开发人员通常会放置一个加载视图,以向用户显示正在进行某些操作。
SkeletonView 的构想是为了解决这一需求,它是一种优雅的方式来向用户展示正在发生的事情,并同时为他们准备等待的内容。
尽情享受吧! 🙂
🌟 特性
- 易于使用
- 所有UIView都可以使用骨架视图
- 完全可自定义
- 通用(iPhone & iPad)
- Interface Builder友好
- 简洁的Swift语法
- 轻量级可读的代码库
🎬 指南
 |  | 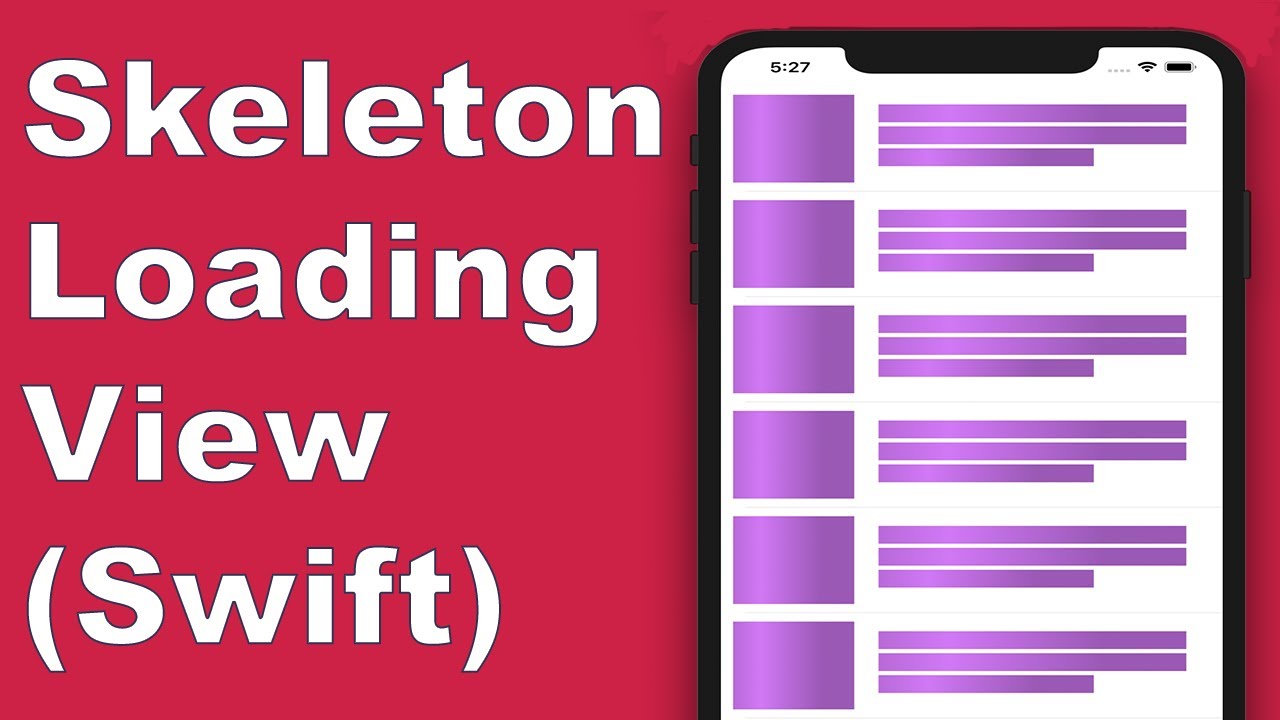 |  |
|---|---|---|---|
| SkeletonView 指南 - 入门 | 如何在 Swift 5.2 中创建使用骨架视图的加载视图 由 iKh4ever Studio 制作 | 在应用程序中创建骨架加载视图 (Swift 5) - Xcode 11, 2020 由 iOS Academy 制作 | 如何在 iOS 中创建数据加载动画 由 MoureDev 制作 |
📲 安装
pod 'SkeletonView'
github "Juanpe/SkeletonView"
dependencies: [
  .package(url: "https://github.com/Juanpe/SkeletonView.git", from: "1.7.0")
]
📣 重要!
从1.30.0版本开始,
SkeletonView支持XCFrameworks,所以如果你想将其作为XCFramework安装,请使用这个仓库。
🐒 使用方法
只需3步即可使用SkeletonView:
1️⃣ 在适当的地方导入 SkeletonView。
import SkeletonView
2️⃣ 现在,设置哪些视图将是可骨架化的。你可以通过两种方式实现这一点:
使用代码:
avatarImageView.isSkeletonable = true
使用 IB/Storyboards:
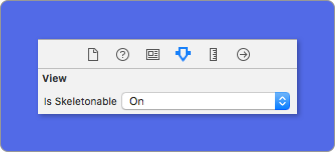
3️⃣ 一旦你设置了视图,你就可以显示骨架。为此,你有4种选择:
(1) view.showSkeleton()                 // 实心
(2) view.showGradientSkeleton()         // 渐变
(3) view.showAnimatedSkeleton()         // 实心动画
(4) view.showAnimatedGradientSkeleton() // 渐变动画
预览
|
|
|
|
|

|

|

|

|
📣 重要!
SkeletonView是递归的,所以如果你想在所有可骨架化的视图中显示骨架,你只需要在主容器视图中调用显示方法。例如,对于UIViewControllers。
🌿 集合
SkeletonView 兼容 UITableView 和 UICollectionView。
UITableView
如果你想在 UITableView 中显示骨架,你需要遵循 SkeletonTableViewDataSource 协议。
public protocol SkeletonTableViewDataSource: UITableViewDataSource {
    func numSections(in collectionSkeletonView: UITableView) -> Int // 默认: 1
    func collectionSkeletonView(_ skeletonView: UITableView, numberOfRowsInSection section: Int) -> Int
    func collectionSkeletonView(_ skeletonView: UITableView, cellIdentifierForRowAt indexPath: IndexPath) -> ReusableCellIdentifier
    func collectionSkeletonView(_ skeletonView: UITableView, skeletonCellForRowAt indexPath: IndexPath) -> UITableViewCell? // 默认: nil
    func collectionSkeletonView(_ skeletonView: UITableView, prepareCellForSkeleton cell: UITableViewCell, at indexPath: IndexPath)
}
如你所见,此协议继承自 UITableViewDataSource,所以你可以用骨架协议替换这个协议。
这个协议为一些方法提供了默认实现。例如,每个部分的行数在运行时计算:
func collectionSkeletonView(_ skeletonView: UITableView, numberOfRowsInSection section: Int) -> Int
// 默认:
// 它计算需要填充整个表格视图的单元格数量
📣 重要!
如果你在上述方法中返回
UITableView.automaticNumberOfSkeletonRows,它的行为就像默认行为(即它计算需要填充整个表格视图的单元格数量)。 要让Skeleton知道单元格标识符,你只需要实现一个方法。这个方法没有默认实现:
func collectionSkeletonView(_ skeletonView: UITableView, cellIdentifierForRowAt indexPath: IndexPath) -> ReusableCellIdentifier {
   return "CellIdentifier"
}
默认情况下,库会从每个indexPath取出单元格,但如果你想在骨架出现前做一些修改,也可以这样做:
func collectionSkeletonView(_ skeletonView: UITableView, skeletonCellForRowAt indexPath: IndexPath) -> UITableViewCell? {
    let cell = skeletonView.dequeueReusableCell(withIdentifier: "CellIdentifier", for: indexPath) as? Cell
    cell?.textField.isHidden = indexPath.row == 0
    return cell
}
如果你希望将取出单元格的部分留给库来处理,你可以使用这个方法来配置单元格:
func collectionSkeletonView(_ skeletonView: UITableView, prepareCellForSkeleton cell: UITableViewCell, at indexPath: IndexPath) {
    let cell = cell as? Cell
    cell?.textField.isHidden = indexPath.row == 0
}
此外,你还可以为页眉和页脚添加骨架。你需要遵守SkeletonTableViewDelegate协议。
public protocol SkeletonTableViewDelegate: UITableViewDelegate {
    func collectionSkeletonView(_ skeletonView: UITableView, identifierForHeaderInSection section: Int) -> ReusableHeaderFooterIdentifier? // 默认:nil
    func collectionSkeletonView(_ skeletonView: UITableView, identifierForFooterInSection section: Int) -> ReusableHeaderFooterIdentifier? // 默认:nil
}
📣 重要!
1️⃣ 如果你使用的是可调整大小的单元格(
tableView.rowHeight = UITableViewAutomaticDimension),必须定义**estimatedRowHeight**。2️⃣ 当你向**
UITableViewCell添加元素时,应该将其添加到contentView**而不是直接添加到单元格。self.contentView.addSubview(titleLabel) ✅ self.addSubview(titleLabel) ❌
UICollectionView
对于UICollectionView,你需要遵守SkeletonCollectionViewDataSource协议。
public protocol SkeletonCollectionViewDataSource: UICollectionViewDataSource {
    func numSections(in collectionSkeletonView: UICollectionView) -> Int  // 默认:1
    func collectionSkeletonView(_ skeletonView: UICollectionView, numberOfItemsInSection section: Int) -> Int
    func collectionSkeletonView(_ skeletonView: UICollectionView, cellIdentifierForItemAt indexPath: IndexPath) -> ReusableCellIdentifier
    func collectionSkeletonView(_ skeletonView: UICollectionView, supplementaryViewIdentifierOfKind: String, at indexPath: IndexPath) -> ReusableCellIdentifier? // 默认:nil
    func collectionSkeletonView(_ skeletonView: UICollectionView, skeletonCellForItemAt indexPath: IndexPath) -> UICollectionViewCell?  // 默认:nil
    func collectionSkeletonView(_ skeletonView: UICollectionView, prepareCellForSkeleton cell: UICollectionViewCell, at indexPath: IndexPath)
    func collectionSkeletonView(_ skeletonView: UICollectionView, prepareViewForSkeleton view: UICollectionReusableView, at indexPath: IndexPath)
}
其余过程与UITableView相同
🔠 文本
当使用带有文本的元素时,SkeletonView会绘制线条来模拟文本。
你可以为多行元素设置一些属性。
| 属性 | 类型 | 默认值 | 预览 |
|---|---|---|---|
| lastLineFillPercent | CGFloat | 70 |  |
| linesCornerRadius | Int | 0 |  |
| skeletonLineSpacing | CGFloat | 10 |  |
| skeletonPaddingInsets | UIEdgeInsets | .zero |  |
| skeletonTextLineHeight | SkeletonTextLineHeight | .fixed(15) |  |
| skeletonTextNumberOfLines | SkeletonTextNumberOfLines | .inherited |  |
要使用代码修改百分比或半径,请设置属性:
descriptionTextView.lastLineFillPercent = 50
descriptionTextView.linesCornerRadius = 5
或者,如果你更喜欢使用IB/Storyboard:
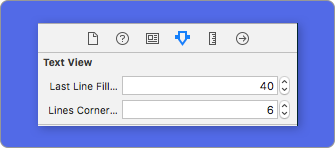
如何定义行数?
默认情况下,行数与numberOfLines属性的值相同。如果设置为零,它将计算填充整个骨架所需的行数并绘制它。
但是,如果你想设置特定数量的骨架线,你可以通过设置skeletonTextNumberOfLines属性来实现。这个属性有两个可能的值,inherited返回numberOfLines的值,custom(Int)返回指定为关联值的特定行数。
例如:
label.skeletonTextNumberOfLines = 3 // .custom(3)
⚠️ 已弃用!
useFontLineHeight已被弃用。你可以使用skeletonTextLineHeight代替:
descriptionTextView.skeletonTextLineHeight = .relativeToFont
📣 重要!
请注意,对于没有多行的视图,单行将被视为最后一行。
🦋 外观
骨架有默认外观。因此,当你不指定颜色、渐变或多行属性时,SkeletonView使用默认值。
默认值:
- tintColor:
UIColor- 默认:.skeletonDefault(与.clouds相同但适应深色模式)
- gradient: SkeletonGradient
- 默认:SkeletonGradient(baseColor: .skeletonDefault)
- multilineHeight:
CGFloat- 默认:15
- multilineSpacing:
CGFloat- 默认:10
- multilineLastLineFillPercent:
Int- 默认:70
- multilineCornerRadius:
Int- 默认:0
- skeletonCornerRadius:
CGFloat(IBInspectable) (为你的骨架视图添加圆角)- 默认:0
要获取这些默认值,你可以使用SkeletonAppearance.default。使用此属性你也可以设置值:
SkeletonAppearance.default.multilineHeight = 20
SkeletonAppearance.default.tintColor = .green
⚠️ 已弃用!
useFontLineHeight已被弃用。你可以使用textLineHeight代替:
SkeletonAppearance.default.textLineHeight = .relativeToFont
🎨 自定义颜色
你可以决定骨架的着色颜色。你只需要传递你想要的颜色或渐变作为参数。
使用纯色
view.showSkeleton(usingColor: UIColor.gray) // 纯色
// 或
view.showSkeleton(usingColor: UIColor(red: 25.0, green: 30.0, blue: 255.0, alpha: 1.0))
使用渐变
let gradient = SkeletonGradient(baseColor: UIColor.midnightBlue)
view.showGradientSkeleton(usingGradient: gradient) // 渐变
此外,SkeletonView提供了20种扁平颜色🤙🏼
UIColor.turquoise, UIColor.greenSea, UIColor.sunFlower, UIColor.flatOrange ...
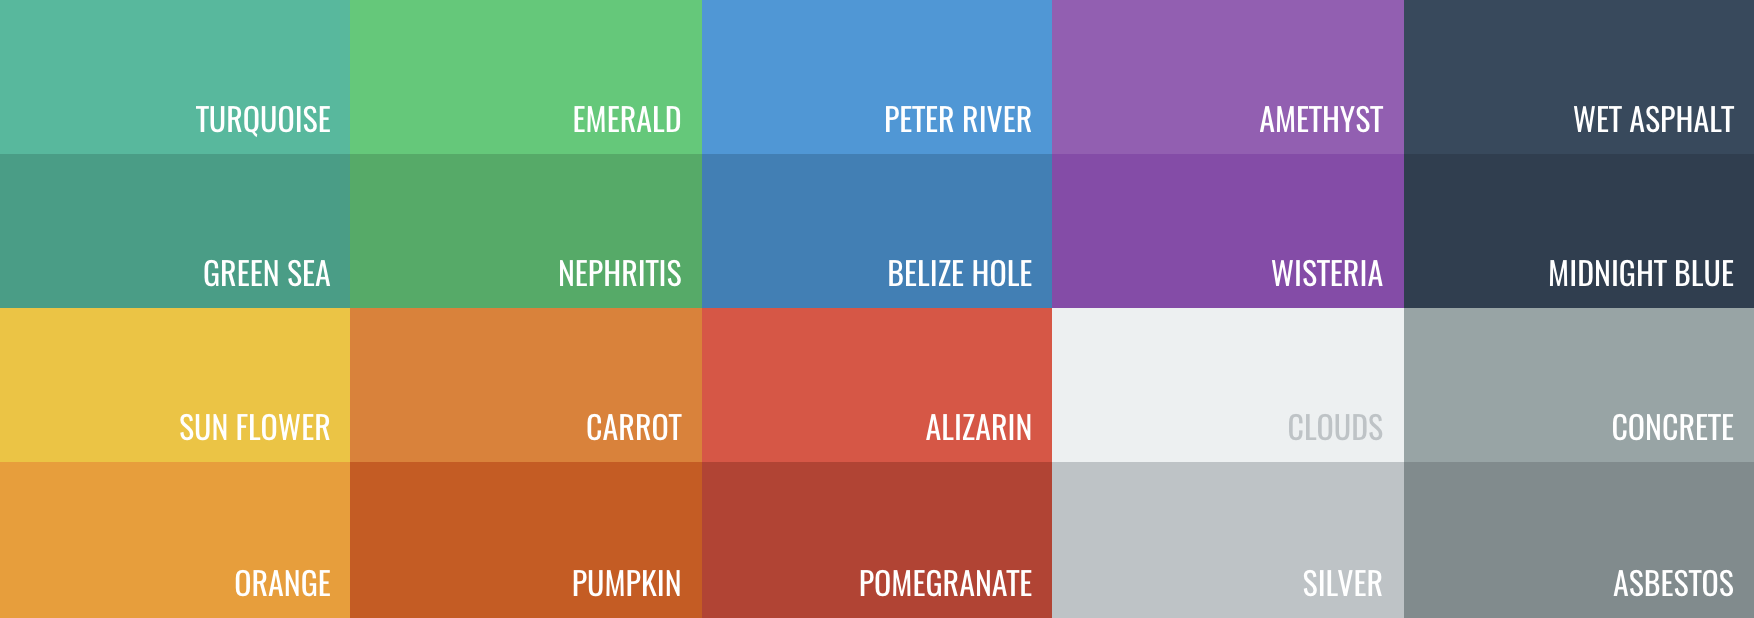
图片来自网站https://flatuicolors.com
🏃♀️ 动画
SkeletonView有两种内置动画,纯色骨架的脉冲和渐变的滑动。
此外,如果你想制作自己的骨架动画,这真的很容易。
Skeleton提供了showAnimatedSkeleton函数,该函数有一个SkeletonLayerAnimation闭包,你可以在其中定义自定义动画。
public typealias SkeletonLayerAnimation = (CALayer) -> CAAnimation
你可以这样调用该函数:
view.showAnimatedSkeleton { (layer) -> CAAnimation in
  let animation = CAAnimation()
  // 在这里自定义你的动画

  return animation
}
还提供了SkeletonAnimationBuilder。它是一个用于创建SkeletonLayerAnimation的构建器。
目前,你可以为渐变创建滑动动画,决定方向并设置动画的持续时间(默认= 1.5秒)。
// func makeSlidingAnimation(withDirection direction: GradientDirection, duration: CFTimeInterval = 1.5) -> SkeletonLayerAnimation

let animation = SkeletonAnimationBuilder().makeSlidingAnimation(withDirection: .leftToRight)
view.showAnimatedGradientSkeleton(usingGradient: gradient, animation: animation)
GradientDirection是一个枚举,包含以下情况:
| 方向 | 预览 |
|---|---|
| .leftRight |  |
| .rightLeft |  |
| .topBottom |  |
| .bottomTop |  |
| .topLeftBottomRight |  |
| .bottomRightTopLeft |  |
😉 技巧!
还有另一种创建滑动动画的方法,只需使用这个快捷方式:
let animation = GradientDirection.leftToRight.slidingAnimation()
🏄 过渡
SkeletonView内置了过渡效果,可以更平滑地显示或隐藏骨架🤙
要使用过渡,只需在showSkeleton()或hideSkeleton()函数中添加transition参数和过渡时间,如下所示:
view.showSkeleton(transition: .crossDissolve(0.25))     //显示骨架屏,使用0.25秒淡入淡出过渡效果
view.hideSkeleton(transition: .crossDissolve(0.25))     //隐藏骨架屏,使用0.25秒淡入淡出过渡效果
默认值为 crossDissolve(0.25)
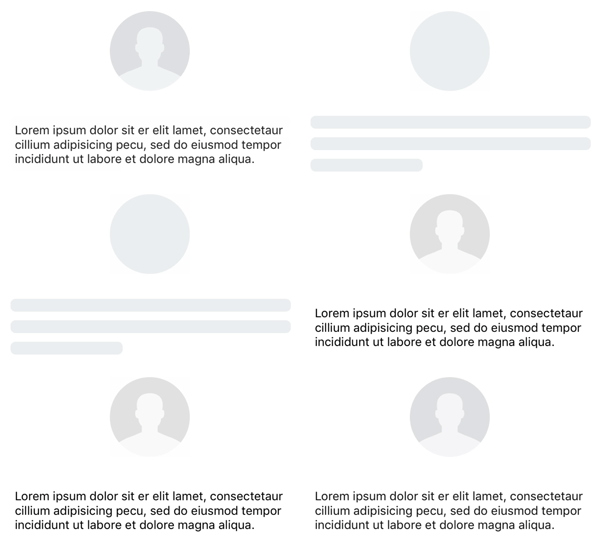
预览
|
|
|

|
|
✨ 其他
层级
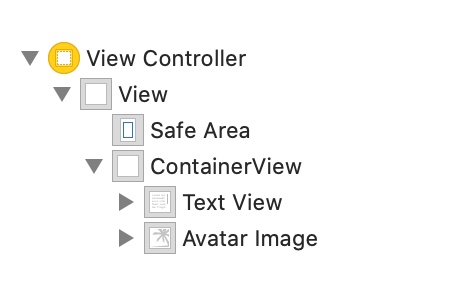
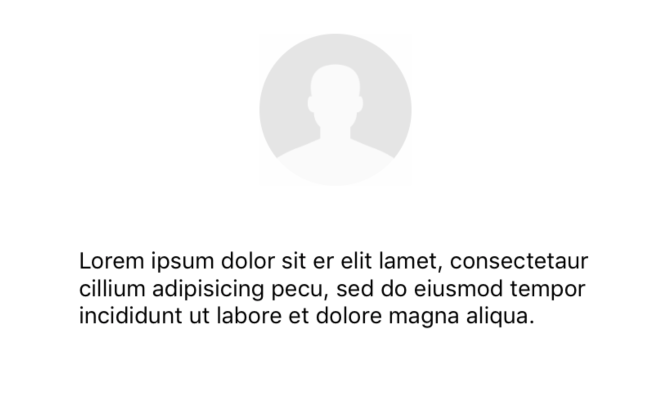
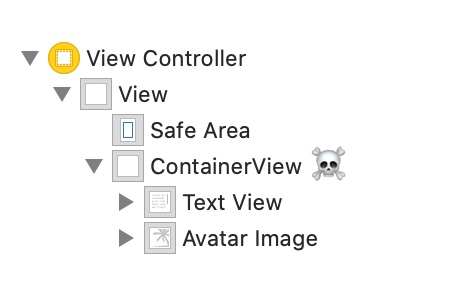
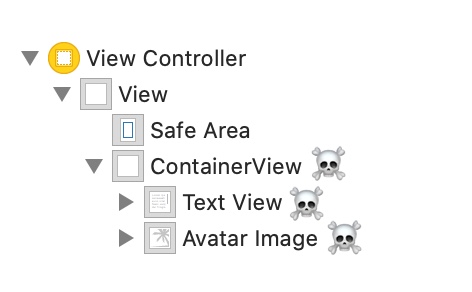
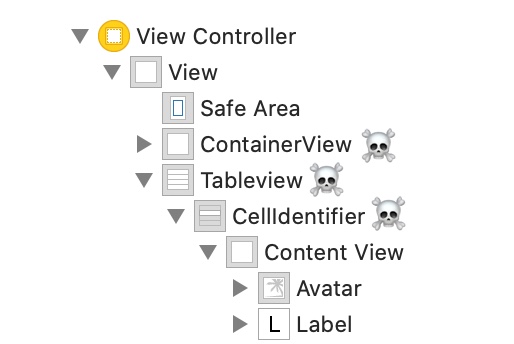
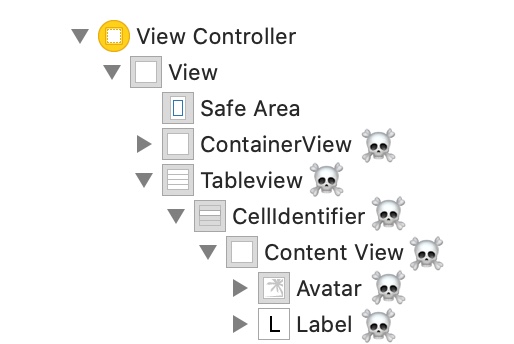
由于 SkeletonView 是递归的,为了提高效率,我们希望尽快停止递归。因此,您必须将容器视图设置为 Skeletonable,因为一旦某个视图不是Skeletonable,Skeleton就会停止寻找 skeletonable 子视图,从而中断递归。
一图胜千言:
在这个例子中,我们有一个带有 ContainerView 和 UITableView 的 UIViewController。当视图准备就绪时,我们使用以下方法显示骨架:
view.showSkeleton()
isSkeletonable= ☠️
| 配置 | 结果 |
|---|---|
 |  |
 |  |
 |  |
 |  |
 |  |
 |  |
骨架视图布局
有时由于父视图边界发生变化,骨架布局可能不适合您的布局。例如,旋转设备。
您可以这样重新布局骨架视图:
override func viewDidLayoutSubviews() {
    view.layoutSkeletonIfNeeded()
}
📣 重要!
您不应该调用此方法。从1.8.1版本开始,您不需要调用此方法,库会自动处理。因此,您只能在需要手动更新骨架布局的情况下使用此方法。
更新骨架
您可以随时更改骨架配置,如颜色、动画等,使用以下方法:
(1) view.updateSkeleton()                 // 纯色
(2) view.updateGradientSkeleton()         // 渐变
(3) view.updateAnimatedSkeleton()         // 纯色动画
(4) view.updateAnimatedGradientSkeleton() // 渐变动画
动画开始时隐藏视图
有时您希望在动画开始时隐藏某些视图,因此有一个快速属性可以实现这一点:
view.isHiddenWhenSkeletonIsActive = true // 仅在 isSkeletonable = true 时生效
骨架激活时不修改用户交互
默认情况下,骨架化项目的用户交互被禁用,但如果您不想在骨架激活时修改用户交互指示器,可以使用 isUserInteractionDisabledWhenSkeletonIsActive 属性:
view.isUserInteractionDisabledWhenSkeletonIsActive = false // 骨架激活时该视图将保持活动状态。
不使用字体行高作为标签中的骨架线
禁用骨架自动调整到 UILabel 或 UITextView 的字体高度。默认情况下,骨架线高度会自动调整到字体高度,以更准确地反映标签矩形中的文本,而不是使用边界框。
label.useFontLineHeight = false
延迟显示骨架
如果视图快速更新,您可以延迟骨架的呈现。
func showSkeleton(usingColor: UIColor,
                  animated: Bool,
                  delay: TimeInterval,
                  transition: SkeletonTransitionStyle)
func showGradientSkeleton(usingGradient: SkeletonGradient,
                          animated: Bool,
                          delay: TimeInterval,
                          transition: SkeletonTransitionStyle)
调试
为了便于在出现问题时进行调试任务,SkeletonView 有一些新工具。
首先,UIView 有一个可用的属性,包含其骨架信息:
var sk.skeletonTreeDescription: String
此外,您可以激活新的调试模式。只需添加环境变量 SKELETON_DEBUG 并激活它。
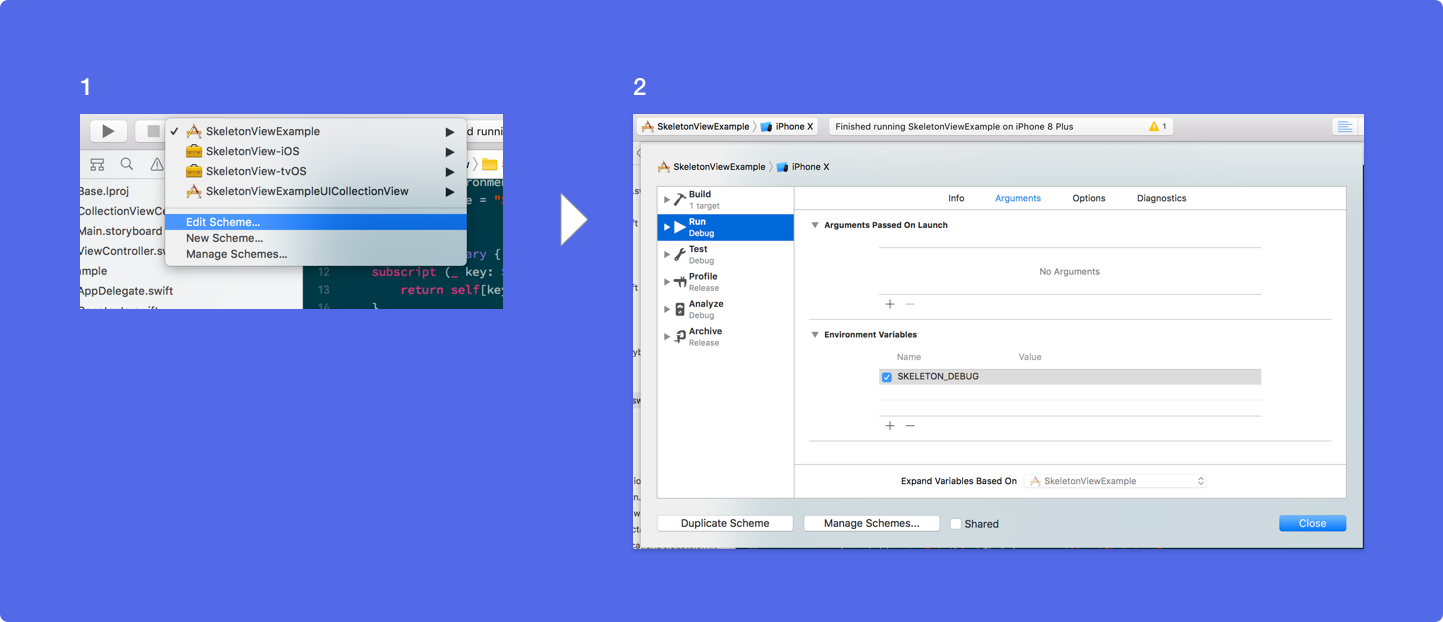
然后,当骨架出现时,您可以在Xcode控制台中看到视图层次结构。
{
  "type" : "UIView", // UITableView, UILabel...
  "isSkeletonable" : true,
  "reference" : "0x000000014751ce30",
  "children" : [
    {
      "type" : "UIView",
      "isSkeletonable" : true,
      "children" : [ ... ],
      "reference" : "0x000000014751cfa0"
    }
  ]
}
支持的操作系统和SDK版本
- iOS 9.0+
- tvOS 9.0+
- Swift 5.3
❤️ 贡献
这是一个开源项目,欢迎贡献。如何贡献?
查看所有贡献者
有关更多信息,请阅读贡献指南。
📢 提及
- iOS Dev Weekly #327
- Hacking with Swift 文章
- 11月Swift文章前10名
- 30个惊人的iOS Swift库(2018版)
- AppCoda Weekly #44
- iOS Cookies Newsletter #103
- Swift Developments Newsletter #113
- iOS Goodies #204
- Swift Weekly #96
- CocoaControls
- Awesome iOS Newsletter #74
- Swift News #36
- 最佳iOS文章、新工具等
🏆 赞助商
开源项目离不开您的帮助。如果您觉得 SkeletonView 有用,请考虑成为赞助商支持这个项目。
通过 GitHub Sponsors 成为赞助商 :heart:
👨🏻💻 作者
👮🏻 许可证
MIT License

Copyright (c) 2017 Juanpe Catalán

特此免费授予任何获得本软件副本和相关文档文件("软件")的人不受限制地处理本软件的权利,
包括但不限于使用、复制、修改、合并、发布、分发、再许可和/或出售软件副本的权利,
并允许向其提供本软件的人这样做,但须符合以下条件:

上述版权声明和本许可声明应包含在本软件的所有副本或主要部分中。
本软件"按原样"提供,不提供任何形式的明示或暗示担保,包括但不限于对适销性、特定用途适用性和非侵权性的担保。在任何情况下,无论是在合同诉讼、侵权诉讼或其他诉讼中,作者或版权持有人均不对任何索赔、损害或其他责任负责,无论这些追责来自、起因于或与本软件有关或与本软件的使用或其他处置有关。

 访问官网
访问官网 Github


