轨迹一致性蒸馏
论文《轨迹一致性蒸馏》的官方代码仓库:Trajectory Consistency Distillation

关于抄袭指控的严正声明
我们对来自CTM团队的严重指控深感遗憾。
我们遗憾地发现我们的CTM论文(ICLR24)被TCD抄袭了!这令人难以置信😢——他们不仅窃取了我们轨迹一致性的想法,还进行了"逐字抄袭",一字不差地抄袭了我们的证明!请帮我传播这个消息。pic.twitter.com/aR6pRjhj5X
— Dongjun Kim (@gimdong58085414) 2024年3月25日
在这篇帖子发布之前,我们已经与CTM的作者进行了多轮沟通。 我们将在此阐明情况。
我们对来自CTM团队@gimdong58085414的严重指控深感遗憾。我将在此阐明情况并做一个存档。我们已经与CTM的作者进行了多轮沟通。https://t.co/BKn3w1jXuh
— Michael (@Merci0318) 2024年3月26日
-
在第一个arXiv版本中,我们在A.相关工作部分提供了引用和讨论:
Kim等人(2023)提出了一个适用于CM和DM的通用框架。核心设计与我们的相似,主要区别在于我们专注于减少CM中的误差,巧妙地利用PF ODE的半线性结构进行参数化,并避免了对抗训练的需求。
-
在第一个arXiv版本中,我们在D.3定理4.2的证明中指出:
在本节中,我们的推导主要借鉴了(Kim等人,2023;Chen等人,2022)的证明。
我们从未打算声称这些功劳。
正如我们在邮件中提到的,我们想就论文中明显不充分的引用水平向CTM作者正式道歉。我们将在修订稿中提供更多致谢。
-
在更新的第二个arXiv版本中,我们扩展了讨论以阐明与CTM框架的关系。此外,我们删除了一些先前为完整性而包含的证明。
-
CTM和TCD在动机、方法和实验方面都有所不同。TCD基于潜在一致性模型(LCM)的原理,旨在通过利用指数积分器设计有效的一致性函数。
-
实验结果也无法通过任何类型的CTM算法获得。
5.1 这里我们提供一个简单的检查方法:使用我们的采样器对CTM发布的检查点进行采样,或反之。
5.2 CTM还提供了训练脚本。我们欢迎任何人基于CTM算法在SDXL或LDM上复现实验。
我们认为抄袭的指控不仅严重,而且有损涉事各方的学术诚信。 我们真诚希望每个人都能对这件事有更全面的了解。
📣 新闻
- (🔥新) 2024/3/28 ComfyUI插件 ComfyUI-TCD。感谢@JettHu和@dfl。
- (🔥新) 2024/3/18 我们已将官方TCDScheduler集成到🧨 Diffusers库中!查看官方文档此处。感谢Diffusers团队!
- (🔥新) 2024/3/11 我们发布了SDv1.5的TCD-SD15-LoRA和SDv2.1-base的TCD-SD21-base-LoRA。
- (🔥新) 2024/2/29 我们在🤗 Hugging Face Space上提供了TCD的演示。点此尝试。
- (🔥新) 2024/2/29 我们在🤗 Hugging Face上发布了我们的模型TCD-SDXL-Lora。
- (🔥新) 2024/2/29 TCD现已集成到🧨 Diffusers库中。更多信息请参考使用方法。
介绍
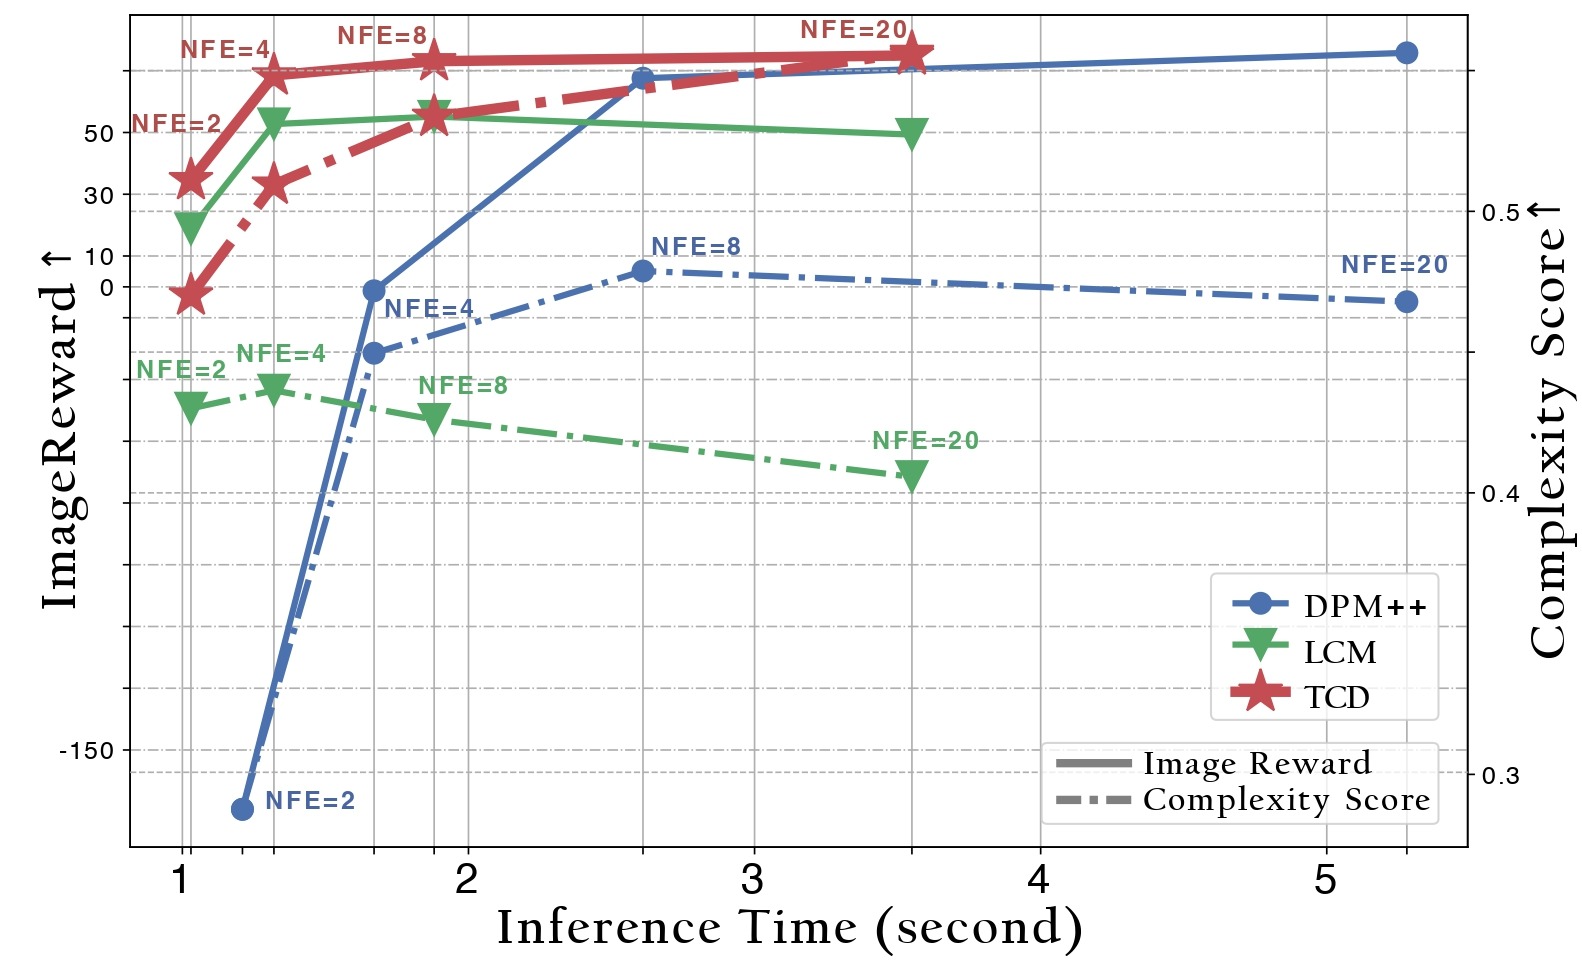
TCD受一致性模型启发,是一种新颖的蒸馏技术,能将预训练扩散模型的知识蒸馏到几步采样器中。在本仓库中,我们发布了推理代码和我们的模型TCD-SDXL,该模型从SDXL Base 1.0蒸馏而来。我们在这个🔥仓库中提供了LoRA检查点。

⭐ TCD具有以下优势:
灵活的NFEs:对于TCD,NFEs可以随意变化(相比SDXL Turbo),而不会对结果质量产生不利影响(相比LCM,LCM在高NFEs时质量明显下降)。优于教师模型:TCD在高NFEs下保持优越的生成质量,甚至超过了使用原始SDXL的DPM-Solver++(2S)的性能。值得注意的是,训练过程中没有包含额外的判别器或LPIPS监督。自由改变细节程度:在推理过程中,只需调整一个超参数gamma,就可以简单地修改图像的细节程度。这个选项不需要引入任何额外参数。
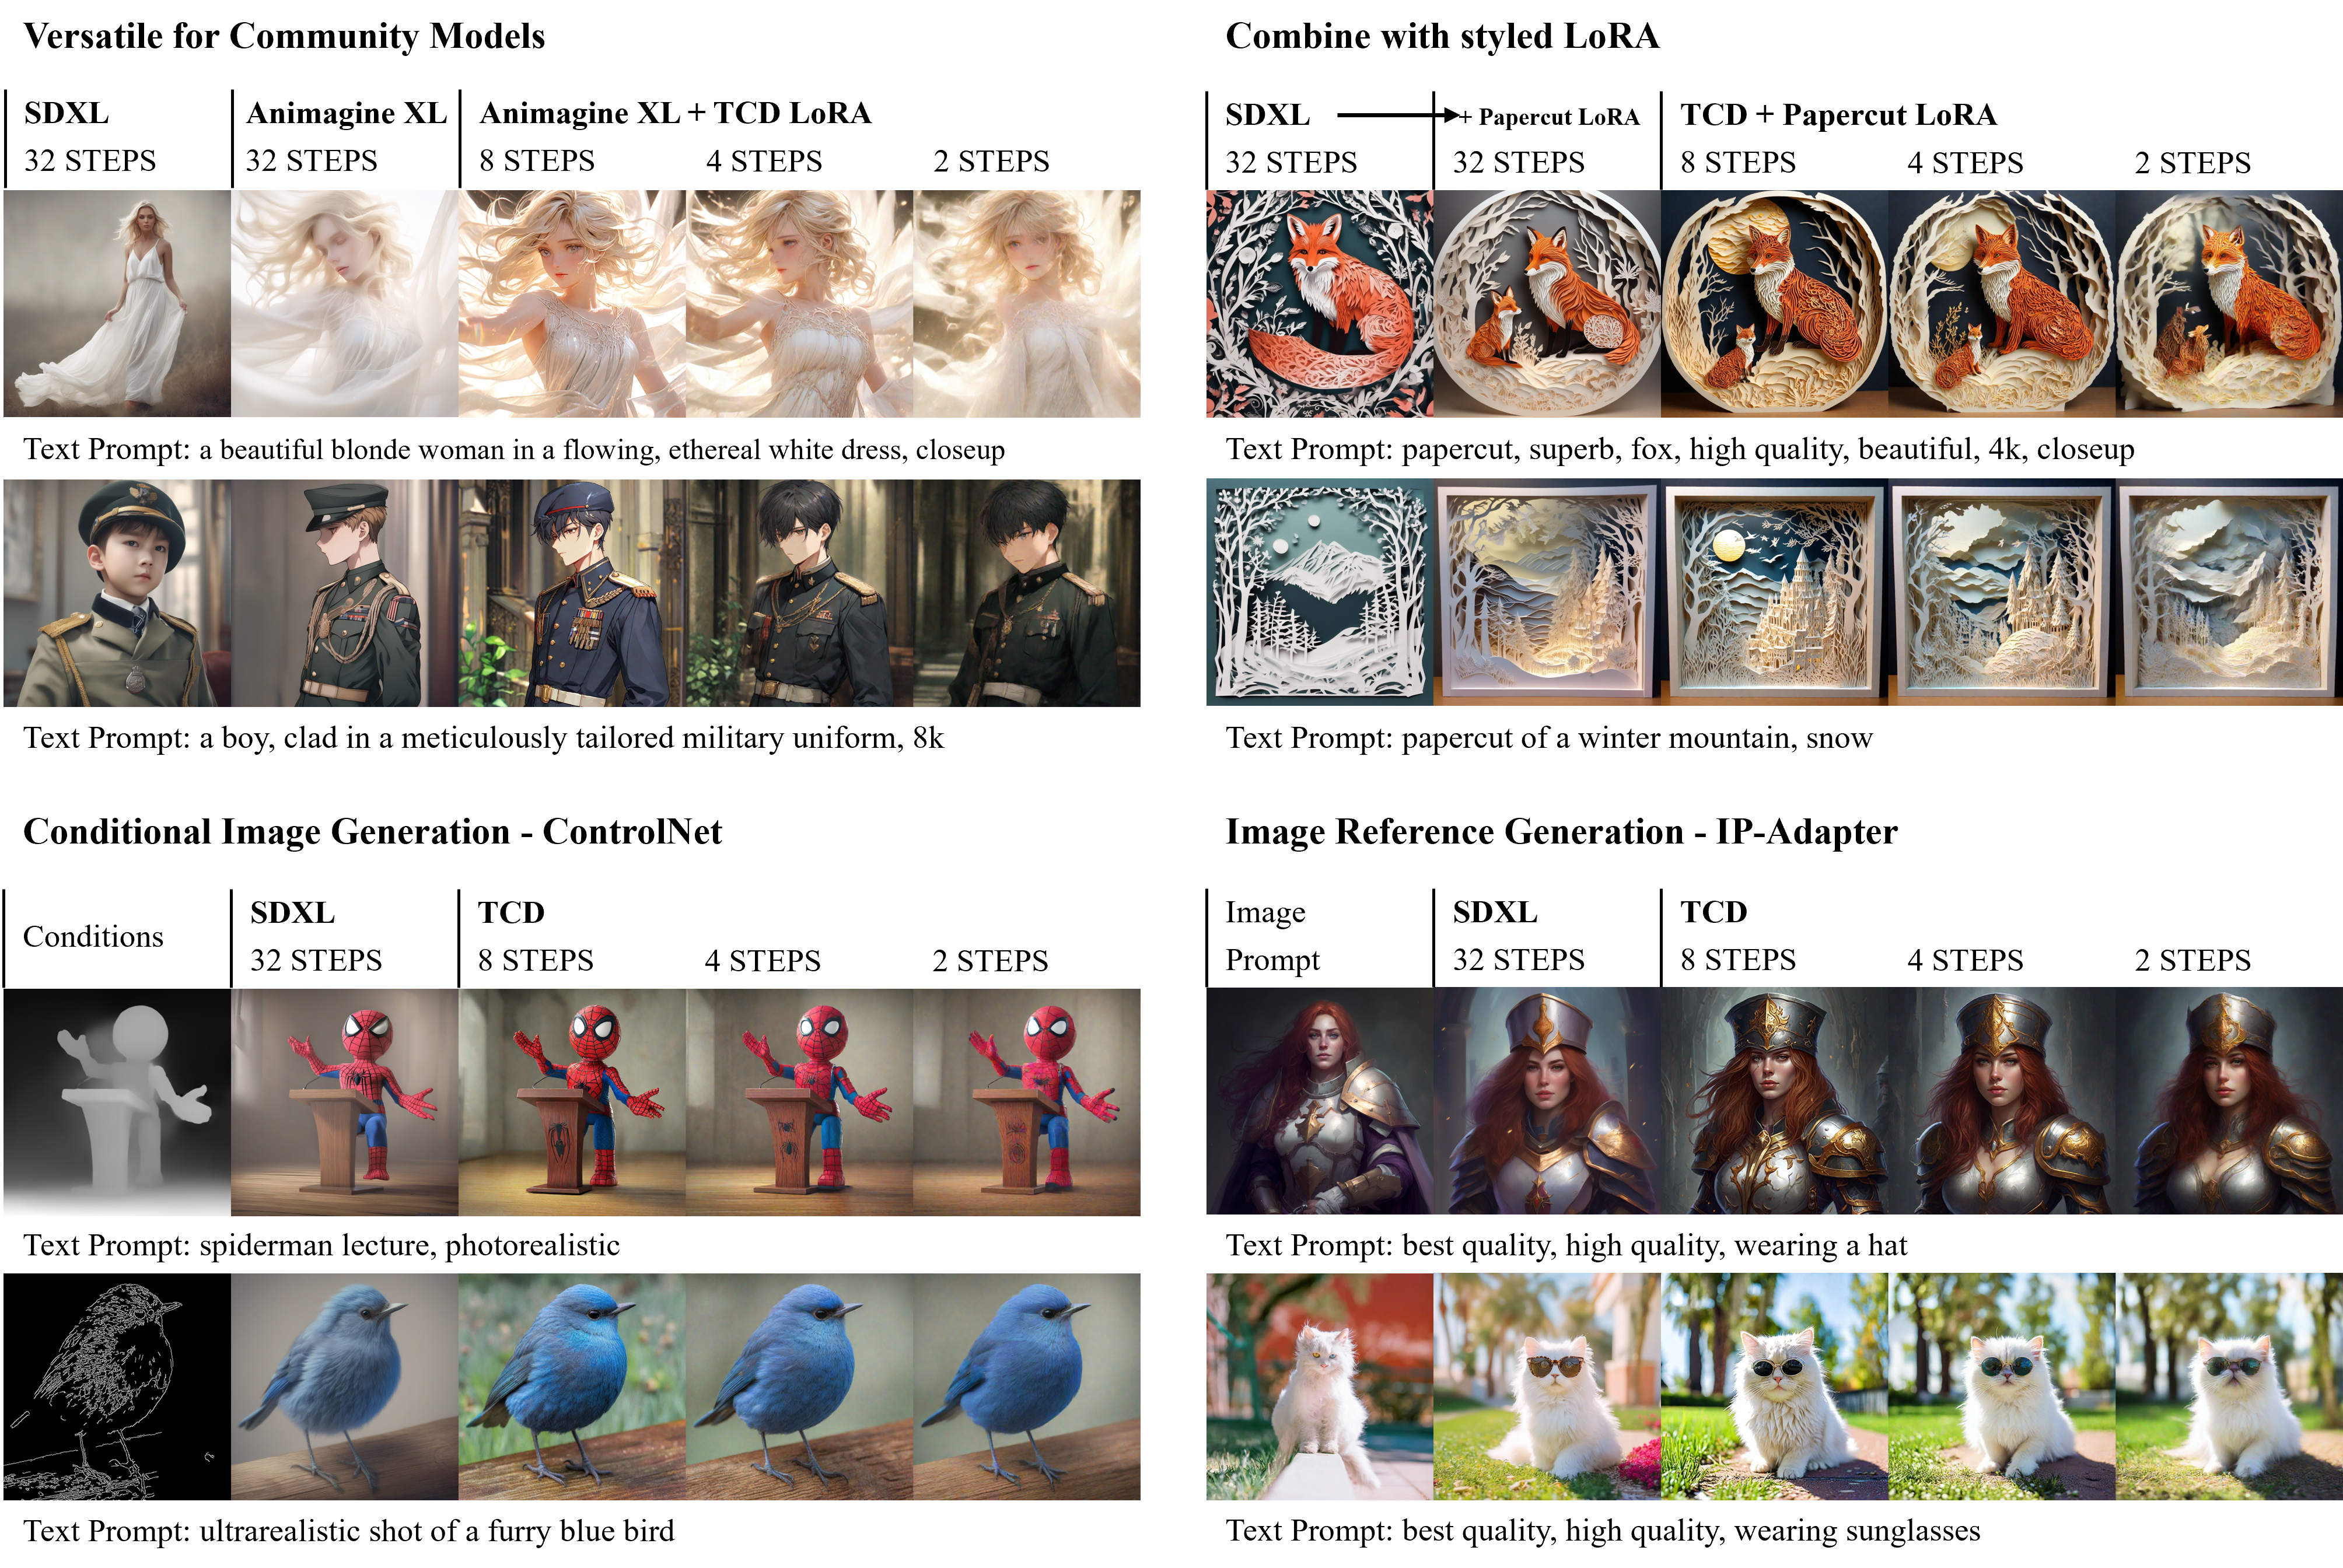
通用性:结合LoRA技术,TCD可以直接应用于共享相同骨干网络的各种模型(包括自定义社区模型、风格化LoRA、ControlNet、IP-Adapter),如使用方法中所示。
避免模式崩溃:TCD无需对抗训练即可实现少步生成,从而避免了GAN目标导致的模式崩溃。 与同期工作SDXL-Lightning相比,后者依赖对抗性扩散蒸馏,TCD可以合成更真实、略微更多样化的结果,而不会出现"双面神"伪影。
更多信息,请参阅我们的论文轨迹一致性蒸馏。
使用方法
要自行运行模型,您可以使用 🧨 Diffusers 库。
pip install diffusers transformers accelerate peft
然后我们克隆仓库。
git clone https://github.com/jabir-zheng/TCD.git
cd TCD
在这里,我们展示了我们的 TCD LoRA 在各种模型上的适用性,包括 SDXL、SDXL 修复、一个名为 Animagine XL 的社区模型、一个风格化 LoRA Papercut、预训练的 深度 Controlnet、Canny Controlnet 和 IP-Adapter,以在几个步骤内加速高质量图像生成。
文本到图像生成
import torch
from diffusers import StableDiffusionXLPipeline
from scheduling_tcd import TCDScheduler

device = "cuda"
base_model_id = "stabilityai/stable-diffusion-xl-base-1.0"
tcd_lora_id = "h1t/TCD-SDXL-LoRA"

pipe = StableDiffusionXLPipeline.from_pretrained(base_model_id, torch_dtype=torch.float16, variant="fp16").to(device)
pipe.scheduler = TCDScheduler.from_config(pipe.scheduler.config)

pipe.load_lora_weights(tcd_lora_id)
pipe.fuse_lora()

prompt = "美丽的女人,泡泡糖粉红色,柠檬黄色,薄荷蓝色,未来主义,高细节,史诗构图,水彩画。"

image = pipe(
    prompt=prompt,
    num_inference_steps=4,
    guidance_scale=0,
    # Eta(在论文中称为 `gamma`)用于控制每一步的随机性。
    # 0.3 的值通常能产生良好的结果。
    # 我们建议在增加推理步骤数时使用更高的 eta。
    eta=0.3,
    generator=torch.Generator(device=device).manual_seed(0),
).images[0]

图像修复
import torch
from diffusers import AutoPipelineForInpainting
from diffusers.utils import load_image, make_image_grid
from scheduling_tcd import TCDScheduler

device = "cuda"
base_model_id = "diffusers/stable-diffusion-xl-1.0-inpainting-0.1"
tcd_lora_id = "h1t/TCD-SDXL-LoRA"

pipe = AutoPipelineForInpainting.from_pretrained(base_model_id, torch_dtype=torch.float16, variant="fp16").to(device)
pipe.scheduler = TCDScheduler.from_config(pipe.scheduler.config)

pipe.load_lora_weights(tcd_lora_id)
pipe.fuse_lora()

img_url = "https://raw.githubusercontent.com/CompVis/latent-diffusion/main/data/inpainting_examples/overture-creations-5sI6fQgYIuo.png"
mask_url = "https://raw.githubusercontent.com/CompVis/latent-diffusion/main/data/inpainting_examples/overture-creations-5sI6fQgYIuo_mask.png"

init_image = load_image(img_url).resize((1024, 1024))
mask_image = load_image(mask_url).resize((1024, 1024))

prompt = "一只老虎坐在公园长椅上"

image = pipe(
  prompt=prompt,
  image=init_image,
  mask_image=mask_image,
  num_inference_steps=8,
  guidance_scale=0,
  eta=0.3, # Eta(在论文中称为 `gamma`)用于控制每一步的随机性。0.3 的值通常能产生良好的结果。
  strength=0.99,  # 确保使用低于 1.0 的 `strength`
  generator=torch.Generator(device=device).manual_seed(0),
).images[0]

grid_image = make_image_grid([init_image, mask_image, image], rows=1, cols=3)

适用于社区模型
import torch
from diffusers import StableDiffusionXLPipeline
from scheduling_tcd import TCDScheduler

device = "cuda"
base_model_id = "cagliostrolab/animagine-xl-3.0"
tcd_lora_id = "h1t/TCD-SDXL-LoRA"

pipe = StableDiffusionXLPipeline.from_pretrained(base_model_id, torch_dtype=torch.float16, variant="fp16").to(device)
pipe.scheduler = TCDScheduler.from_config(pipe.scheduler.config)

pipe.load_lora_weights(tcd_lora_id)
pipe.fuse_lora()

prompt = "一个男人,身着精心裁剪的军装,坚定不移地站立着。军装上有着精细的细节,他的眼睛闪烁着坚毅的光芒。鲜艳的头发从帽檐下飘逸而出,被风吹拂着。"
image = pipe(
    prompt=prompt,
    num_inference_steps=8,
    guidance_scale=0,
    # Eta(在论文中称为`gamma`)用于控制每一步的随机性。
    # 0.3的值通常能产生良好的结果。
    # 我们建议在增加推理步骤数时使用更高的eta值。
    eta=0.3,
    generator=torch.Generator(device=device).manual_seed(0),
).images[0]

结合风格化LoRA
import torch
from diffusers import StableDiffusionXLPipeline
from scheduling_tcd import TCDScheduler

device = "cuda"
base_model_id = "stabilityai/stable-diffusion-xl-base-1.0"
tcd_lora_id = "h1t/TCD-SDXL-LoRA"
styled_lora_id = "TheLastBen/Papercut_SDXL"

pipe = StableDiffusionXLPipeline.from_pretrained(base_model_id, torch_dtype=torch.float16, variant="fp16").to(device)
pipe.scheduler = TCDScheduler.from_config(pipe.scheduler.config)

pipe.load_lora_weights(tcd_lora_id, adapter_name="tcd")
pipe.load_lora_weights(styled_lora_id, adapter_name="style")
pipe.set_adapters(["tcd", "style"], adapter_weights=[1.0, 1.0])

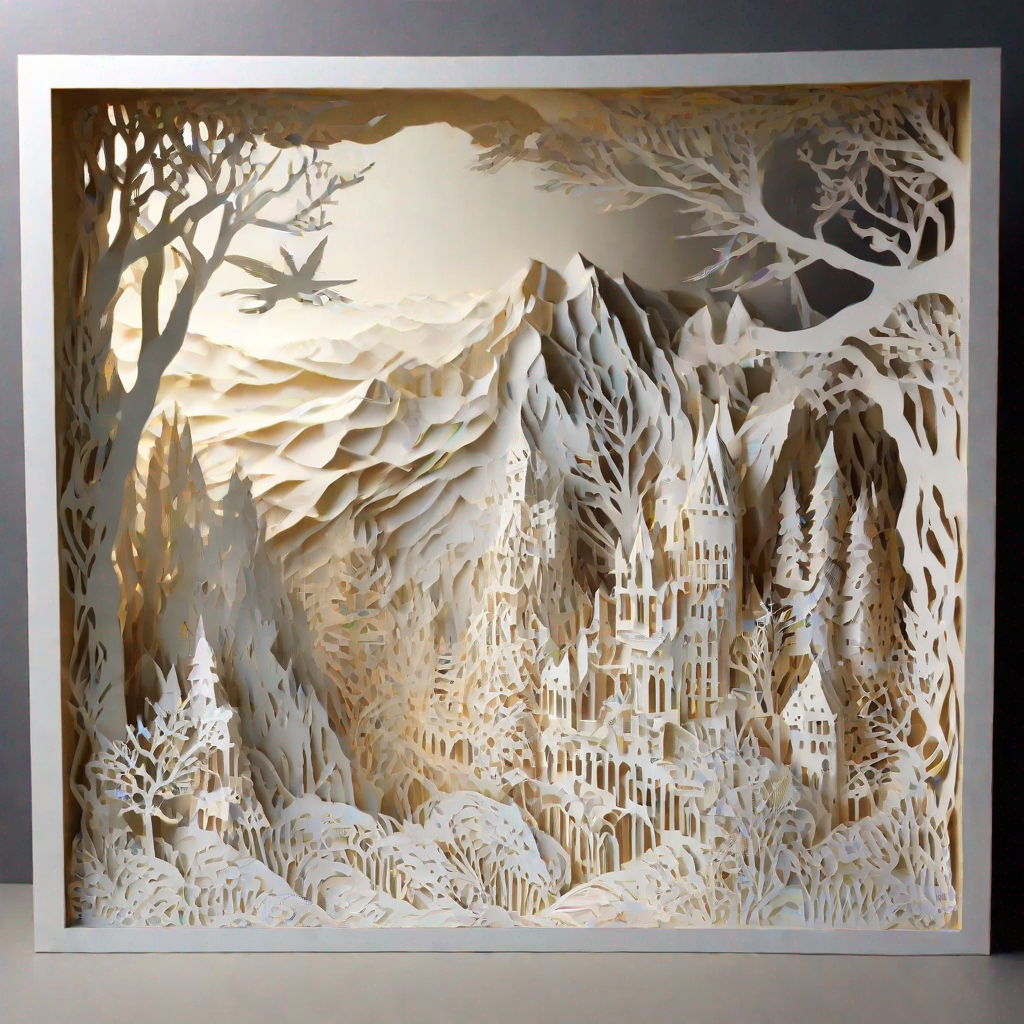
prompt = "冬季山脉的剪纸艺术,有雪"

image = pipe(
    prompt=prompt,
    num_inference_steps=4,
    guidance_scale=0,
    # Eta(在论文中称为`gamma`)用于控制每一步的随机性。
    # 0.3的值通常能产生良好的结果。
    # 我们建议在增加推理步骤数时使用更高的eta值。
    eta=0.3,
    generator=torch.Generator(device=device).manual_seed(0),
).images[0]

与ControlNet的兼容性
深度ControlNet
import torch
import numpy as np
from PIL import Image
from transformers import DPTFeatureExtractor, DPTForDepthEstimation
from diffusers import ControlNetModel, StableDiffusionXLControlNetPipeline
from diffusers.utils import load_image, make_image_grid
from scheduling_tcd import TCDScheduler

device = "cuda"
depth_estimator = DPTForDepthEstimation.from_pretrained("Intel/dpt-hybrid-midas").to(device)
feature_extractor = DPTFeatureExtractor.from_pretrained("Intel/dpt-hybrid-midas")

def get_depth_map(image):
    image = feature_extractor(images=image, return_tensors="pt").pixel_values.to(device)
    with torch.no_grad(), torch.autocast(device):
        depth_map = depth_estimator(image).predicted_depth

    depth_map = torch.nn.functional.interpolate(
        depth_map.unsqueeze(1),
        size=(1024, 1024),
        mode="bicubic",
        align_corners=False,
    )
    depth_min = torch.amin(depth_map, dim=[1, 2, 3], keepdim=True)
    depth_max = torch.amax(depth_map, dim=[1, 2, 3], keepdim=True)
    depth_map = (depth_map - depth_min) / (depth_max - depth_min)
    image = torch.cat([depth_map] * 3, dim=1)

    image = image.permute(0, 2, 3, 1).cpu().numpy()[0]
    image = Image.fromarray((image * 255.0).clip(0, 255).astype(np.uint8))
    return image

base_model_id = "stabilityai/stable-diffusion-xl-base-1.0"
controlnet_id = "diffusers/controlnet-depth-sdxl-1.0"
tcd_lora_id = "h1t/TCD-SDXL-LoRA"

controlnet = ControlNetModel.from_pretrained(
    controlnet_id,
    torch_dtype=torch.float16,
    variant="fp16",
).to(device)
pipe = StableDiffusionXLControlNetPipeline.from_pretrained(
    base_model_id,
    controlnet=controlnet,
    torch_dtype=torch.float16,
    variant="fp16",
).to(device)
pipe.enable_model_cpu_offload()

pipe.scheduler = TCDScheduler.from_config(pipe.scheduler.config)

pipe.load_lora_weights(tcd_lora_id)
pipe.fuse_lora()

prompt = "风暴兵讲课,真实照片风格"

image = load_image("https://huggingface.co/lllyasviel/sd-controlnet-depth/resolve/main/images/stormtrooper.png")
depth_image = get_depth_map(image)

controlnet_conditioning_scale = 0.5  # 推荐用于良好的泛化效果

image = pipe(
    prompt,
    image=depth_image,
    num_inference_steps=4,
    guidance_scale=0,
    eta=0.3, # 参数(在论文中称为`gamma`)用于控制每一步的随机性。0.3的值通常能产生良好的结果。
    controlnet_conditioning_scale=controlnet_conditioning_scale,
    generator=torch.Generator(device=device).manual_seed(0),
).images[0]

grid_image = make_image_grid([depth_image, image], rows=1, cols=2)

Canny ControlNet
import torch
from diffusers import ControlNetModel, StableDiffusionXLControlNetPipeline
from diffusers.utils import load_image, make_image_grid
from scheduling_tcd import TCDScheduler

device = "cuda"
base_model_id = "stabilityai/stable-diffusion-xl-base-1.0"
controlnet_id = "diffusers/controlnet-canny-sdxl-1.0"
tcd_lora_id = "h1t/TCD-SDXL-LoRA"

controlnet = ControlNetModel.from_pretrained(
    controlnet_id,
    torch_dtype=torch.float16,
    variant="fp16",
).to(device)
pipe = StableDiffusionXLControlNetPipeline.from_pretrained(
    base_model_id,
    controlnet=controlnet,
    torch_dtype=torch.float16,
    variant="fp16",
).to(device)
pipe.enable_model_cpu_offload()

pipe.scheduler = TCDScheduler.from_config(pipe.scheduler.config)

pipe.load_lora_weights(tcd_lora_id)
pipe.fuse_lora()

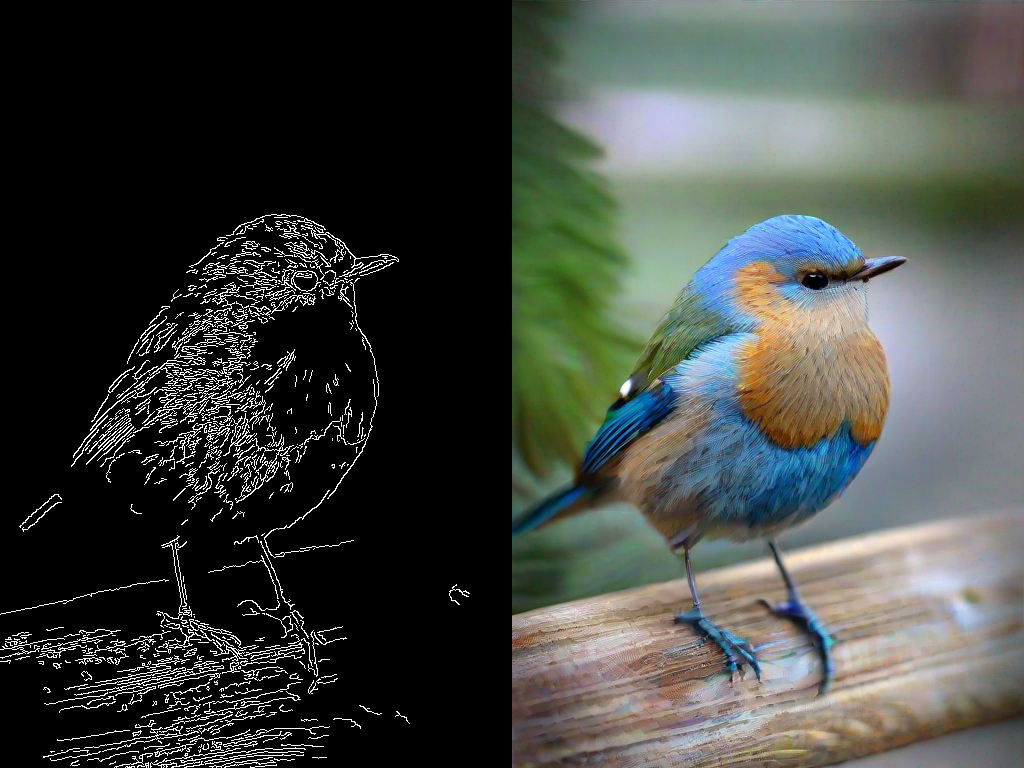
prompt = "ultrarealistic shot of a furry blue bird"

canny_image = load_image("https://huggingface.co/datasets/hf-internal-testing/diffusers-images/resolve/main/sd_controlnet/bird_canny.png")

controlnet_conditioning_scale = 0.5  # 推荐用于良好的泛化

image = pipe(
    prompt,
    image=canny_image,
    num_inference_steps=4,
    guidance_scale=0,
    eta=0.3, # 参数(在论文中称为`gamma`)用于控制每个步骤的随机性。0.3的值通常能产生良好的结果。
    controlnet_conditioning_scale=controlnet_conditioning_scale,
    generator=torch.Generator(device=device).manual_seed(0),
).images[0]

grid_image = make_image_grid([canny_image, image], rows=1, cols=2)

与IP-Adapter的兼容性
⚠️ 请参考官方仓库以获取安装IP-Adapter依赖项的说明。
import torch
from diffusers import StableDiffusionXLPipeline
from diffusers.utils import load_image, make_image_grid

from ip_adapter import IPAdapterXL
from scheduling_tcd import TCDScheduler

device = "cuda"
base_model_path = "stabilityai/stable-diffusion-xl-base-1.0"
image_encoder_path = "sdxl_models/image_encoder"
ip_ckpt = "sdxl_models/ip-adapter_sdxl.bin"
tcd_lora_id = "h1t/TCD-SDXL-LoRA"

pipe = StableDiffusionXLPipeline.from_pretrained(
    base_model_path,
    torch_dtype=torch.float16,
    variant="fp16"
)
pipe.scheduler = TCDScheduler.from_config(pipe.scheduler.config)

pipe.load_lora_weights(tcd_lora_id)
pipe.fuse_lora()

ip_model = IPAdapterXL(pipe, image_encoder_path, ip_ckpt, device)

ref_image = load_image("https://raw.githubusercontent.com/tencent-ailab/IP-Adapter/main/assets/images/woman.png").resize((512, 512))

prompt = "best quality, high quality, wearing sunglasses"

image = ip_model.generate(
    pil_image=ref_image,
    prompt=prompt,
    scale=0.5,
    num_samples=1,
    num_inference_steps=4,
    guidance_scale=0,
    eta=0.3, # 参数(在论文中称为`gamma`)用于控制每个步骤的随机性。0.3的值通常能产生良好的结果。
    seed=0,
)[0]

grid_image = make_image_grid([ref_image, image], rows=1, cols=2)

本地Gradio演示
首先安装gradio库,
pip install gradio
然后可以通过以下方式启动本地gradio演示:
python gradio_app.py

Colab演示
我们提供了一个用于TCD-LoRA文本到图像生成的Colab演示。
相关和并行工作
- Luo S, Tan Y, Huang L, 等. 潜在一致性模型:通过少步推理合成高分辨率图像. arXiv预印本 arXiv:2310.04378, 2023.
- Luo S, Tan Y, Patil S, 等. LCM-LoRA:一个通用的稳定扩散加速模块. arXiv预印本 arXiv:2311.05556, 2023.
- Lu C, Zhou Y, Bao F, 等. DPM-Solver:一种快速的常微分方程求解器,用于在大约10步内采样扩散概率模型. 神经信息处理系统进展, 2022, 35: 5775-5787.
- Lu C, Zhou Y, Bao F, 等. DPM-solver++:用于引导扩散概率模型采样的快速求解器. arXiv预印本 arXiv:2211.01095, 2022.
- Zhang Q, Chen Y. 使用指数积分器快速采样扩散模型. ICLR 2023, 基加利, 卢旺达, 2023年5月1-5日.
- Kim D, Lai C H, Liao W H, 等. 一致性轨迹模型:学习扩散的概率流常微分方程轨迹. ICLR 2024.
引用
@misc{zheng2024trajectory,
      title={轨迹一致性蒸馏},
      author={郑建斌 and 胡明辉 and 范钟毅 and 王超越 and 丁长兴 and 陶大程 and Tat-Jen Cham},
      year={2024},
      eprint={2402.19159},
      archivePrefix={arXiv},
      primaryClass={cs.CV}
}
致谢
本代码库heavily依赖于🤗Diffusers库和LCM。 此外,我们使用了社区中几个微调的Stable Diffusion模型来评估TCD的通用性,包括SDXL修复模型、Animagine XL、Papercut LoRA、深度Controlnet、Canny Controlnet、IP-Adapter。 我们还要感谢@hysts创建Hugging Face Space并提供免费的GPU资源来启动我们的在线演示。
感谢他们的贡献!

 访问官网
访问官网 Github
 Huggingface
 论文
论文


