alfred-py 可以通过终端命令 alfred 调用,作为深度学习的工具。它还提供了大量的实用 API 来提高您的日常效率,例如,如果您想绘制带有分数和标签的框,如果您想在 Python 应用程序中进行日志记录,如果您想将模型转换为 TRT 引擎,只需 import alfred,您就能获得所需的一切。更多用法请阅读以下说明。
功能概述
由于许多 alfred 的新用户可能不太熟悉它,这里简要总结一下功能,更多细节请参阅我的更新:
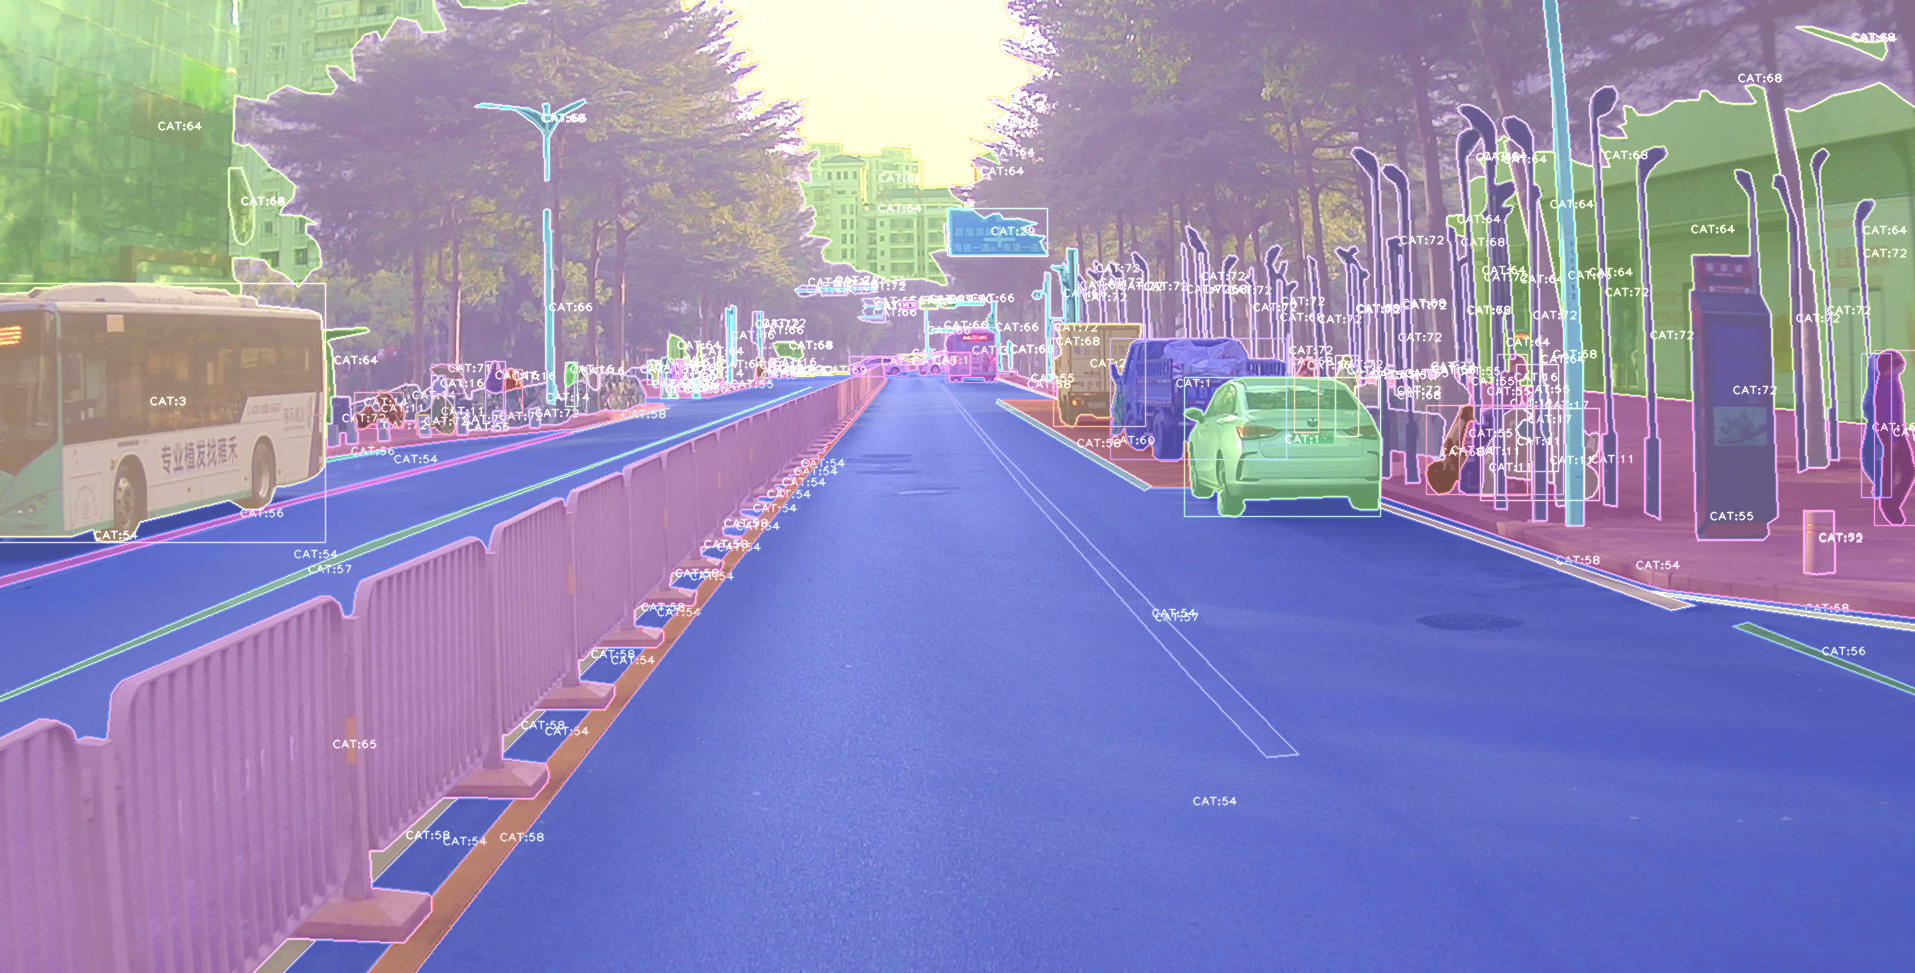
- 可视化:绘制框、掩码、关键点非常简单,甚至支持点云上的 3D 框;
- 命令行工具:例如,查看任何格式(yolo、voc、coco 等)的标注数据;
- 部署:您可以使用 alfred 部署 TensorRT 模型;
- 深度学习常用工具:如 torch.device() 等;
- 渲染器:渲染您的 3D 模型。
使用 alfred 可视化的图片:
安装
安装 alfred 非常简单:
要求:
lxml [可选]
pycocotools [可选]
opencv-python [可选]
然后:
sudo pip3 install alfred-py
alfred 既是一个库,也是一个工具,您可以导入它的 API,或者直接在终端中调用它。
alfred 的一瞥,安装上述包后,您将拥有 alfred:
-
data模块:# 显示 VOC 标注 alfred data vocview -i JPEGImages/ -l Annotations/ # 显示 coco 标注 alfred data cocoview -j annotations/instance_2017.json -i images/ # 显示 yolo 标注 alfred data yoloview -i images -l labels # 显示 txt 格式的检测标签 alfred data txtview -i images/ -l txts/ # 查看更多数据相关命令 alfred data -h # 评估工具 alfred data evalvoc -h -
cab模块:# 统计某种类型文件的数量 alfred cab count -d ./images -t jpg # 将文本文件拆分为训练集和测试集 alfred cab split -f all.txt -r 0.9,0.1 -n train,val -
vision模块:# 从视频中提取图像 alfred vision extract -v video.mp4 # 将图像合成为视频 alfred vision 2video -d images/ -
使用
-h查看更多:usage: alfred [-h] [--version] {vision,text,scrap,cab,data} ... positional arguments: {vision,text,scrap,cab,data} vision 视觉相关命令。 text 文本相关命令。 scrap 抓取相关命令。 cab 工具箱相关命令。 data 数据相关命令。 optional arguments: -h, --help 显示此帮助信息并退出 --version, -v 显示版本信息。在每个子模块中,您也可以调用它的
-h:alfred text -h。
如果您使用的是 Windows,可以通过以下命令安装 pycocotools:
pip install "git+https://github.com/philferriere/cocoapi.git#egg=pycocotools&subdirectory=PythonAPI"。由于我们需要 pycoco API,我们已将 pycocotools 作为依赖项。
更新
alfred-py 已经更新了 3 年,并将继续更新!
-
2050-xxx:未完待续;
-
2023.04.28:更新了 3D 关键点可视化器,现在您可以实时可视化 Human3DM 关键点:
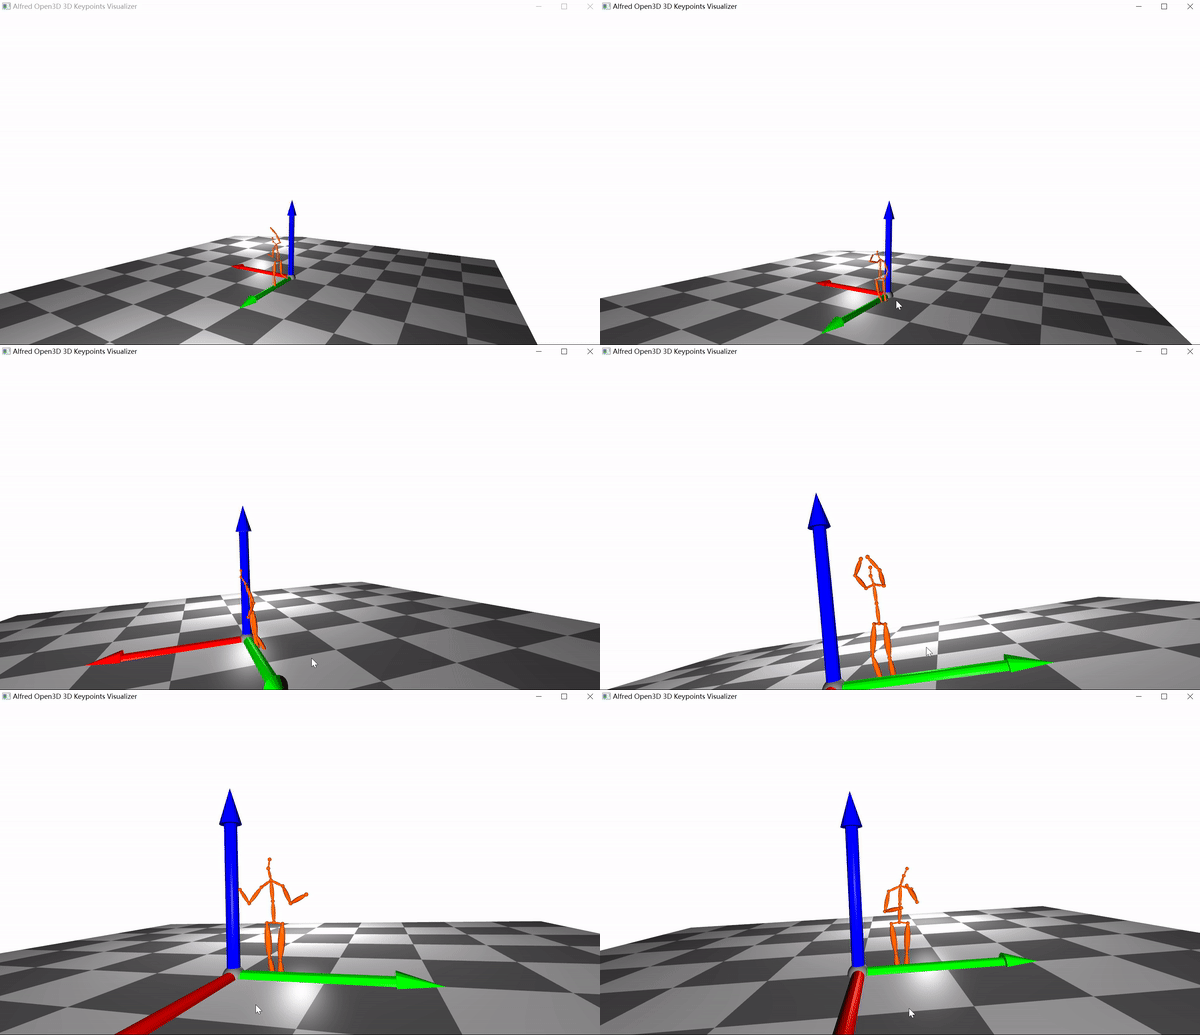 详情请参考
详情请参考 examples/demo_o3d_server.py。 结果由MotionBert生成。 -
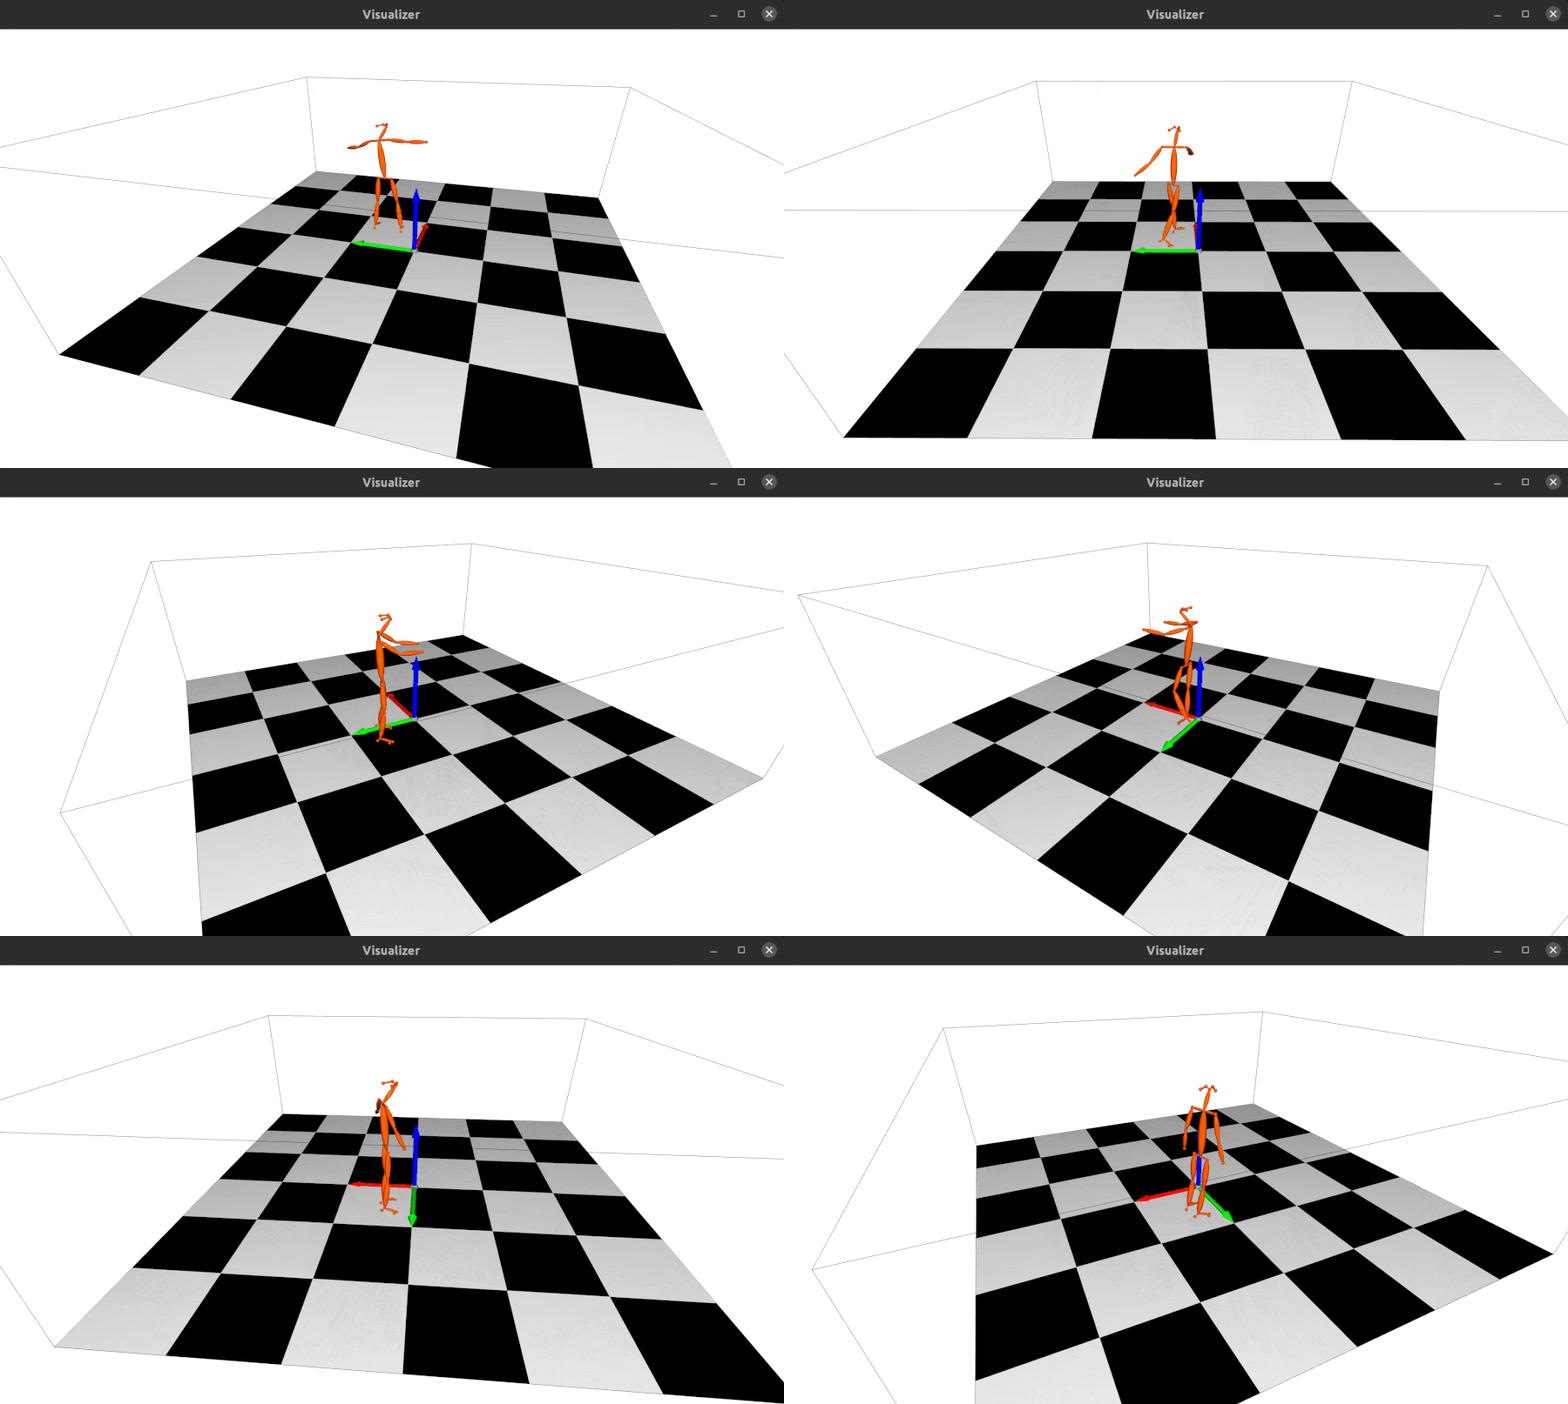
2022.01.18: 现在alfred支持基于Open3D的3D网格可视化服务器:
from alfred.vis.mesh3d.o3dsocket import VisOpen3DSocket

def main():
    server = VisOpen3DSocket()
    while True:
        server.update()


if __name__ == "__main__":
    main()
然后,您只需设置一个客户端,将3D关键点发送到服务器,它就会自动可视化显示出来。 效果如下:
-
2021.12.22: 现在alfred支持关键点可视化,几乎所有mmpose支持的数据集也都被alfred支持:
from alfred.vis.image.pose import vis_pose_result # preds是姿态数据,对于coco人体是(Bs, 17, 3)形状 vis_pose_result(ori_image, preds, radius=5, thickness=2, show=True) -
2021.12.05: 您现在可以使用
alfred.deploy.tensorrt进行TensorRT推理:from alfred.deploy.tensorrt.common import do_inference_v2, allocate_buffers_v2, build_engine_onnx_v3 def engine_infer(engine, context, inputs, outputs, bindings, stream, test_image): # image_input, img_raw, _ = preprocess_np(test_image) image_input, img_raw, _ = preprocess_img((test_image)) print('输入形状: ', image_input.shape) inputs[0].host = image_input.astype(np.float32).ravel() start = time.time() dets, labels, masks = do_inference_v2(context, bindings=bindings, inputs=inputs, outputs=outputs, stream=stream, input_tensor=image_input) img_f = 'demo/demo.jpg' with build_engine_onnx_v3(onnx_file_path=onnx_f) as engine: inputs, outputs, bindings, stream = allocate_buffers_v2(engine) # 上下文用于执行推理 with engine.create_execution_context() as context: print(engine.get_binding_shape(0)) print(engine.get_binding_shape(1)) print(engine.get_binding_shape(2)) INPUT_SHAPE = engine.get_binding_shape(0)[-2:] print(context.get_binding_shape(0)) print(context.get_binding_shape(1)) dets, labels, masks, img_raw = engine_infer( engine, context, inputs, outputs, bindings, stream, img_f) -
2021.11.13: 现在我添加了Siren SDK支持!
from functools import wraps
from alfred.siren.handler import SirenClient
from alfred.siren.models import ChatMessage, InvitationMessage

siren = SirenClient('daybreak_account', 'password')


@siren.on_received_invitation
def on_received_invitation(msg: InvitationMessage):
    print('收到邀请: ', msg.invitation)
    # 机器人直接同意邀请


@siren.on_received_chat_message
def on_received_chat_msg(msg: ChatMessage):
    print('收到新消息: ', msg.text)
    siren.publish_txt_msg('我收到了你的消息 O(∩_∩)O哈哈~', msg.roomId)


if __name__ == '__main__':
    siren.loop()
使用这个,您可以轻松设置一个聊天机器人。通过使用Siren客户端。
-
2021.06.24: 添加了一个有用的命令行工具,轻松更改您的pypi源!!:
alfred cab changesource然后您的pypi将默认使用阿里云源!
-
2021.05.07: 升级Open3D说明: Open3D>0.9.0不再与之前的alfred-py兼容。请升级Open3D,您可以从源码构建Open3D:
  git clone --recursive https://github.com/intel-isl/Open3D.git
  cd Open3D && mkdir build && cd build
  sudo apt install libc++abi-8-dev
  sudo apt install libc++-8-dev
  cmake .. -DPYTHON_EXECUTABLE=/usr/bin/python3
Ubuntu 16.04及以下版本我尝试从源码构建都失败了。所以,请为alfred-py使用open3d==0.9.0。
-
2021.04.01: 添加了统一的评估器。众所周知,对于许多用户来说,编写评估可能与您的项目深度耦合。但在Alfred的帮助下,您可以通过简单地编写8行代码在任何项目中进行评估,例如,如果您的数据集格式是Yolo,那么这样做:
  def infer_func(img_f):
  image = cv2.imread(img_f)
  results = config_dict['model'].predict_for_single_image(
      image, aug_pipeline=simple_widerface_val_pipeline, classification_threshold=0.89, nms_threshold=0.6, class_agnostic=True)
  if len(results) > 0:
      results = np.array(results)[:, [2, 3, 4, 5, 0, 1]]
      # xywh转xyxy
      results[:, 2] += results[:, 0]
      results[:, 3] += results[:, 1]
  return results

  if __name__ == '__main__':
      conf_thr = 0.4
      iou_thr = 0.5

      imgs_root = 'data/hand/images'
      labels_root = 'data/hand/labels'

      yolo_parser = YoloEvaluator(imgs_root=imgs_root, labels_root=labels_root, infer_func=infer_func)
      yolo_parser.eval_precisely()
然后您可以自动获得评估结果。将打印出所有召回率、精确度和mAP。更多数据集格式正在开发中。
-
2021.03.10: 新增
ImageSourceIter类,当您想为项目编写需要处理任何输入(如图像文件/文件夹/视频文件等)的演示时。您可以使用ImageSourceIter:from alfred.utils.file_io import ImageSourceIter # data_f可以是图像文件或图像文件夹或视频 iter = ImageSourceIter(ops.test_path) while True: itm = next(iter) if isinstance(itm, str): itm = cv2.imread(itm) # cv2.imshow('raw', itm) res = detect_for_pose(itm, det_model) cv2.imshow('res', itm) if iter.video_mode: cv2.waitKey(1) else: cv2.waitKey(0)然后您可以避免编写处理文件glob或在cv中读取视频的其他内容。注意itm返回可以是cv数组或文件路径。
-
2021.01.25: alfred现在支持对coco格式注释的自定义可视化(不使用pycoco工具):
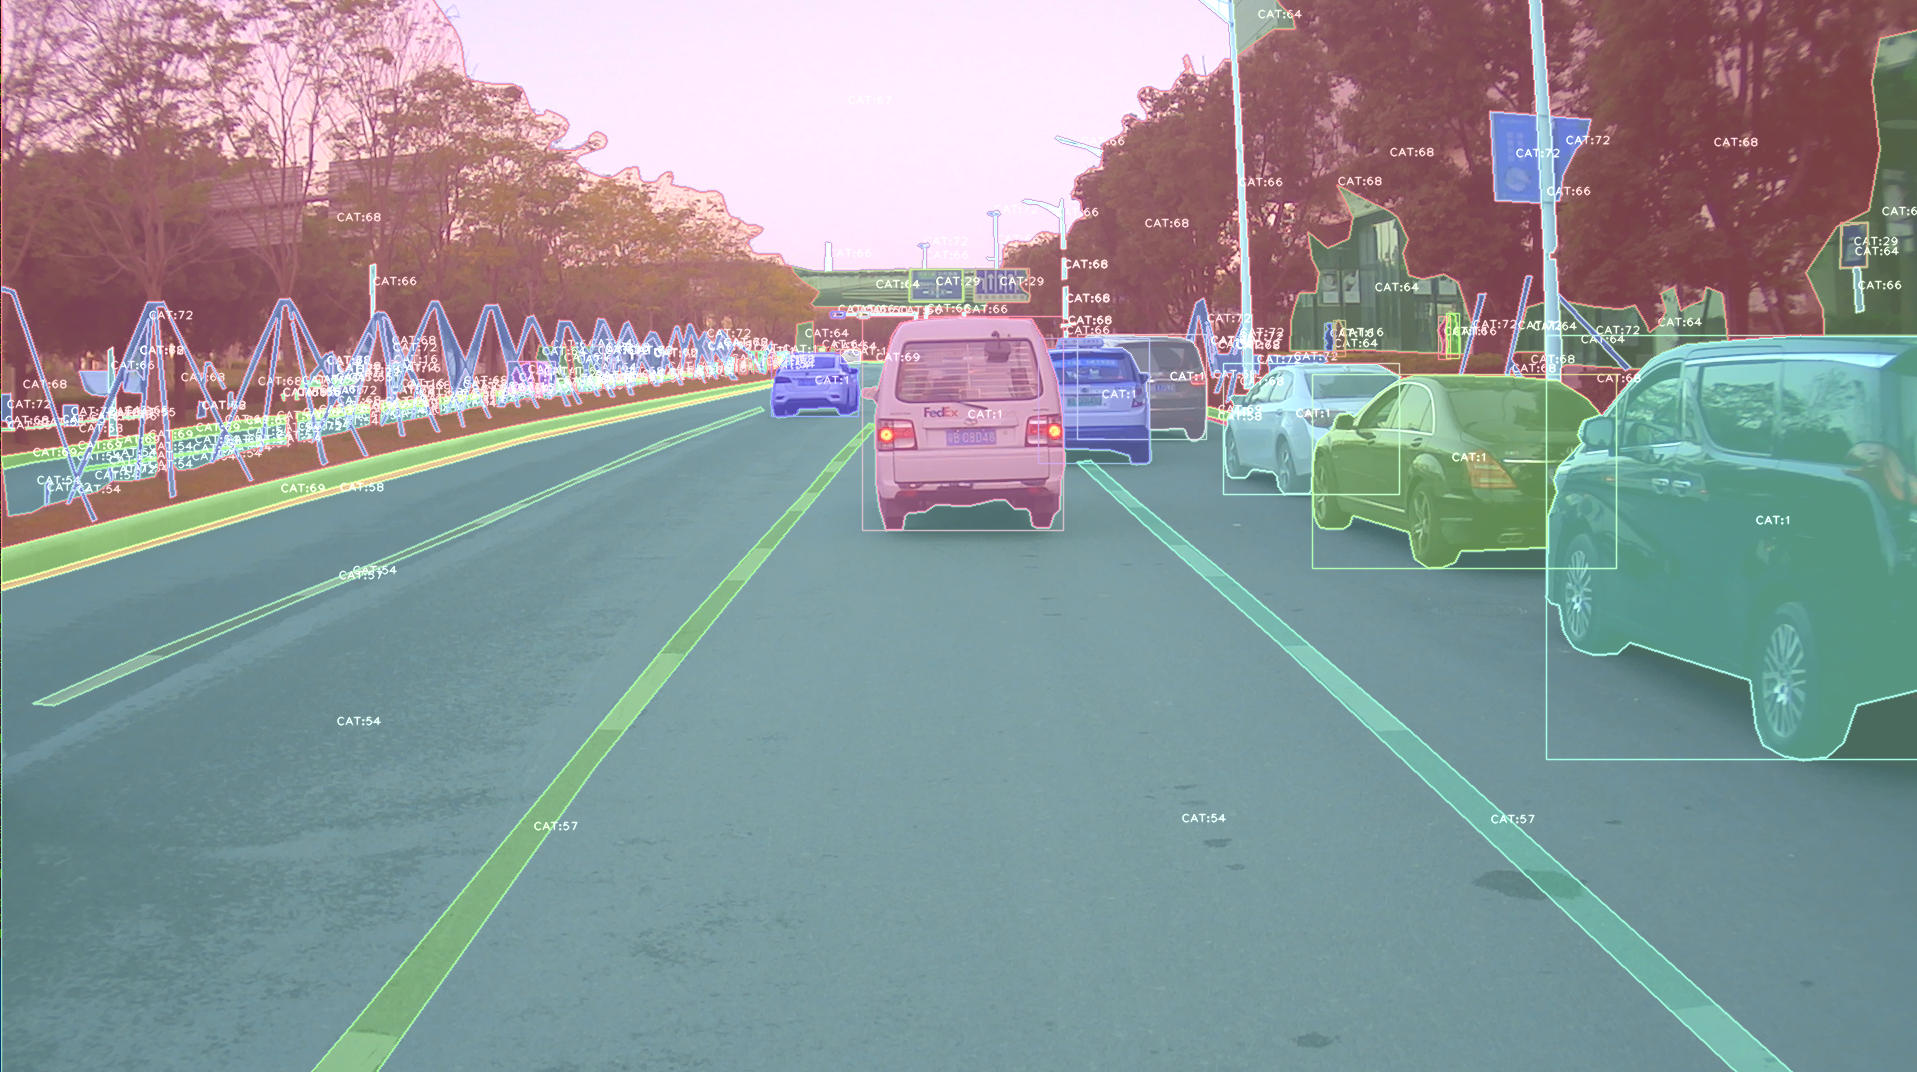
如果您的数据集是COCO格式但无法正确可视化,请向我提出issue,谢谢!
-
2020.09.27: 现在,YOLO和VOC格式可以相互转换,因此使用Alfred您可以:
- 将YOLO转换为VOC;
- 将VOC转换为YOLO;
- 将VOC转换为COCO;
- 将COCO转换为VOC;
通过这种方式,您可以在各种标注格式之间进行转换。
-
2020.09.08: 经过很长一段时间,alfred进行了一些更新: 我们在其中提供了
coco2yolo的功能。用户可以运行以下命令将数据转换为YOLO格式:alfred data coco2yolo -i images/ -j annotations/val_split_2020.json只需提供图像根路径和JSON文件。然后所有结果将生成到images文件夹下的
yolo文件夹或images父目录中。之后(您得到了yolo文件夹),您可以可视化转换结果以检查是否正确:
alfred data yolovview -i images/ -l labels/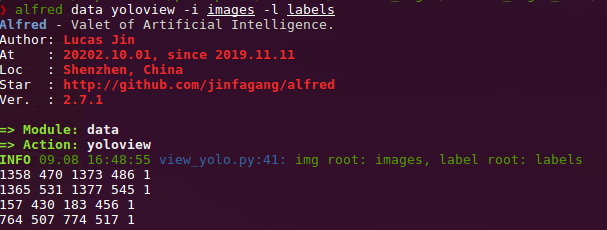
-
2020.07.27: 经过很长一段时间,alfred终于有了一些更新:
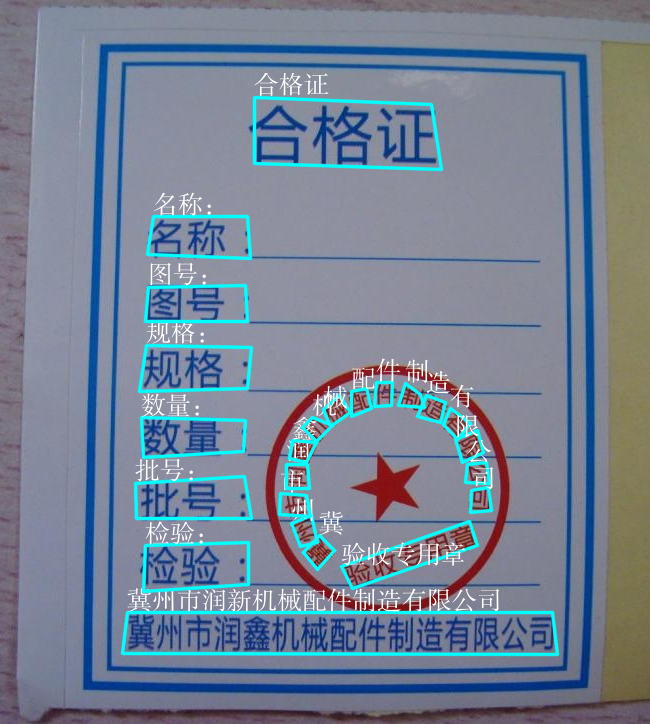
现在,您可以使用alfred在图像上绘制中文字符,不会出现编码未定义的问题。
from alfred.utils.cv_wrapper import put_cn_txt_on_img img = put_cn_txt_on_img(img, spt[-1], [points[0][0], points[0][1]-25], 1.0, (255, 255, 255))此外,您现在可以合并2个VOC数据集!当您有2个数据集并想将它们合并为一个时,这非常有用。
alfred data mergevoc -h您可以看到更多提示。
-
2020.03.08:在alfred中新增了几个文件:
alfred.utils.file_io: 提供常用的文件IO工具 alfred.dl.torch.env: 提供PyTorch中的种子或环境设置(与detectron2有相同的API) alfred.dl.torch.distribute: 使用PyTorch进行分布式训练时使用的工具 -
2020.03.04: 我们添加了一些评估工具来计算目标检测模型性能评估的mAP,它很有用并且可以可视化结果:
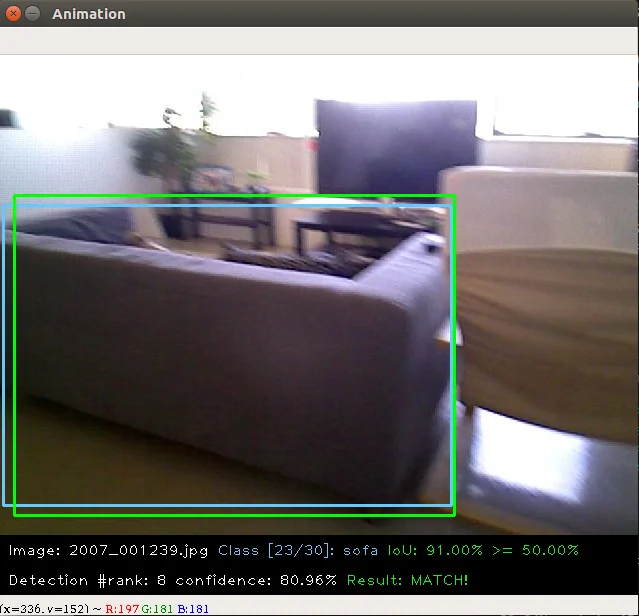
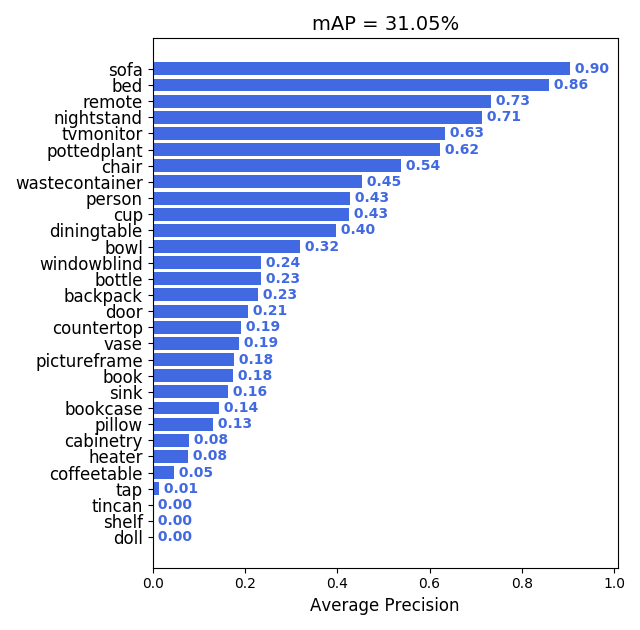
使用方法也很简单:
alfred data evalvoc -g ground-truth -d detection-results -im images其中
-g是您的真实标签目录(包含xml或txt文件),-d是您的检测结果文件目录,-im是您的图像文件夹。您只需将所有检测结果保存为txt文件,每个图像一个txt,格式如下:bottle 0.14981 80 1 295 500 bus 0.12601 36 13 404 316 horse 0.12526 430 117 500 307 pottedplant 0.14585 212 78 292 118 tvmonitor 0.070565 388 89 500 196 -
2020.02.27: 我们刚刚在alfred中更新了一个
license模块,比如您想为项目应用许可证或更新许可证,只需:alfred cab license -o 'MANA' -n 'YoloV3' -u 'manaai.cn'您可以通过
alfred cab license -h找到更多详细用法 -
2020-02-11: open3d已更改其API。我们已在alfred中更新了新的open3d,您可以简单地使用最新的open3d并运行
python3 examples/draw_3d_pointcloud.py,您将看到: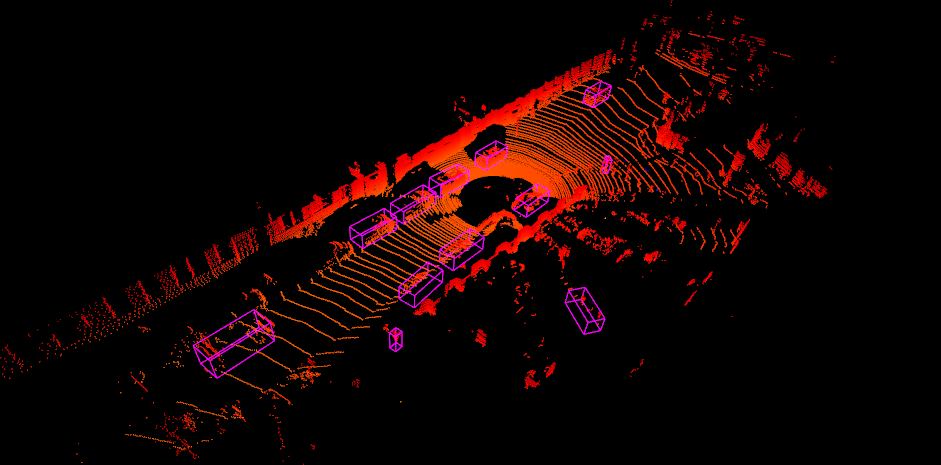
-
2020-02-10: alfred现在支持Windows(实验性);
-
2020-02-01: 武汉加油! alfred 修复了与编码'gbk'相关的Windows pip安装问题;
-
2020-01-14: 添加了cabinet模块,还在data模块下添加了一些工具;
-
2019-07-18: 添加了1000类ImageNet标签映射。可以这样调用:
from alfred.vis.image.get_dataset_label_map import imagenet_labelmap # 同时,coco、voc、cityscapes的标签映射也都已添加 from alfred.vis.image.get_dataset_label_map import coco_labelmap from alfred.vis.image.get_dataset_label_map import voc_labelmap from alfred.vis.image.get_dataset_label_map import cityscapes_labelmap -
2019-07-13: 我们在命令行用法中添加了一个VOC检查模块,您现在可以像这样可视化VOC格式的检测数据:
alfred data voc_view -i ./images -l labels/ -
2019-05-17: 我们添加了open3d作为一个库,用于在Python中可视化3D点云。现在您可以进行一些简单的准备,并直接在激光雷达点上可视化3D框,并像OpenCV一样显示!!
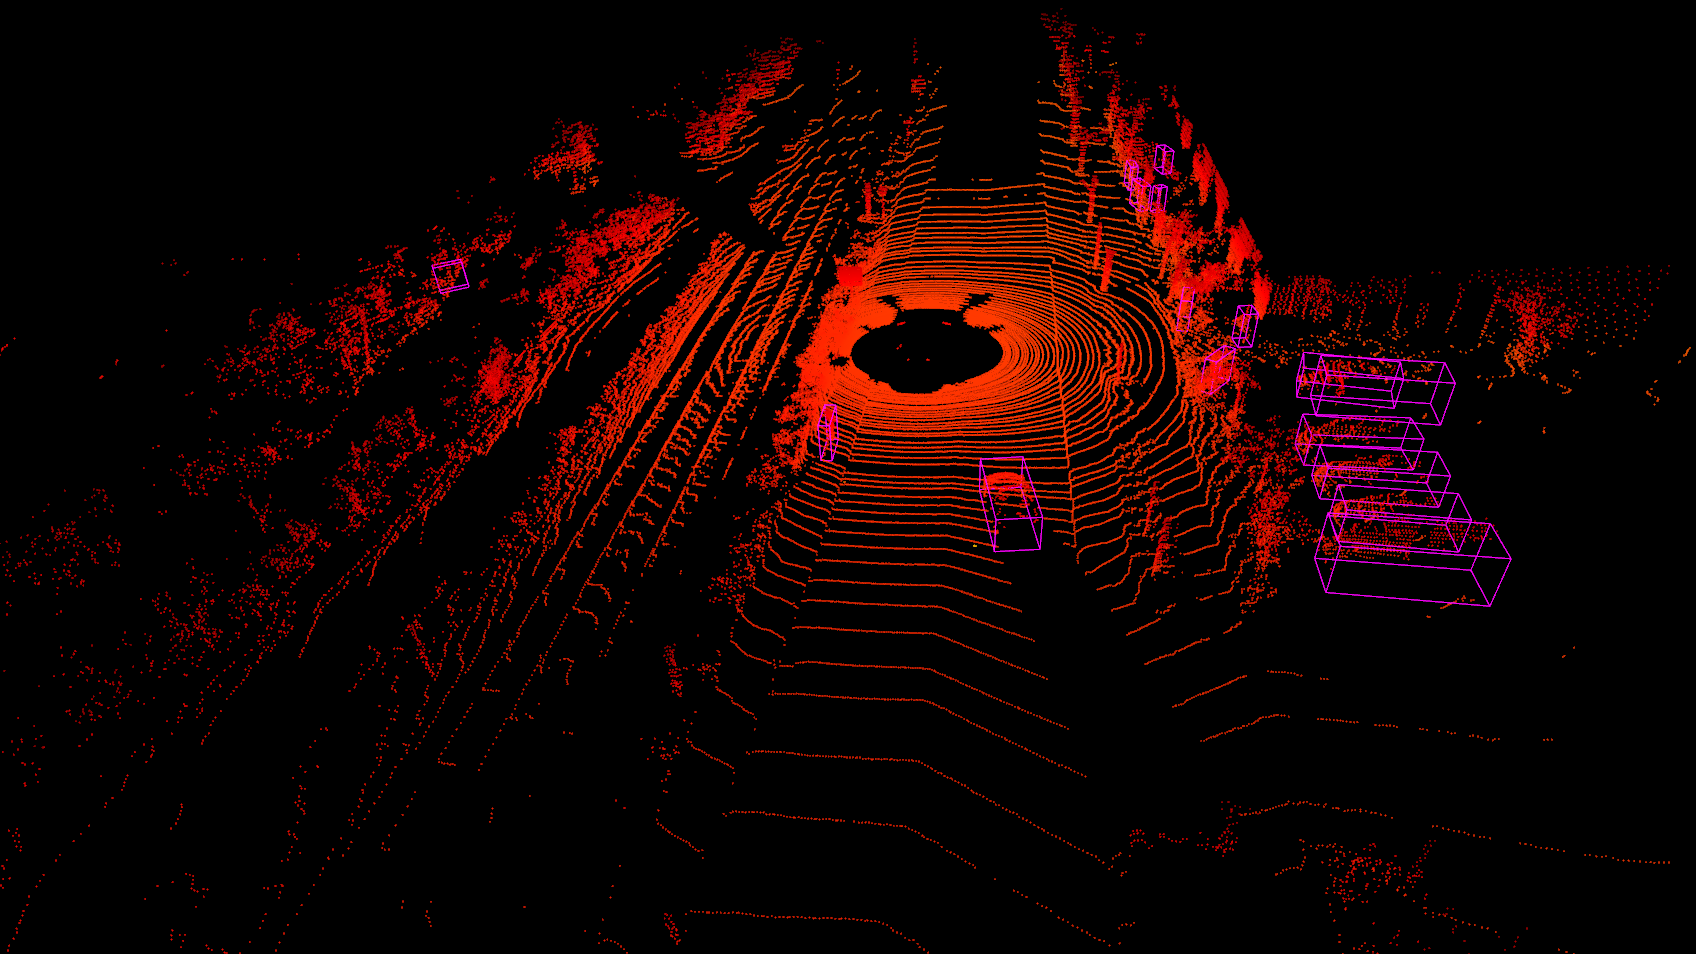
您只需使用alfred-py和open3d就可以实现这一点!
示例代码可以在
examples/draw_3d_pointcloud.py中找到。代码已使用最新的open3d API更新! -
2019-05-10: 一个小更新但非常有用,我们称之为mute_tf,您想禁用TensorFlow的忽略日志吗?只需这样做!!
from alfred.dl.tf.common import mute_tf
mute_tf()
import tensorflow as tf
然后,日志消息就消失了....
-
2019-05-07: 添加了一些协议,现在您可以使用alfred解析TensorFlow COCO标签映射:
from alfred.protos.labelmap_pb2 import LabelMap
from google.protobuf import text_format

with open('coco.prototxt', 'r') as f:
    lm = LabelMap()
    lm = text_format.Merge(str(f.read()), lm)
    names_list = [i.display_name for i in lm.item]
    print(names_list)
-
2019-04-25:添加了KITTI融合功能,现在您可以像这样将3D标签投影到图像上: 我们还将添加更多融合工具,如用于nuScene数据集的工具。
我们提供了kitti融合工具,用于将"相机链接的3D点"转换为图像像素,以及将"雷达链接的3D点"转换为图像像素。API的大致使用如下:
# 将雷达预测转换为图像像素
from alfred.fusion.kitti_fusion import LidarCamCalibData, \
    load_pc_from_file, lidar_pts_to_cam0_frame, lidar_pt_to_cam0_frame
from alfred.fusion.common import draw_3d_box, compute_3d_box_lidar_coords

# 雷达预测结果
# 包含x,y,z,h,w,l,rotation_y
res = [[4.481686, 5.147319, -1.0229858, 1.5728549, 3.646751, 1.5121397, 1.5486346],
       [-2.5172017, 5.0262384, -1.0679419, 1.6241353, 4.0445814, 1.4938312, 1.620804],
       [1.1783253, -2.9209857, -0.9852259, 1.5852798, 3.7360613, 1.4671413, 1.5811548]]

for p in res:
    xyz = np.array([p[: 3]])
    c2d = lidar_pt_to_cam0_frame(xyz, frame_calib)
    if c2d is not None:
        cv2.circle(img, (int(c2d[0]), int(c2d[1])), 3, (0, 255, 255), -1)
    hwl = np.array([p[3: 6]])
    r_y = [p[6]]
    pts3d = compute_3d_box_lidar_coords(xyz, hwl, angles=r_y, origin=(0.5, 0.5, 0.5), axis=2)

    pts2d = []
    for pt in pts3d[0]:
        coords = lidar_pt_to_cam0_frame(pt, frame_calib)
        if coords is not None:
            pts2d.append(coords[:2])
    pts2d = np.array(pts2d)
    draw_3d_box(pts2d, img)
您可以看到类似这样的结果:
注意:
compute_3d_box_lidar_coords用于雷达预测,compute_3d_box_cam_coords用于KITTI标签,因为KITTI标签是基于相机坐标系的!。
由于许多用户询问如何重现这个结果,您可以查看
examples/draw_3d_box.py下的演示文件; -
2019-01-25:我们刚刚为pytorch添加了网络可视化工具!它看起来如何?简单地打印出每一层网络及其输出形状,我相信这对人们可视化他们的模型非常有帮助!
➜  mask_yolo3 git:(master) ✗ python3 tests.py
----------------------------------------------------------------
        Layer (type)               Output Shape         Param #
================================================================
            Conv2d-1         [-1, 64, 224, 224]           1,792
              ReLU-2         [-1, 64, 224, 224]               0
              .........
           Linear-35                 [-1, 4096]      16,781,312
             ReLU-36                 [-1, 4096]               0
          Dropout-37                 [-1, 4096]               0
           Linear-38                 [-1, 1000]       4,097,000
================================================================
Total params: 138,357,544
Trainable params: 138,357,544
Non-trainable params: 0
----------------------------------------------------------------
Input size (MB): 0.19
Forward/backward pass size (MB): 218.59
Params size (MB): 527.79
Estimated Total Size (MB): 746.57
----------------------------------------------------------------
好了,就是这样。您只需要做以下操作:
from alfred.dl.torch.model_summary import summary
from alfred.dl.torch.common import device

from torchvision.models import vgg16

vgg = vgg16(pretrained=True)
vgg.to(device)
summary(vgg, input_size=[224, 224])
假设您输入(224, 224)的图像,您将得到这个输出,或者您可以更改任何其他尺寸来查看输出如何变化。(目前不支持单通道图像)
-
2018-12-7:现在,我们添加了一个可扩展的类,用于快速编写图像检测或分割演示。
如果您想编写一个在图像、视频或直接从网络摄像头进行推理的演示,现在您可以使用标准的alfred方式来做到这一点:
class ENetDemo(ImageInferEngine):

    def __init__(self, f, model_path):
        super(ENetDemo, self).__init__(f=f)

        self.target_size = (512, 1024)
        self.model_path = model_path
        self.num_classes = 20

        self.image_transform = transforms.Compose(
            [transforms.Resize(self.target_size),
             transforms.ToTensor()])

        self._init_model()

    def _init_model(self):
        self.model = ENet(self.num_classes).to(device)
        checkpoint = torch.load(self.model_path)
        self.model.load_state_dict(checkpoint['state_dict'])
        print('模型已加载!')

    def solve_a_image(self, img):
        images = Variable(self.image_transform(Image.fromarray(img)).to(device).unsqueeze(0))
        predictions = self.model(images)
        _, predictions = torch.max(predictions.data, 1)
        prediction = predictions.cpu().numpy()[0] - 1
        return prediction

    def vis_result(self, img, net_out):
        mask_color = np.asarray(label_to_color_image(net_out, 'cityscapes'), dtype=np.uint8)
        frame = cv2.resize(img, (self.target_size[1], self.target_size[0]))
        # mask_color = cv2.resize(mask_color, (frame.shape[1], frame.shape[0]))
        res = cv2.addWeighted(frame, 0.5, mask_color, 0.7, 1)
        return res
如果 name == 'main': v_f = '' enet_seg = ENetDemo(f=v_f, model_path='save/ENet_cityscapes_mine.pth') enet_seg.run()
之后,你可以直接从视频中进行推理。这种用法可以在 git 仓库中找到:
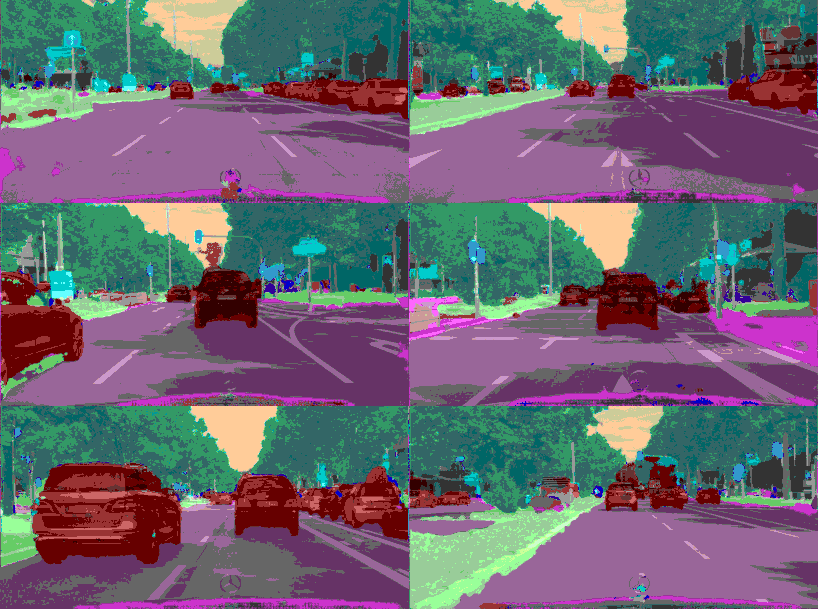
使用 alfred 的仓库:http://github.com/jinfagang/pt_enet
-
2018-11-6:我很高兴地宣布 alfred 2.0 发布了!😄⛽️👏👏 让我们快速看一下更新了什么:
# 2个新模块,fusion 和 vis
from alred.fusion import fusion_utils
fusion 模块包含了许多你可能会用到的有用的传感器融合辅助函数,比如将激光雷达点云投影到图像上。
-
2018-08-01:修复了视频组合函数与序列不能很好配合的问题。添加了一个排序算法以确保视频序列正确。 还在包中添加了一些绘制边界框的函数。
可以这样调用:
-
2018-03-16:稍微更新了 alfred,现在我们可以使用这个工具将视频序列组合回原始视频! 只需简单地执行:
# alfred 二进制可执行程序
alfred vision 2video -d ./video_images
功能
alfred 既是一个库,也是一个命令行工具。它可以做这些事情:
# 从视频中提取图像
alfred vision extract -v video.mp4
# 将图像序列组合成视频
alfred vision 2video -d /path/to/images
# 从图像中获取人脸
alfred vision getface -d /path/contains/images/
快来试试吧!
版权
Alfred 由 Lucas Jin 用 ❤️ 构建,欢迎 star 和提交 PR。如果你有任何问题,可以通过微信联系我:jintianiloveu,本代码在 GPL-3 许可下发布。

 访问官网
访问官网 Github


