pyChatGPT
由于ChatGPT现在有了官方API,我已停止维护此项目。有关更多详情,请参阅OpenAI API。如果您想继续开发,欢迎fork此项目。
OpenAI的ChatGPT API的非官方Python封装器
特性
- 使用
undetected_chromedriver绕过Cloudflare的反机器人保护 - 支持OpenAI / Google / Microsoft登录(实验性)
- 支持验证码解决器(2Captcha, PyPasser)
- 支持无头机器
- 支持代理(仅限无基本认证)
入门
从0.3.0版本开始,本库仅使用
undetected_chromedriver来绕过Cloudflare的反机器人保护。由于保护的复杂性,不再使用requests模块。在使用此封装器之前,请确保您已安装Google Chrome或Chromium。
安装
pip install -U pyChatGPT
使用方法
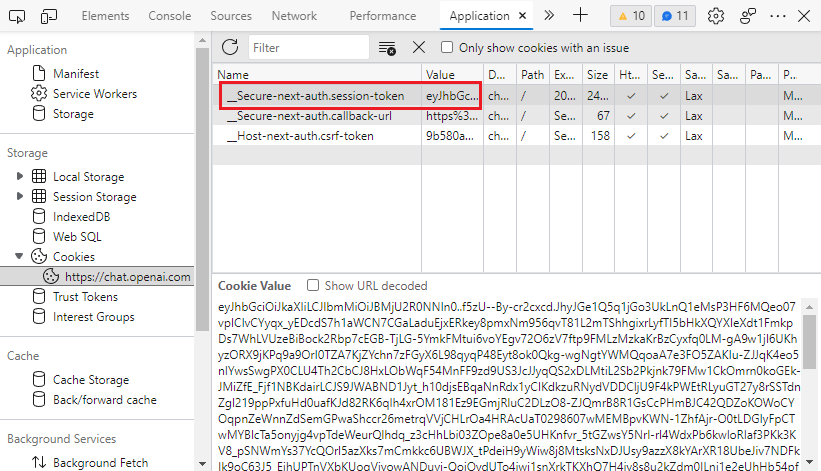
获取session_token
- 前往https://chat.openai.com/chat并按`F12`打开开发者工具。
- 在
Application>Storage>Cookies>https://chat.openai.com中找到__Secure-next-auth.session-tokencookie。 - 复制
Cookie Value字段中的值。

交互模式
python3 -m pyChatGPT
作为模块导入
from pyChatGPT import ChatGPT

session_token = 'abc123'  # 来自https://chat.openai.com/chat的`__Secure-next-auth.session-token` cookie
api = ChatGPT(session_token)  # 使用会话令牌进行身份验证
api = ChatGPT(session_token, conversation_id='some-random-uuid')  # 指定对话ID
api = ChatGPT(session_token, proxy='https://proxy.example.com:8080')  # 指定代理
api = ChatGPT(session_token, chrome_args=['--window-size=1920,768'])  # 指定Chrome参数
api = ChatGPT(session_token, moderation=False)  # 禁用审核
api = ChatGPT(session_token, verbose=True)  # 详细模式(打印调试信息)

# 使用Google登录进行身份验证
api = ChatGPT(auth_type='google', email='example@gmail.com', password='password')
# 使用Microsoft登录进行身份验证
api = ChatGPT(auth_type='microsoft', email='example@gmail.com', password='password')
# 使用OpenAI登录进行身份验证(使用语音转文本引擎解决验证码)
api = ChatGPT(auth_type='openai', email='example@gmail.com', password='password')
# 使用OpenAI登录进行身份验证(手动解决验证码)
api = ChatGPT(
    auth_type='openai', captcha_solver=None,
    email='example@gmail.com', password='password'
)
# 使用OpenAI登录进行身份验证(使用2captcha解决验证码)
api = ChatGPT(
    auth_type='openai', captcha_solver='2captcha', solver_apikey='abc',
    email='example@gmail.com', password='password'
)
# 在登录前重用之前成功登录生成的cookies,
# 如果`login_cookies_path`不存在,将使用`auth_type`进行登录处理,并将cookies保存到`login_cookies_path`
# 仅在`auth_type`为`openai`或`google`时有效
api = ChatGPT(auth_type='openai', email='example@xxx.com', password='password',
    login_cookies_path='your_cookies_path',
)

resp = api.send_message('你好,世界!')
print(resp['message'])

api.reset_conversation()  # 重置对话
api.clear_conversations()  # 清除所有对话
api.refresh_chat_page()  # 刷新聊天页面
常见问题
如何在无头Linux服务器上运行?
# 安装chromium和X虚拟帧缓冲
sudo apt install chromium-browser xvfb

# 启动您的脚本
python3 your_script.py
如何在Google Colab上运行?
安装依赖项时会话崩溃是正常的。忽略错误并运行您的脚本。
# 安装依赖项
!apt install chromium-browser xvfb
!pip install -U selenium_profiles pyChatGPT

# 安装chromedriver
from selenium_profiles.utils.installer import install_chromedriver
install_chromedriver()
# 正常启动您的脚本
!python3 -m pyChatGPT
灵感来源
本项目受以下项目启发:
免责声明
本项目与OpenAI没有任何关联。使用风险自负。我不对本项目造成的任何损害负责。在使用本项目之前,请阅读OpenAI服务条款。
许可证
本项目根据GPLv3许可证授权 - 有关详细信息,请参阅LICENSE文件。

 访问官网
访问官网 Github
 文档
文档


