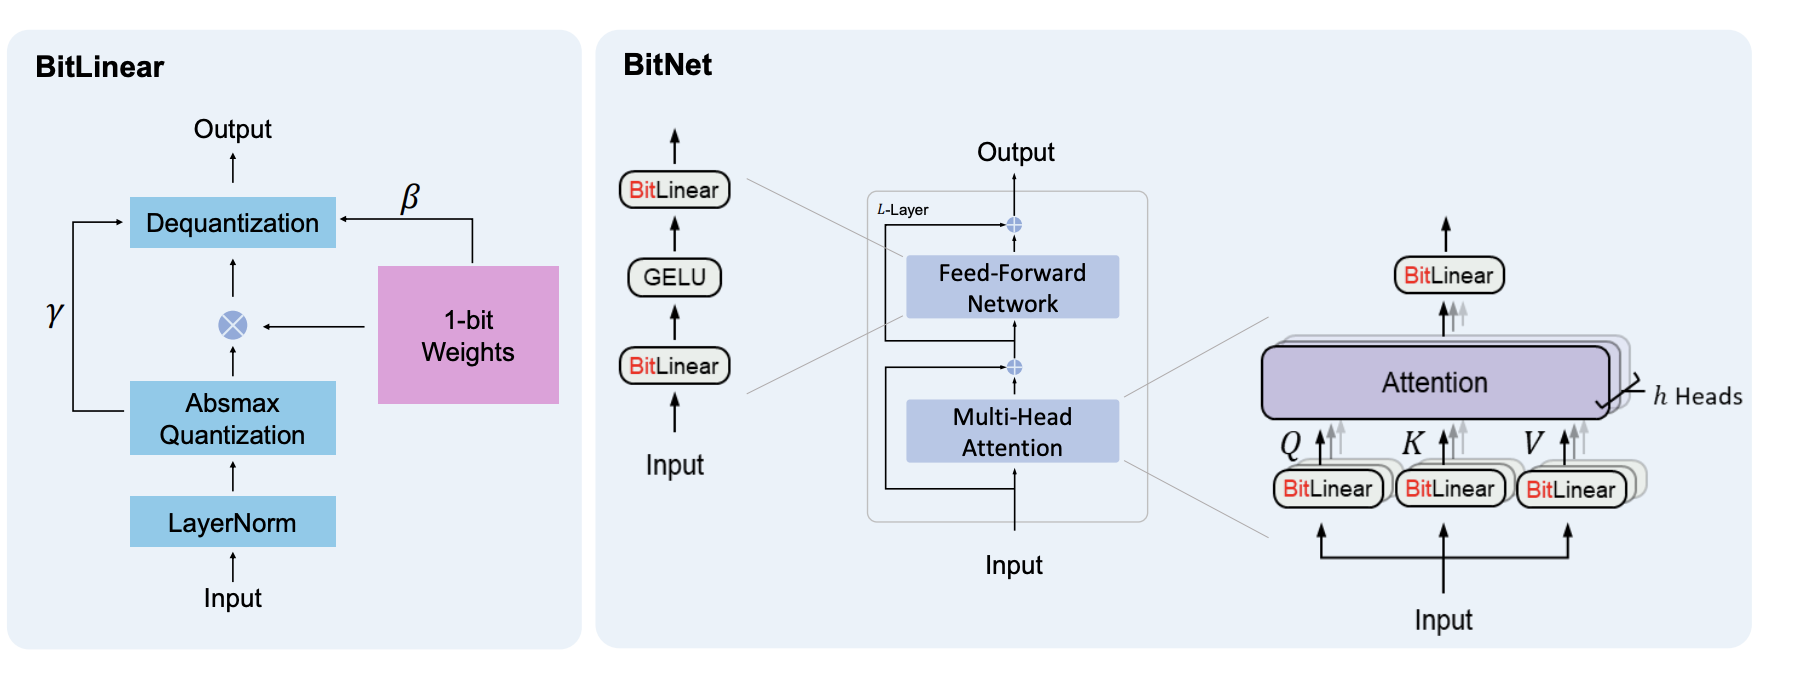
BitNet
 论文"BitNet: 扩展大型语言模型的1比特Transformer"中线性方法和模型的PyTorch实现
BitLinear = 张量 -> 层归一化 -> 二值化 -> 绝对值最大量化 -> 反量化
"BitNet架构的实现相当简单,只需要替换Transformer中的线性投影(即PyTorch中的nn.Linear)。" -- BitNet真的很容易实现,只需用BitLinear模块替换线性层即可!
新闻
- 新迭代 🔥 论文"1比特LLM时代:所有大型语言模型都在1.58比特中"有一个全新的迭代,我们正在实现它。加入Agora discord并贡献!在此加入
- 新优化 第一个
BitLinear已经优化,我们现在有一个Bit注意力BitMGQA,将BitLinear实现到注意力机制中。多组查询注意力也被广泛认为是最好的注意力机制,因为它具有快速解码和长上下文处理能力,感谢Frank提供易于使用的实现! - BitLinear 1.5发布 🔥: 新的BitLinear 1.5仍在进行中 🔥 这里是文件 仍有一些bug,如反量化算法,我们还需要用元素级加法替换乘法,如果你能帮助解决这个问题,那将非常棒。
- 注意: 一个模型显然需要从头开始微调才能使用BitLinear,仅仅改变已训练模型中的线性方法是行不通的。请从头开始微调或训练。
致谢
- Dimitry, Nullonix进行分析、代码审查和修订
- Vyom提供4080用于训练!
安装
pip3 install bitnet
使用
我们在这里和examples文件夹中有大量示例脚本,如果你需要某个用例的帮助,请在discord中告诉我!
BitLinear
- BitLinear层的示例,这是论文的主要创新!
import torch

from bitnet import BitLinear

# 输入
x = torch.randn(10, 1000, 512)

# BitLinear层
layer = BitLinear(512, 400)

# 输出
y = layer(x)

print(y)
BitLinearNew
import torch
from bitnet import BitLinearNew

# 创建一个形状为(16, 10)的随机张量
x = torch.randn(16, 1000, 512)

# 创建一个BitLinearNew类的实例,输入大小为10,输出大小为20,2个组
layer = BitLinearNew(
    512,
    20,
)

# 对输入x进行BitLinearNew层的前向传播
output = layer(x)

# 打印输出张量
print(output)
print(output.shape)
BitNetTransformer
- 完全按照图中描述实现的Transformer,包含MHA和BitFeedforwards
- 不仅可用于文本,还可用于图像,甚至可能用于视频或音频处理
- 完整的残差和跳跃连接,用于梯度流
# 导入必要的库
import torch
from bitnet import BitNetTransformer

# 创建一个随机整数张量
x = torch.randint(0, 20000, (1, 1024))

# 初始化BitNetTransformer模型
bitnet = BitNetTransformer(
    num_tokens=20000,  # 输入中唯一token的数量
    dim=1024,  # 输入和输出嵌入的维度
    depth=6,  # transformer层的数量
    heads=8,  # 注意力头的数量
    ff_mult=4,  # 前馈网络隐藏维度的乘数
)

# 将张量通过transformer模型
logits = bitnet(x)

# 打印输出的形状
print(logits)
BitAttention
这个注意力机制已被修改为使用BitLinear而不是默认的线性投影。它还使用多组查询注意力而不是常规的多头注意力,以实现更快的解码和更长的上下文处理。
import torch
from bitnet import BitMGQA

# 创建一个形状为(1, 10, 512)的随机张量
x = torch.randn(1, 10, 512)

# 创建一个BitMGQA模型实例,输入大小为512,8个注意力头,4层
gqa = BitMGQA(512, 8, 4)

# 将输入张量通过BitMGQA模型,获取输出和注意力权重
out, _ = gqa(x, x, x, need_weights=True)

# 打印输出张量和注意力张量的形状
print(out)
BitFeedForward
- 如图所示的前馈网络,带有BitLinear和GELU:
- Linear -> GELU -> Linear
- 你可以添加dropout、层归一化或其他层以获得更好的前馈网络
import torch
from bitnet import BitFeedForward

# 创建一个形状为(10, 512)的随机输入张量
x = torch.randn(10, 512)

# 创建一个BitFeedForward类的实例,参数如下:
# - input_dim: 512
# - hidden_dim: 512
# - num_layers: 4
# - swish: True(使用Swish激活函数)
# - post_act_ln: True(在每个激活后应用层归一化)
# - dropout: 0.1(应用0.1的dropout概率)
ff = BitFeedForward(512, 512, 4, swish=True, post_act_ln=True, dropout=0.1)

# 将输入张量x通过BitFeedForward网络
y = ff(x)

# 打印输出张量y的形状
print(y)  # torch.Size([10, 512])
推理
from bitnet import BitNetInference

bitnet = BitNetInference()
bitnet.load_model("../model_checkpoint.pth")  # 下载模型
output_str = bitnet.generate("The dog jumped over the ", 512)
print(output_str)
Huggingface用法
import torch
from transformers import AutoModelForSequenceClassification, AutoTokenizer

from bitnet import replace_linears_in_hf

# 从Hugging Face的Transformers加载模型
model_name = "bert-base-uncased"
tokenizer = AutoTokenizer.from_pretrained(model_name)
model = AutoModelForSequenceClassification.from_pretrained(model_name)

# 用BitLinear替换Linear层
replace_linears_in_hf(model)

# 要分类的示例文本
text = "用你的文本替换这里"
inputs = tokenizer(
    text, return_tensors="pt", padding=True, truncation=True, max_length=512
)

# 执行推理
model.eval()  # 将模型设置为评估模式
with torch.no_grad():
    outputs = model(**inputs)
    predictions = torch.nn.functional.softmax(outputs.logits, dim=-1)
    print(predictions)

# 处理预测结果
predicted_class_id = predictions.argmax().item()
print(f"预测的类别ID: {predicted_class_id}")

# 可选:如果你知道分类标签,可以将预测的类别ID映射到标签
# labels = ["标签1", "标签2", ...]  # 定义与模型类别对应的标签
# print(f"预测的标签: {labels[predicted_class_id]}")
Pytorch模型的即插即用替换
import torch
from torch import nn
from bitnet import replace_linears_in_pytorch_model

# 定义一个简单的模型
model = nn.Sequential(
    nn.Linear(10, 20),
    nn.ReLU(),
    nn.Linear(20, 30),
)

print("替换前:")
print(model)
# 将 nn.Linear 替换为 BitLinear
replace_linears_in_pytorch_model(model)

print("替换后:")
print(model)

# 现在你可以使用该模型进行训练或推理
# 例如,将随机输入传递给模型
input = torch.randn(1, 10)
output = model(input)
优化的 Cuda 内核
python setup.py build_ext --inplace
import torch
import gemm_lowbit_ext  # 导入编译后的模块

# 使用示例
a = torch.randn(10, 20, dtype=torch.half, device='cuda')  # 示例张量
b = torch.randn(20, 30, dtype=torch.half, device='cuda')  # 示例张量
c = torch.empty(10, 30, dtype=torch.half, device='cuda')  # 输出张量

w_scale = 1.0  # 示例缩放因子
x_scale = 1.0  # 示例缩放因子

# 调用自定义 CUDA GEMM 操作
gemm_lowbit_ext.gemm_lowbit(a, b, c, w_scale, x_scale)

print(c)  # 查看结果
BitLora
BitLora 的实现!
import torch
from bitnet import BitLora

# 随机文本张量
x = torch.randn(1, 12, 200)

# 创建 BitLora 模型实例
model = BitLora(in_features=200, out_features=200, rank=4, lora_alpha=1)

# 执行前向传播
out = model(x)

# 打印输出张量的形状
print(out.shape)
BitMamba
import torch
from bitnet import BitMamba

# 创建一个大小为 (2, 10) 的张量,包含 0 到 100 之间的随机值
x = torch.randint(0, 100, (2, 10))

# 创建 BitMamba 模型实例,输入大小为 512,隐藏大小为 100,输出大小为 10,深度为 6
model = BitMamba(512, 100, 10, 6, return_tokens=True)

# 将输入张量传递给模型并获取输出
output = model(x)

# 打印输出张量
print(output)

# 打印输出张量的形状
print(output.shape)
BitMoE
import torch
from bitnet.bit_moe import BitMoE

# 创建输入张量
x = torch.randn(2, 4, 8)

# 创建具有指定输入和输出维度的 BitMoE 模型
model = BitMoE(8, 4, 2)

# 通过模型进行前向传播
output = model(x)

# 打印输出
print(output)
1 比特视觉 Transformer
这个想法突然出现在我脑海中,看起来非常有趣,因为你可以利用 bitlinear 来进行视觉任务以实现超高压缩。如果你能编写一个脚本,在 ImageNet 上训练这个模型会很不错,我们会提供计算资源。下一阶段将是训练一个联合视觉语言模型 gpt-4o
import torch
from bitnet import OneBitViT

# 创建 OneBitViT 模型实例
v = OneBitViT(
    image_size=256,
    patch_size=32,
    num_classes=1000,
    dim=1024,
    depth=6,
    heads=16,
    mlp_dim=2048,
)

# 生成随机图像张量
img = torch.randn(1, 3, 256, 256)

# 将图像传递给 OneBitViT 模型以获得预测结果
preds = v(img)  # (1, 1000)

# 打印预测结果
print(preds)
许可证
MIT
引用
@misc{2310.11453,
Author = {Hongyu Wang and Shuming Ma and Li Dong and Shaohan Huang and Huaijie Wang and Lingxiao Ma and Fan Yang and Ruiping Wang and Yi Wu and Furu Wei},
Title = {BitNet: Scaling 1-bit Transformers for Large Language Models},
Year = {2023},
Eprint = {arXiv:2310.11453},
}
待办事项
- 仔细检查 BitLinear 实现,确保其与论文中的完全一致
- 为
BitNetTransformer实现训练脚本 - 在 Enwiki8 上进行训练,从 Lucidrains 仓库复制粘贴代码和数据
- 基准性能测试
- 研究用于非可微反向传播的直通估计器
- 实现 BitFeedForward
- 清理代码库
- 为每个模块添加单元测试
- 实现论文中的新 BitNet1.5b
- 用 Cuda 实现 BitNet15b
- 实现低比特 gemm cuda 内核

 Github
 论文
论文


